
A ski pylon is one of the most important parts for anyone who enjoys water skiing, wakeboarding, or tow sports behind a boat. This tall, sturdy post is usually installed near the center or stern of a boat, providing a secure, elevated point to attach the tow rope.
But what if you need to remove it? Maybe you want to service your boat, replace the pylon, switch to a different setup, or simply store your boat for winter. Removing a ski pylon is not always as simple as it seems, and doing it incorrectly can damage your boat or the pylon itself.
Many boat owners are surprised by how different ski pylon designs and mounting systems can be. Some are easy to remove by hand, while others require tools and careful attention to detail. This article will guide you through the entire process of removing a ski pylon, step by step.
Whether your pylon is a factory model or an aftermarket upgrade, you’ll find practical advice, important safety tips, and helpful comparisons to help you complete the job confidently and safely.
Understanding Ski Pylons And Their Mounting Systems
Before you start removal, it’s essential to know what kind of ski pylon you have and how it is attached to your boat. There are several common types, and each has its own removal process.
Types Of Ski Pylons
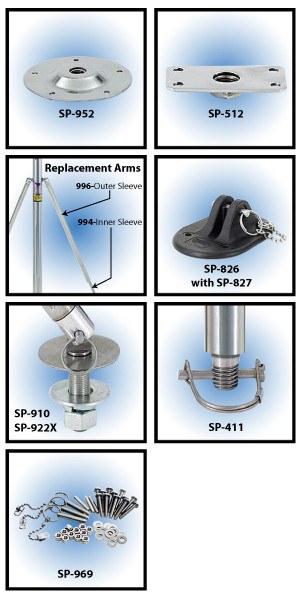
- Removable/Quick-Release Pylons: These are designed for easy on-off use. They often slide into a base or socket and are secured with a pin or clamp.
- Fixed/Bolted Pylons: These are permanently mounted and require tools to remove. They are usually bolted through the deck or into reinforced mounts.
- Adjustable/Collapsible Pylons: These can be folded down or adjusted for height. They may have locking pins, clamps, or bolts.
- Aftermarket Universal Pylons: Popular for older boats, these often use bracket systems and may be semi-permanent or removable.
Common Mounting Methods
- Base Socket: The pylon fits into a cup or socket, sometimes with a locking pin.
- Deck Plate: Bolted to the deck, requires wrenching from above or below.
- Bracket System: Uses metal arms bolted to stringers or the transom.
- Support Cables: Some pylons use cables for extra stability, which must also be disconnected.
Here’s a quick comparison of removal difficulty for different systems:
| Mounting Type | Removal Time | Tools Needed | Skill Level |
|---|---|---|---|
| Quick-Release Socket | 2-5 minutes | None / Basic | Beginner |
| Bolt-Through Deck | 15-45 minutes | Wrenches, Screwdrivers | Intermediate |
| Bracket & Cable | 30-60 minutes | Wrenches, Pliers | Intermediate |
Knowing which system your boat uses will save you time and help you avoid frustration.
Why Remove A Ski Pylon?
There are several reasons you might want to take out your ski pylon:
- Winterization: Removing the pylon can make it easier to cover and store your boat.
- Upgrades/Repairs: You might want to install a different pylon, fix deck damage, or upgrade to a newer system.
- Switching Sports: If you’re changing to sports that don’t need a pylon, like fishing, it’s best to remove it.
- Transport/Storage: Tall pylons can make towing or garage storage difficult.
An often-overlooked reason is regular inspection. Removing the pylon allows you to check for hidden corrosion, cracks, or deck damage under the mounting hardware.
Essential Tools And Safety Precautions
Before you start, gather the right tools and take basic safety steps. This will make removal easier and protect your boat and yourself.
Tools You May Need
- Socket wrench set (imperial and metric)
- Screwdrivers (flathead and Phillips)
- Allen wrenches (for set screws)
- Pliers (standard and locking)
- Lubricant spray (like WD-40, for stuck bolts)
- Soft mallet (for gentle tapping, if needed)
- Gloves (to protect your hands)
- Flashlight (for seeing under decks)
- Ziplock bags or small containers (for hardware)
- Marker or masking tape (to label parts)
Safety Tips
- Disconnect the battery before working near electrical wires.
- Wear gloves to avoid sharp edges or pinched fingers.
- Work in a stable area: Ensure the boat is on a trailer or lift, not floating.
- Get help if needed: Some pylons are heavy or awkward to handle alone.
- Keep children and pets away from the work area.
Some bolts or nuts may be hidden under carpet or trim, so move slowly and check for hidden hardware.
Step-by-step Guide: How To Remove A Ski Pylon
The exact process will depend on your pylon type, but the steps below cover most situations. Always consult your boat’s manual if available.
1. Clear The Work Area
Remove any gear, cushions, or covers near the pylon. If the pylon passes through the rear seat, you may need to lift or remove seating.
2. Inspect The Mounting System
Look for:
- Pins, bolts, or clamps securing the pylon to the base.
- Support cables attached to the deck or transom.
- Access panels or carpet hiding hardware.
Take photos with your phone before starting—this makes reassembly easier.
3. Release Support Cables (if Present)
If your pylon uses cables for stability, disconnect these first:
- Unscrew the cable ends or snap hooks from their deck eyes.
- Keep all small parts in a labeled bag.
- Inspect cables for fraying or corrosion (replace if damaged).
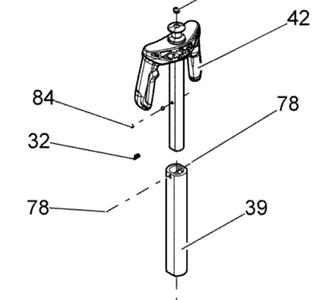
4. Remove Pins Or Locking Mechanisms
Removable pylons often use a locking pin or quick-release lever:
- Pull out the pin or lift the lever.
- Some have a spring-loaded detent ball—depress it as you pull.
- If stuck, spray a little lubricant and let it sit for a few minutes.
5. Loosen And Remove Bolts Or Screws
For bolted pylons, use the correct size wrench or screwdriver:
- Hold the nut underneath with one tool while turning the bolt from above.
- If bolts are rusty, apply lubricant and wait.
- Remove all hardware and keep it organized.
6. Lift The Pylon Out
Once all attachments are removed:
- Grasp the pylon low, near the base.
- Wiggle gently—do not use force or hammering.
- If the pylon is stuck, tap lightly with a soft mallet.
- For very tight fittings, try rotating as you pull up.
Never pry against fiberglass or gelcoat—this can cause expensive damage.
7. Inspect And Clean The Mounting Area
Once the pylon is out, check the mounting socket or deck for:
- Cracks or soft spots
- Corrosion or rust
- Debris or old lubricant
Clean the area with a soft cloth. If you see damage, address it before reinstalling the pylon.
Special Tips For Different Pylon Types
Quick-release And Socket Pylons
- Make sure the pylon is unlocked before pulling.
- Some sockets have a small set screw—loosen it fully.
- Grease the socket lightly before reinstalling to prevent sticking.
Bolt-through Deck Pylons
- Some bolts are hidden under deck panels or carpet.
- Use a flashlight to locate all attachment points.
- For stripped bolts, use a bolt extractor tool.
Bracket And Cable Systems
- Loosen both ends of support cables before removing the main pole.
- Check for hidden locknuts on the underside.
- If brackets are corroded, soak in penetrating oil before removal.
Collapsible/adjustable Pylons
- Lower the pylon fully before removal.
- Locking pins may be spring-loaded—hold firmly to avoid snapping.
Common Mistakes To Avoid
Even experienced boat owners make errors when removing ski pylons. Here are some pitfalls to avoid:
- Forgetting to Label Hardware: Mixing up bolts, pins, and washers can make reassembly difficult.
- Using Force: Excessive prying or hammering can crack fiberglass or bend metal parts.
- Losing Small Parts: Always use labeled bags or containers for every piece.
- Skipping Inspection: Failing to check for hidden damage can lead to unsafe towing later.
- Ignoring Manufacturer’s Instructions: Some pylons have specific steps—consult your manual if possible.
One non-obvious tip: if your pylon base uses nylon or plastic bushings, check these for wear when removing the pylon. Replacing worn bushings now can save trouble later.
Comparing Removal Time And Difficulty
To help you plan, here’s a practical comparison of popular ski pylon models and their typical removal challenges:
| Pylon Model | Mounting Type | Estimated Removal Time | Notes |
|---|---|---|---|
| MasterCraft Factory Pylon | Quick-Release Socket | 5-10 minutes | Usually tool-free, but can stick with age |
| Universal Aftermarket Pylon | Bracket/Cable | 30-60 minutes | Requires wrenches, cable disconnection |
| Older Ski Nautique | Bolt-Through Deck | 30-45 minutes | Often hidden bolts under carpet |
| Removable Aluminum Pylon | Set-Screw Socket | 10-15 minutes | Allen wrench needed for set screws |
What To Do After Removal
Once your ski pylon is out, it’s a good idea to handle it and the boat properly:
- Store the pylon in a dry place, away from weather and salt.
- Clean and lubricate the base and all hardware before storage.
- Inspect the deck or mounting area for water intrusion or rot.
- Plug or cover any open holes in the deck to keep water out.
- If upgrading, compare new pylon specs to the old one for fit.
Many owners miss the benefit of cleaning and lubricating the mounting socket after removal. This small step makes future installation much smoother and prevents corrosion.
When To Seek Professional Help
Some situations make it best to call a marine mechanic or experienced installer:
- Corroded or frozen hardware that won’t budge
- Cracked or soft deck around the mounting area
- Complex bracket or cable systems beyond your comfort level
- Warranty concerns—removing a factory pylon could affect coverage
Most basic removals can be done at home, but don’t risk damaging your boat or voiding a warranty just to save time.
Maintenance Tips For Reinstalling Or Storing Your Ski Pylon
After removing your ski pylon, a few maintenance steps can help extend its life:
- Clean all metal parts with fresh water and mild soap.
- Apply marine grease to sliding or locking parts before reinstalling.
- Check support cables for wear and replace if needed.
- Inspect mounting hardware for rust—replace any questionable bolts.
- Store upright if possible to avoid bending.
If you’re planning to reinstall later, keep all hardware together and labeled. For seasonal storage, consider a padded bag to prevent scratches or dents.
Real-world Example: Removing A Ski Pylon From A Bowrider
Let’s walk through a practical example. Imagine you have a 20-foot bowrider with a quick-release ski pylon. Here’s how removal usually goes:
- Clear the stern seats and remove any gear.
- Pull the locking pin at the base of the pylon.
- Twist and lift the pylon from its socket.
- Detach support cables from the deck eyes.
- Inspect the socket for dirt and clean it.
- Store the pylon in your garage, hardware in a zip bag.
Total time: 10-15 minutes. No special tools needed, but using gloves helps avoid pinched fingers.
Frequently Asked Questions
How Often Should I Remove My Ski Pylon For Inspection?
It’s a good idea to remove and inspect your ski pylon at least once a season, or every 50-100 hours of use. This helps you spot early signs of corrosion, loose hardware, or deck damage.
Can I Remove A Ski Pylon By Myself, Or Do I Need Help?
Many pylons, especially quick-release types, can be removed by one person. However, if your pylon is heavy, awkward, or uses brackets/cables, it’s safer to have a helper.
Will Removing My Ski Pylon Affect My Boat’s Warranty?
It depends on your boat and warranty terms. Some manufacturers require authorized service for major changes. Check your manual or contact your dealer before removing a factory-installed pylon.
How Do I Prevent The Mounting Area From Leaking After Removal?
Always plug or cover any open holes left by the pylon or its hardware. Marine-grade silicone or temporary deck plugs work well. Never leave mounting holes open, as this can lead to rot or mold.

Where Can I Find More Detailed Instructions For My Specific Boat Model?
The best source is your boat’s owner’s manual or the manufacturer’s website. For more general boating maintenance tips, check out BoatUS.
Removing a ski pylon doesn’t have to be difficult or risky. With the right tools, a careful approach, and a little patience, you can keep your boat in top shape and ready for anything the water brings. Whether you’re prepping for winter, upgrading your gear, or just keeping your setup fresh, this process is a valuable skill for every boat owner.

