

Taking a screenshot is a simple skill, but it can save time and help you share information quickly. Whether you’re a student collecting notes, a worker documenting issues, or a gamer sharing moments, knowing how to capture your screen is essential.
Many people do not realize how many ways exist to take a screenshot, or that methods can change depending on your device or purpose. This guide will show you clear, step-by-step instructions for taking screenshots on Windows, Mac, mobile devices, and web browsers.

36% off Today’s Exclusive Deals
Limited-time Exclusive Deals. Check current discount on Amazon.
Check Price on Amazon As an Amazon Associate I earn from qualifying purchases.You will also learn about editing, sharing, and organizing your screenshots, plus some tips and common mistakes to avoid.
What Is A Screenshot And Why Is It Useful?
A screenshot is a digital image that shows exactly what appears on your screen at a specific time. Screenshots are useful for many reasons:
- Documenting errors: If your computer or phone shows an error message, a screenshot helps technical support understand the problem.
- Saving information: Capture receipts, booking confirmations, or maps for later use.
- Sharing moments: Send funny messages, social media posts, or game achievements to friends.
- Learning and teaching: Show step-by-step instructions or examples in presentations and tutorials.
Most people take screenshots every week, but not everyone knows all the options available. The best method depends on your device, operating system, and what you want to capture.
How To Take A Screenshot On Windows
Windows gives you several ways to take a screenshot. The method you choose depends on whether you want to capture the entire screen, a single window, or a custom area.
Using The Print Screen Key
The easiest way is the Print Screen (PrtScn) key, found on most keyboards.
- Press the PrtScn key. This copies the entire screen to the clipboard.
- Open an image editor like Paint or Photoshop.
- Press Ctrl + V to paste.
- Save the file.
Capturing Only The Active Window
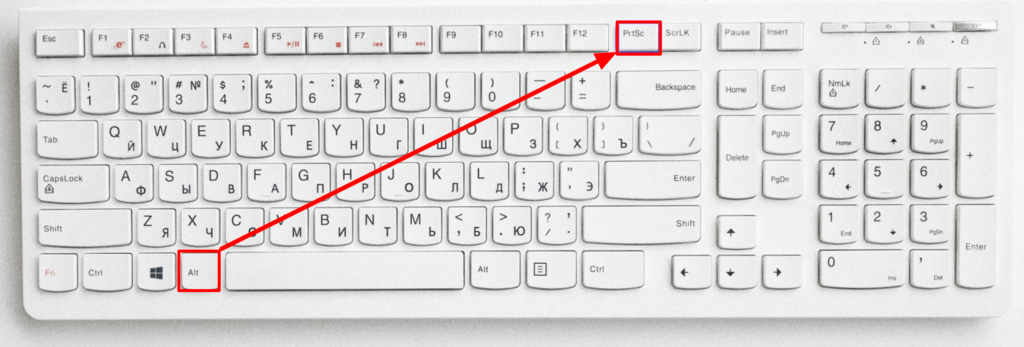
- Hold Alt and press PrtScn. This copies only the currently active window.
- Paste and save as above.
Saving Directly As A File
On Windows 8/10/11:
- Press Windows + PrtScn together.
- The screen dims briefly.
- The screenshot is saved directly to the Pictures > Screenshots folder.
Using Snipping Tool And Snip & Sketch
Windows includes tools for capturing parts of your screen.
- Snipping Tool (Windows 7/8/10): Open the tool, choose a snip type (freeform, rectangular, window, full-screen), and select the area.
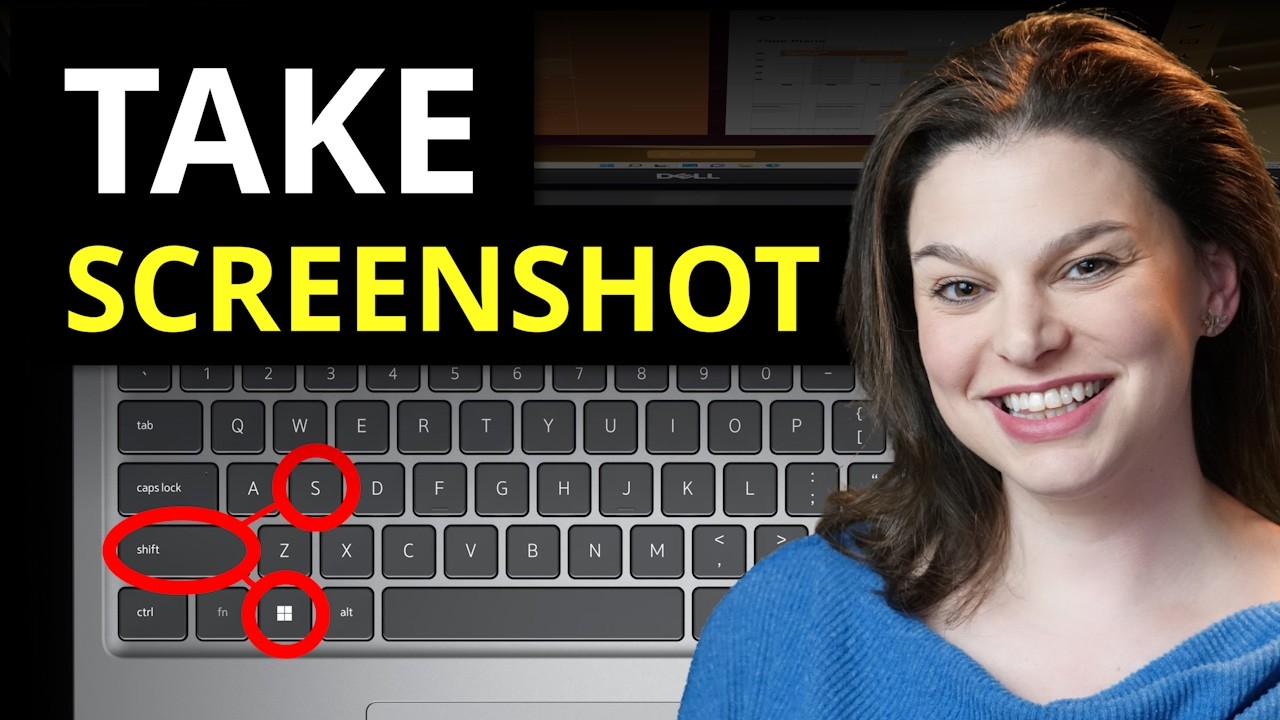
- Snip & Sketch (Windows 10/11): Press Windows + Shift + S. Select the area to capture. The screenshot goes to the clipboard and a notification appears for quick editing.
Using Game Bar
For gamers or screen recording:
- Press Windows + G to open Game Bar.
- Click the camera icon or press Windows + Alt + PrtScn.
- Screenshots save to Videos > Captures.
Comparison Of Windows Screenshot Methods
Here’s a quick look at the main Windows screenshot tools:
| Method | Shortcut | Where It Saves | Best For |
|---|---|---|---|
| Print Screen | PrtScn | Clipboard | Whole screen |
| Alt + Print Screen | Alt + PrtScn | Clipboard | Active window |
| Windows + Print Screen | Win + PrtScn | Pictures folder | Quick save |
| Snip & Sketch | Win + Shift + S | Clipboard | Custom area |
| Game Bar | Win + Alt + PrtScn | Videos > Captures | Gaming |
Extra Tips For Windows Screenshots
- You can paste screenshots directly into Word or email.
- Use OneDrive or Dropbox to sync your Screenshots folder for easy access across devices.
- Some laptops require pressing Fn with PrtScn.
How To Take A Screenshot On Mac
Mac computers offer simple yet powerful screenshot tools. The shortcuts have become standard, but many people don’t know you can also record video or change where screenshots are saved.
Basic Shortcuts
- Capture the entire screen: Press Command (⌘) + Shift + 3. The screenshot saves to your desktop.
- Capture a selected area: Press Command (⌘) + Shift + 4. Drag to select the area.
- Capture a window: Press Command (⌘) + Shift + 4, then tap Space. Click the window.
Using The Screenshot App
For more options:
- Press Command (⌘) + Shift + 5. The screenshot toolbar appears.
- Choose to capture the whole screen, a window, or a portion.
- You can also record the screen (video).
- Click Options to change the save location or set a timer.
Saving To Clipboard
To copy instead of save:
- Add Control to any shortcut. For example, Command (⌘) + Control + Shift + 4 copies the selection to the clipboard.
Touch Bar Screenshots
If your Mac has a Touch Bar, press Command (⌘) + Shift + 6 to capture it.
Mac Screenshot Features Compared
Here’s a summary of Mac screenshot shortcuts:
| Action | Shortcut | Result |
|---|---|---|
| Entire screen | Cmd + Shift + 3 | File on desktop |
| Selected area | Cmd + Shift + 4 | File on desktop |
| Window only | Cmd + Shift + 4, then Space | File on desktop |
| Screenshot toolbar | Cmd + Shift + 5 | Advanced options |
| Touch Bar | Cmd + Shift + 6 | Touch Bar image |
Advanced Mac Screenshot Tips
- Screenshots are named by date and time for easy sorting.
- Hold Space while dragging to move the selection area.
- Use the Preview app for quick annotation and sharing.
- Change the default save location in the Screenshot toolbar under Options.
How To Take A Screenshot On Mobile Devices
Smartphones and tablets make screenshots easy, but the method depends on your brand and operating system.
Iphone And Ipad
With Face Id
- Press the Side Button and the Volume Up button at the same time.
- Release quickly.
- The screen flashes and a thumbnail appears.
With Home Button
- Press the Home Button and the Sleep/Wake Button together.
- Release quickly.
Editing And Sharing
- Tap the thumbnail to edit, crop, or draw.
- Save or share directly from the screen.
Ios 14+ Features
- Full Page Screenshot for web pages in Safari: After taking a screenshot, tap Full Page at the top.
Android Devices
Most Android phones use a similar method, but some brands add features.
Standard Android
- Press Power and Volume Down at the same time.
- Hold for a second until the screen flashes.
Samsung Devices
- Press Power + Volume Down.
- Or, use the Palm Swipe gesture (enable in Settings > Advanced Features > Motions and gestures).
- Screenshots save in the Gallery app.
Google Pixel
- Press Power + Volume Down.
- Or, tap Screenshot from the recent apps menu (Android 11+).
Special Features
- Long scrolling screenshots: Some Android phones (Samsung, Xiaomi, OnePlus) let you capture long web pages. After taking a screenshot, tap Scroll Capture or Capture more.
- Google Assistant: Say “Take a screenshot” after holding the Home button.
Comparing Mobile Screenshot Methods
Here’s a side-by-side look at iOS and Android screenshot shortcuts:
| Device | Shortcut | Special Feature |
|---|---|---|
| iPhone (Face ID) | Side + Volume Up | Annotate, Full Page |
| iPhone (Home Button) | Home + Sleep/Wake | Annotate |
| Android (Most) | Power + Volume Down | Scroll capture (some models) |
| Samsung | Power + Volume Down / Palm Swipe | Edge panel, Scroll capture |
| Pixel | Power + Volume Down / Recents | Quick menu |
Practical Insights For Mobile Screenshots
- Screenshots are usually saved in a dedicated folder in your Photos or Gallery app.
- You can quickly share or delete the screenshot right after capturing.
- On iOS, screenshots taken in private apps (like Netflix) may appear blank for copyright reasons.
Taking Screenshots In Web Browsers
Sometimes you only need to capture a website or part of a web page. Many browsers and extensions make this easy.
Google Chrome
- Built-in tool: Right-click on a page, select Inspect, then click the three dots menu > Capture screenshot.
- Extensions: Tools like Awesome Screenshot or Nimbus let you capture and annotate.
Mozilla Firefox
- Right-click on the page and choose Take Screenshot.
- Select Save full page, Visible, or Custom area.
Microsoft Edge
- Use the Web Capture tool (click the scissors icon or press Ctrl + Shift + S).
- Edge allows annotation before saving.
Safari
- On Mac, use regular screenshot shortcuts, or right-click and choose Capture Screenshot in developer mode.
Why Use Browser Tools?
- Capture a full web page, not just what you see.
- Save clean images without browser menus.
- Some tools let you edit or blur sensitive information.
Non-obvious Tip
- Most browser screenshot tools are updated often, so check for new features or keyboard shortcuts. For example, in Chrome’s Developer Tools, you can capture a screenshot of a specific element, which is helpful for UI designers.
Editing, Annotating, And Sharing Screenshots
Capturing the screen is just the first step. Editing and sharing make screenshots more useful.
Editing Tools
- Windows: Snip & Sketch, Paint, or third-party apps like Greenshot.
- Mac: Preview, Markup in Screenshot toolbar.
- Mobile: Built-in editors let you crop, highlight, or draw.
Common Edits
- Crop: Focus on important content.
- Highlight: Draw arrows or boxes to show key points.
- Blur: Hide private information.
Sharing Screenshots
- Email: Attach directly from the editor.
- Messaging apps: Paste or send from the Photos app.
- Cloud services: Use Google Drive, Dropbox, or OneDrive for easy sharing links.
Organizing Screenshots
Screenshots can quickly become messy. Organize them by:
- Renaming files with keywords.
- Creating folders by project or date.
- Using cloud services to search and share.
Advanced Tools
- Lightshot: Free tool for quick editing and sharing.
- ShareX: Advanced features for automation, watermarking, and uploading.
Common Mistakes And How To Avoid Them
Many people waste time repeating screenshots, capturing too much, or sharing private data by mistake. Here are common errors and how to fix them:
- Forgetting where screenshots are saved: Always check or set your save location.
- Capturing too much or too little: Use region selection tools for accuracy.
- Sharing sensitive info: Blur or crop out private data before sharing.
- Not backing up important screenshots: Use cloud storage to avoid losing them.
- Ignoring built-in features: Explore your device’s screenshot options to save time.
When To Use Third-party Screenshot Software
Built-in tools are enough for most people. However, advanced needs may require extra features.
- Scrolling screenshots: Capture web pages longer than your screen.
- Annotation tools: Add text, shapes, or highlights.
- Direct upload: Share screenshots via a link.
- Automation: Schedule screenshots or capture at intervals.
Popular apps include Snagit, Lightshot, Greenshot, and ShareX. These are helpful for professionals who need to capture, edit, and share regularly.
Screenshots For Work, Study, And Fun
Screenshots are not just for IT support. Here are some practical uses:
- Work: Document software bugs, show progress in reports, or share meeting notes.
- Study: Save lecture slides, online articles, or diagrams.
- Personal: Keep recipes, social media posts, or digital receipts.
A non-obvious benefit: Screenshots can serve as legal evidence or proof of transactions (always check local laws). Many businesses use screenshots to track changes, explain procedures, or train new staff.
Security And Privacy: What To Keep In Mind
Screenshots can contain sensitive information. Always think before sharing.
- Check for private data: Usernames, emails, or account numbers may be visible.
- Company rules: Some workplaces have policies about screenshots.
- App restrictions: Some apps block screenshots for security (e.g., banking apps).
- Cloud sharing: Use private links or permissions when sharing screenshots online.
An important tip: On Windows, you can use Snip & Sketch or third-party tools to blur sensitive areas before sharing.
Troubleshooting Screenshot Problems
Sometimes screenshots don’t work as expected. Here’s how to fix common issues:
- Keyboard shortcuts not working: Check if the key is reassigned or if an app is blocking it.
- Screenshots appear blank: The app may block screenshots (Netflix, banking apps).
- No storage space: Free up space or change the save location.
- Clipboard not working: Restart your computer or check for background apps.
If you need more help, visit the official support pages for your device or operating system. For example, Apple’s support page explains all Mac screenshot options in detail: Apple Support.
Frequently Asked Questions
What Is The Easiest Way To Take A Screenshot On Windows?
The simplest way is to press the Windows + PrtScn keys together. This instantly saves a screenshot of your entire screen to the Pictures > Screenshots folder. For more control, use Windows + Shift + S to select a region.
How Do I Take A Screenshot On A Mac And Copy It To The Clipboard?
Hold Command (⌘) + Control + Shift + 4, then select the area. The screenshot is copied to the clipboard. Paste it into any app with Command + V.
Why Do My Screenshots Appear Black Or Blank?
Some apps block screenshots for privacy or copyright. Examples include banking apps, Netflix, and some video players. Try taking a screenshot in a different app or use a camera if needed.
How Can I Take A Scrolling Screenshot Of A Long Web Page?
On Android (Samsung, Xiaomi, etc.), after taking a screenshot, tap Scroll capture or Capture more. In browsers, use extensions like Awesome Screenshot or built-in browser features. On Mac or Windows, third-party apps like Snagit can capture scrolling windows.
Are There Legal Issues With Sharing Screenshots?
Yes, sometimes. Screenshots may contain private or copyrighted information. Always check your company’s policy and local laws. Never share sensitive or confidential data without permission. For more, see Wikipedia’s Screenshot article.
Screenshots are now a part of everyday life. By mastering these tools and tips, you can save time, improve communication, and avoid mistakes. Whether on Windows, Mac, or mobile, the right method makes sharing your screen simple and effective.


