A hole in your kayak can quickly turn a fun day on the water into a stressful situation. You might feel frustrated or worried about leaks ruining your adventure.
But don’t let that stop you. You can fix that hole yourself, and it’s easier than you think. You’ll discover simple, step-by-step methods to repair your kayak and get back on the water fast. Keep reading, and you’ll learn how to protect your kayak, save money, and enjoy every paddle without worry.
Identify The Damage
Finding and understanding the damage on your kayak is the first step to repair it. This helps you know what tools and materials you need.
Look closely at the hole and the surrounding area. Some damage can be hidden or larger than it seems.
Inspect The Hole Size And Location
Check how big the hole is and where it is on the kayak. This affects how you fix it and how strong the repair must be.
- Measure the hole’s diameter with a ruler or tape measure.
- Note if the hole is on the bottom, side, or near the kayak’s seams.
- Look for cracks or splits around the hole.
- Check if the hole lets water inside or if it is just a surface crack.
Check For Additional Weak Spots
Damage may not stop at the hole. Look around for soft or thin spots that could break later.
| Damage Area | Signs to Look For |
| Around the Hole | Cracks, dents, or softness near the hole |
| Seams | Separation or gaps in the kayak’s joints |
| Bottom Surface | Abrasions or worn-out plastic spots |
| Edges and Rims | Chips or cracks that may spread |
Gather Repair Materials
Fixing a hole in your kayak needs the right materials. Gathering these items before you start makes the repair easier.
Collecting proper tools and supplies helps ensure the patch will hold strong and last long.
Select The Right Patch Kit
Choose a patch kit made for your kayak’s material. Most kayaks are made of either PVC, vinyl, or polyethylene.
- For PVC or vinyl kayaks, get a PVC or vinyl repair kit.
- For polyethylene kayaks, use a polyethylene repair kit or plastic welding kit.
- Check that the patch material matches the kayak’s surface.
- Make sure the kit includes adhesive, patches, and any necessary tools.
Prepare Cleaning Supplies
Clean the damaged area before patching. Dirt and oils stop patches from sticking well.
| Cleaning Supply | Purpose |
| Rubbing Alcohol | Remove grease and dirt |
| Clean Cloth | Wipe and dry surface |
| Sandpaper (fine grit) | Roughen surface for better adhesion |
| Soap and Water | Initial cleaning of the area |
Prepare The Kayak Surface
Fixing a kayak hole starts with a clean and dry surface. Preparing the area helps the patch stick better.
Taking time to prepare the surface ensures a strong, lasting repair on your kayak.
Clean Around The Hole
Remove dirt and debris from the damaged area. Use warm water and mild soap to clean the spot.
Scrub gently with a soft brush or cloth. Avoid harsh cleaners that can damage the kayak material.
- Use a soft brush or sponge
- Clean at least 2 inches around the hole
- Rinse well to remove soap residue
Dry The Area Thoroughly
Dry the cleaned area completely before patching. Moisture can prevent the patch from sticking properly.
Use a clean towel to wipe the surface. Let the kayak air dry in a warm, dry place for best results.
- Wipe with a dry cloth or towel
- Allow air drying for at least 30 minutes
- Ensure no moisture remains on or under the surface
Apply The Patch
Patching a hole in your kayak keeps it safe and water-tight. Use the right patch and glue for a strong fix.
Follow these steps to apply the patch carefully. This will help your kayak last longer and stay dry.
Cut The Patch To Size
Measure the hole and add extra space around it. This ensures the patch covers the damaged area well.
Cut the patch material with sharp scissors. Make sure the edges are smooth and even.
- Cut at least 2 inches larger than the hole
- Shape the patch to fit the kayak’s curve
- Trim any rough or jagged edges
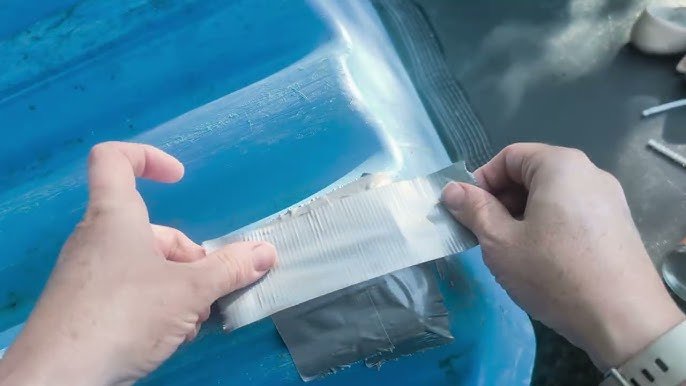
Position And Secure The Patch
Place the patch over the hole carefully. Check that it covers the damaged area completely.
Press the patch firmly onto the kayak surface. Use clamps or weights to keep it in place while drying.
- Clean the kayak surface before applying glue
- Apply glue evenly on both patch and kayak
- Allow glue to dry as per instructions
- Remove clamps only after the patch is secure
Seal And Cure The Repair
Fixing a kayak hole requires careful attention. Sealing and curing the repair ensures your kayak stays watertight.
Follow these steps to properly seal and cure the repaired area for long-lasting results.
Use Adhesive Or Sealant
An adhesive or sealant helps seal the hole effectively. Choose a product designed for marine use to ensure durability.
- Clean the area around the hole with soap and water.
- Dry it thoroughly to ensure the adhesive sticks well.
- Apply the adhesive or sealant evenly over the hole.
- Press firmly and hold for a few minutes.
- Wipe away any excess to keep the surface smooth.
Allow Proper Drying Time
Patience is key after applying the sealant. Allowing proper drying time is crucial for the repair to hold.
Check the product instructions for the recommended drying time. Typically, it ranges from 24 to 48 hours.
Avoid using the kayak until the repair is fully cured. This ensures the sealant bonds well and prevents leaks.
Test The Repair
After fixing the hole in your kayak, you must check if the repair holds well. Testing the repair helps to avoid leaks and ensures safety on water.
Use simple methods to test the patch. This process will show if you need to reinforce the area further.
Check For Leaks In Water
Fill your kayak with water or place it in shallow water. Look closely at the repaired spot for bubbles or wetness inside. These signs mean the leak is still there.
- Place the kayak on a flat surface near water.
- Pour water slowly over the repaired area.
- Watch for any bubbles coming from the patch.
- Check the inside of the kayak for damp spots.
- Mark any areas where water enters.
Reinforce If Necessary
If the patch shows leaks, you should reinforce it. Use extra material or adhesive to strengthen the repair. This will make the kayak stronger and more water-resistant.
| Reinforcement Method | Benefits |
| Apply a second patch layer | Seals holes better |
| Use waterproof tape around edges | Prevents water seepage |
| Add marine-grade adhesive | Improves patch hold |
| Sand and clean surface before repair | Increases patch grip |
Maintenance Tips
Keeping your kayak in top shape is essential. Proper maintenance prevents damage and extends its life.
Small holes can become big problems if ignored. Regular checks help catch issues early.
Prevent Future Damage
Store your kayak in a cool, dry place. Sunlight can weaken the material over time.
Avoid dragging your kayak on rough surfaces. This reduces the risk of creating holes.
- Use a kayak cart for transport
- Cover it with a tarp when not in use
- Inspect for sharp objects before setting it down
Regular Inspection Routine
Check your kayak for damage after each use. Small cracks can appear without notice.
Run your hands over the surface. This helps to feel for any irregularities.
- Inspect seams and joints closely
- Check the hull for scratches or dents
- Look inside for any water leaks

Frequently Asked Questions
How Do I Repair A Hole In My Kayak?
To repair a kayak hole, clean the area first. Use a patch kit or fiberglass resin. Apply the patch smoothly and let it dry. Sand the edges for a seamless finish. This restores kayak strength and prevents leaks effectively.
What Materials Are Needed To Fix Kayak Holes?
You need a kayak repair kit, sandpaper, alcohol wipes, fiberglass or PVC patches, and adhesive resin. These materials ensure a strong, waterproof seal. Always choose products compatible with your kayak’s material for the best results.
Can I Fix Kayak Holes Without Professional Help?
Yes, you can fix small kayak holes yourself. Follow a step-by-step guide, use proper tools, and be patient. DIY repairs save money and extend kayak life. For large damages, consider professional assistance.
How Long Does A Kayak Hole Repair Last?
A properly done kayak hole repair can last several seasons. Durability depends on repair quality and kayak use. Regularly inspect the repair and avoid harsh conditions to prolong its lifespan.
Conclusion
Fixing a kayak hole is easier than you might think. Use the right tools and materials for a strong repair. Clean the area well before starting. Follow each step carefully to avoid leaks. A patched kayak will keep you safe on water.
Regular checks help catch small holes early. Enjoy your kayaking trips without worry. Stay prepared and fix problems quickly. Your kayak will last longer with proper care. Keep paddling and exploring with confidence.