Are you dreaming of slam dunks in your driveway or perfecting your jump shot right at home? Installing a basketball hoop can transform your backyard into a personal court, sparking fun, fitness, and friendly competition.
But where do you start? You might be wondering about the tools you’ll need, the best location for setup, or even the right height for your hoop. Imagine the joy and satisfaction of seeing your family and friends gather around for a game, all thanks to your savvy installation skills.
This guide is here to take you through each step with ease and confidence. By the end, you’ll not only have a hoop standing tall, but also the pride of knowing you did it yourself. Ready to make your basketball dreams a reality? Let’s get started!
Choosing The Right Location
Selecting the ideal spot ensures safety and enjoyment. Find a flat, spacious area free from obstacles. Consider visibility for supervision and good lighting.
Installing a basketball hoop in your yard is an exciting project, promising endless hours of fun and fitness. But before you start drilling holes and pouring concrete, there’s one crucial step you can’t overlook: choosing the right location. The perfect spot will ensure safety, accessibility, and maximum enjoyment for you and your family. So, how do you find that ideal spot in your yard?
Measure The Area
First, grab a tape measure and evaluate the space available. Basketball courts can be as large or small as your area allows, but a regulation half-court is typically around 50 feet by 47 feet. Even if you can’t accommodate a full-sized area, ensure there’s enough space for dribbling and shooting comfortably. Remember, a cramped court can lead to accidents and frustration.
Check For Overhead Clearance
Next, look up. It’s crucial to ensure there are no obstructions above your chosen location. Low-hanging branches, utility lines, or the edge of your garage can interfere with play. Nothing disrupts a perfect shot like hitting an unexpected obstacle. Safety first—make sure there’s ample clearance for jump shots and alley-oops.
Consider Ground Stability
Finally, assess the ground where you plan to install your hoop. Stability is key for both player safety and hoop longevity. A flat, solid surface like concrete or asphalt is ideal. If your chosen spot is on grass or dirt, think about laying a concrete slab. An uneven or unstable base can make the hoop wobble, affecting the quality of your game and potentially causing injury. Have you considered how these factors might affect your enjoyment of the game? Choosing the right location sets the stage for years of fun and skill-building. So, take your time, think it through, and pick the perfect spot for your basketball hoop.

Gathering Necessary Tools
Installing a basketball hoop can be a fun project. Before starting, gather all required tools. Proper tools make installation easier and safer. This guide helps identify the tools needed. With the right tools, the process becomes smooth. Ensure you have everything before beginning.
Basic Tools Required
Start with some basic tools. A tape measure is essential for accurate placement. You’ll need a wrench set for tightening bolts. A level ensures the hoop is straight. A drill is necessary for securing the mounting bracket. Don’t forget safety gear like gloves and goggles. These tools are the foundation for a successful installation.
Optional Tools For Ease
Consider some optional tools for added ease. A ladder can help reach high spots. A power screwdriver can speed up the process. Some prefer a post hole digger for setting the pole. A socket set can make tightening easier. These tools aren’t mandatory but can make the job smoother.
Preparing The Installation Site
Preparing the installation site is crucial for a successful basketball hoop setup. A well-prepared site ensures stability and safety during play. Follow these steps to get your site ready.
Clear The Area
Begin by removing any debris from the installation area. Pick up rocks, sticks, or any obstacles. Ensure the ground is flat and solid. If the surface is uneven, use a shovel to level it out. Trim any nearby grass or plants that might interfere. A clean area prevents accidents and improves play.
Mark The Spot
Once the area is clear, identify where the hoop will go. Measure the distance from the court or driveway. Use a tape measure for accuracy. Mark the spot with spray paint or chalk. This helps guide the installation process. Ensure the spot is away from obstacles like trees or buildings. An open space allows free movement during games.
Installing The Pole
Installing a basketball hoop at home can be an exciting project that brings endless fun and fitness opportunities. But before you start shooting hoops, you need to ensure your basketball hoop is properly installed, starting with the pole. A stable pole is crucial for safety and performance. So, let’s dive into the steps to securely install the pole for your basketball hoop.
Digging The Hole
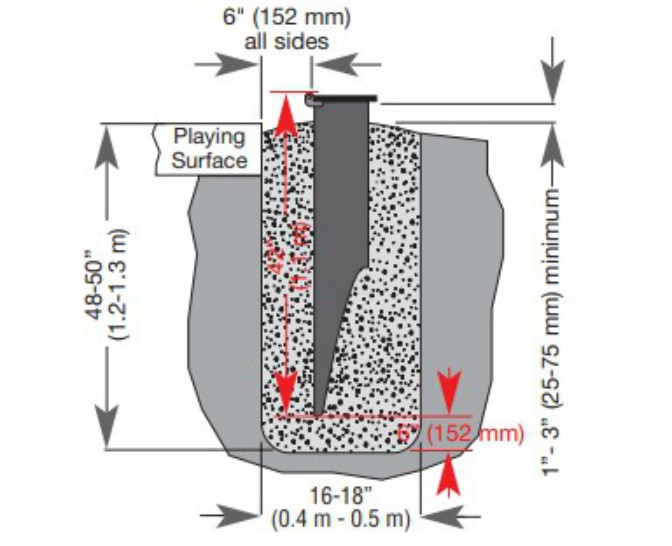
The first step in installing the pole is digging the right-sized hole. You might wonder, “How deep should this hole be?” The answer depends on the height and weight of your basketball hoop. Typically, a hole about 24 inches in diameter and 36 inches deep will suffice for standard hoops.
Use a post hole digger or an auger to make the task easier. If you don’t have these tools, borrowing from a neighbor or renting is a good option. Always call your local utility company before digging to avoid hitting any underground lines.
Remember, the wider and deeper the hole, the more stability your pole will have. This step lays the foundation for hours of enjoyable playtime, so take your time to get it right.
Setting The Pole In Concrete
Once your hole is ready, it’s time to set the pole in concrete. Mix the concrete according to the instructions on the bag. Aim for a consistency similar to thick oatmeal, which ensures it’s solid enough to hold the pole upright.
With the help of a friend, place the pole into the center of the hole. Make sure it’s perfectly vertical using a level. Pour the concrete into the hole, filling it until it’s about two inches from the top.
Allow the concrete to cure for at least 48 hours before attaching the backboard and hoop. During this time, keep the pole supported to prevent it from shifting. Once the concrete is fully set, you can confidently move on to the next steps in setting up your basketball hoop.
Installing a basketball hoop may seem daunting, but it’s a rewarding DIY project. Have you ever experienced the thrill of making your first basket on a hoop you installed yourself? That satisfaction is unmatched. Taking the time to properly set up your pole ensures a safe and enjoyable play area for everyone. So, grab your tools and get started!
Attaching The Backboard
Attaching the backboard is a crucial step in installing a basketball hoop. It ensures stability and safety during play. This process involves precise positioning and secure attachment to the pole. Follow these steps to attach your backboard correctly.
Positioning The Backboard
Begin by deciding the perfect height for the backboard. Most standard installations set it at 10 feet high. Use a ladder to reach the desired height safely. Align the backboard parallel to the ground. Ensure it’s centered above the hoop for optimal play.
Check that the backboard is level. Use a spirit level for accuracy. This will prevent the ball from bouncing unpredictably. An uneven backboard can affect gameplay. Take your time to get it right.
Securing With Brackets
Once positioned, it’s time to secure the backboard. Use strong brackets to attach it to the pole. These brackets hold the weight and withstand strong impacts. Ensure each bracket is tightly fastened. Loose brackets can cause the backboard to wobble or fall.
Double-check all connections. Tug gently on the backboard to test stability. If it moves, tighten the bolts further. Secure attachments are key to a safe basketball experience. Regularly inspect them to maintain safety.
Mounting The Rim
Mounting the rim is a crucial step in installing a basketball hoop. A properly mounted rim ensures stability and safety during play. Let’s dive into the process to get your hoop ready for action.
Aligning The Rim
Start by checking the alignment of the rim with the backboard. Position the rim at the center of the backboard. This guarantees a balanced shot every time. Use a measuring tape for precision. The rim must be level to the ground. An uneven rim leads to missed shots and frustration. Ensure the rim aligns horizontally and vertically.
Tightening The Bolts
Once aligned, secure the rim with bolts. Use a wrench to tighten each bolt firmly. Loose bolts can cause the rim to wobble. A stable rim is essential for accurate shots. Check each bolt twice to ensure security. Tighten until the rim feels solid and doesn’t move. Safety is key; secure bolts prevent injuries and damage.
Adding The Net
Adding the net to your basketball hoop is an exciting step that brings your setup to life. Whether you’re gearing up for intense matches or casual shooting sessions, a well-chosen and properly installed net enhances the experience. With the right net, your hoop becomes a magnet for fun and competition.
Choosing The Right Net
Picking the perfect net is crucial. You want one that withstands weather and wear without compromising performance. Nets come in various materials, such as nylon or polyester. Nylon nets are durable and can handle outdoor conditions, while polyester nets are softer and often used indoors.
Consider the length and thickness. A thicker net may last longer, but a thinner net might provide that satisfying “swish” sound. Think about the type of play you’ll be doing. Are you looking for a net that can handle high-energy games, or one that’s perfect for leisurely shots with friends?
Attaching The Net To The Rim
Now, it’s time to attach the net. Ensure you have a sturdy ladder or step stool to reach the rim comfortably. Safety first! Start by looping the net through the hooks or loops around the rim. This process may require a bit of patience, but the payoff is worth it.
Secure each loop properly. A tight fit prevents the net from sagging or coming loose during play. Have you ever played a game where the net kept slipping off? It’s frustrating and can distract from your focus. Make sure each connection is snug.
Once the net is attached, give it a gentle tug to ensure it’s secure. The satisfaction of a well-installed net is second to none. It’s a small yet significant step that makes your basketball hoop ready for action. Now, you’re all set to make those perfect shots and enjoy countless hours of fun.
Final Adjustments
Final adjustments ensure your basketball hoop is stable and level. Tighten bolts securely and check for wobbling. Confirm net hangs evenly and adjust height if needed.
Final adjustments are the crucial last steps in installing your basketball hoop. These tweaks ensure that your setup is not only functional but also safe and enjoyable. After putting in the hard work to assemble and mount the hoop, taking the time for these final adjustments can make all the difference in your playing experience.
Leveling The Hoop
Before you make your first shot, check if the hoop is level. A tilted hoop can affect your game and might even lead to unnecessary wear and tear. Use a level tool to confirm that the backboard is perfectly horizontal. If you find that one side is higher, don’t worry. Adjust the mounting bracket or the pole until it’s just right. Remember, a level hoop makes for fair play and helps improve your shooting accuracy.
Checking Stability
Stability ensures safety and enhances your playing experience. Gently shake the pole to see if it wobbles. A stable hoop shouldn’t move much, even under pressure. If there’s too much movement, tighten any loose bolts or nuts. You might also need to add more weight to the base if it’s a portable system. Ask yourself, would you feel comfortable dunking on this hoop? If not, make the necessary adjustments. With everything set, take a moment to admire your work. You’ve not only installed a basketball hoop but also created a new space for fun and exercise. Are you ready to make that first slam dunk?
Maintenance Tips
Maintaining your basketball hoop ensures it lasts longer and stays safe. A well-maintained hoop provides a better playing experience. Regular care prevents wear and tear, keeping your equipment in good condition. Follow these simple maintenance tips to enjoy your basketball hoop for years.
Regular Inspections
Inspect your basketball hoop regularly for any visible damage. Check bolts and screws to ensure they are tight. Look for rust or corrosion on metal parts. Examine the backboard for cracks or chips. Regular checks help spot issues before they worsen. This keeps the hoop safe and sturdy.
Cleaning And Care
Clean your hoop to keep it looking new. Use a mild detergent and water for cleaning. Wipe down the backboard and pole with a soft cloth. Avoid harsh chemicals that could damage the material. Rinse thoroughly to remove any soap residue. Dry everything with a towel to prevent rust.
Consider using a protective cover when not in use. This protects the hoop from harsh weather. Covers also keep dirt and debris away. Regular cleaning ensures your hoop remains in top condition.
Frequently Asked Questions
How To Install A Basketball Hoop At Home?
To install a basketball hoop at home, first choose a suitable location. Assemble the pole and backboard, then securely anchor the pole into the ground or wall. Adjust the hoop height according to your preference. Ensure stability and safety by following the manufacturer’s instructions carefully.
How Long To Let Concrete Set Before Installing A Basketball Hoop?
Let concrete set for at least 48 hours before installing a basketball hoop. Ensure it’s completely dry and stable. For best results, wait up to a week, especially in cooler climates. Proper curing prevents tilting and ensures long-lasting stability. Always follow manufacturer’s instructions for specific guidelines.
How Are Basketball Hoops Attached?
Basketball hoops are attached using bolts and brackets to secure them onto poles or walls. Ensure stability by tightening the bolts. Wall-mounted hoops may require additional support. Always follow the manufacturer’s instructions for proper installation.
How Much Does It Cost To Have A Basketball Hoop Installed?
Basketball hoop installation costs range from $400 to $1,500. Factors include hoop type, location, and labor. Portable hoops are cheaper to install than in-ground models. Labor fees vary based on region and complexity of the installation. Always get a detailed quote from a professional installer for accuracy.
Conclusion
Installing a basketball hoop is a rewarding DIY project. Follow the steps carefully for a safe setup. Ensure the location is ideal and the pole is secure. Use the right tools for a smooth installation process. Invite friends for a game and enjoy playing together.
Regular maintenance keeps the hoop in great shape. Check bolts and the net often. With practice, your game improves. And don’t forget to have fun! Building memories on the court is priceless. Enjoy every moment with your new hoop. Happy playing!