
If your Atosa freezer is not working as it should, it can impact your business or home kitchen quickly. You rely on this appliance to keep food cold and safe. When problems happen, you need clear steps to find what’s wrong and fix it fast.
This guide explains common Atosa freezer issues, troubleshooting steps, and practical tips for repairs. Whether you’re a restaurant owner, chef, or a homeowner with an Atosa unit, you’ll learn how to handle the most frequent problems and avoid costly downtime.
Understanding Your Atosa Freezer
Atosa is a well-known brand in the commercial kitchen world. Their freezers are popular in restaurants, supermarkets, and cafeterias because they are efficient and reliable. However, like all machines, Atosa freezers can develop issues over time.
Most Atosa models use a frost-free system and digital temperature controls. They often have self-closing doors, heavy insulation, and strong compressors. Knowing the basics of how your freezer works can help you find and solve problems more easily.
Key Components Of An Atosa Freezer
- Compressor: The “heart” of the cooling system. Compresses refrigerant gas.
- Condenser coils: Release heat from the refrigerant.
- Evaporator coils: Absorb heat inside the freezer.
- Thermostat: Controls the temperature.
- Defrost heater: Melts frost on the coils.
- Door gaskets: Keep cold air inside.
When any of these parts fail, the freezer may not cool properly or can even stop working.
Common Atosa Freezer Problems
Let’s look at the most frequent complaints from Atosa freezer owners. Each problem can have more than one cause. Understanding the symptoms helps you decide what to check first.
1. Freezer Not Cooling
If the temperature inside your Atosa freezer is too high, the food may spoil.
Possible Causes:
- Dirty condenser coils
- Faulty compressor
- Broken thermostat
- Door not sealing
- Refrigerant leak
2. Freezer Running Constantly
A freezer that never turns off wastes energy and may wear out faster.
Possible Causes:
- Door left open or gasket damaged
- Overfilled with warm items
- Thermostat set too low
- Dirty coils
3. Freezer Too Cold (food Freezing Solid)
If food gets too hard or forms thick ice, it can be a sign of another problem.
Possible Causes:
- Thermostat set too low
- Temperature sensor malfunction
- Control board error
4. Ice Buildup Or Frost Inside
You may notice ice forming on the walls, shelves, or door.
Possible Causes:
- Door not closing properly
- Defrost system failure
- Frequent door opening
5. Unusual Noises
Banging, clicking, or loud humming is not normal.
Possible Causes:
- Loose parts or panels
- Failing compressor
- Fan motor problem
- Items touching evaporator fan
6. Water Leaks
Puddles under or inside the freezer can cause slips and messes.
Possible Causes:
- Blocked drain line
- Door gasket leaks
- Defrost system issue
7. Control Panel Errors
Digital Atosa freezers may show error codes or flashing lights.
Possible Causes:
- Sensor failure
- Control board malfunction
- Power surge or reset needed
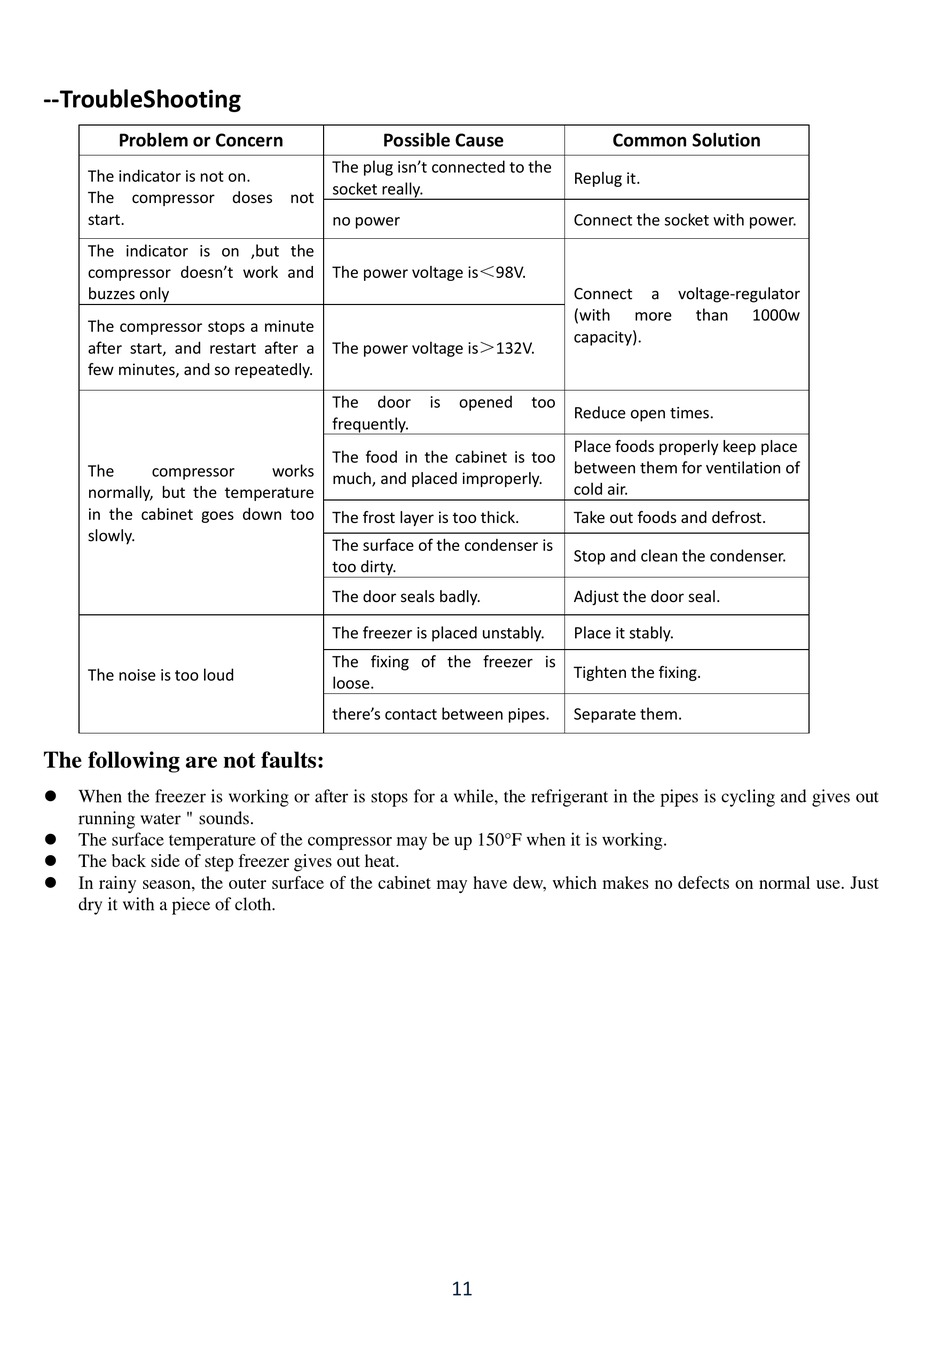
Quick Reference: Problem And Possible Cause Table
Here’s a handy summary for fast troubleshooting.
| Problem | Most Likely Causes |
|---|---|
| Freezer not cooling | Dirty coils, compressor failure, thermostat issue, low refrigerant |
| Runs constantly | Door seal, overloading, thermostat, dirty coils |
| Too cold | Thermostat set too low, sensor error |
| Ice buildup | Poor door seal, defrost failure |
| Noises | Loose parts, fan, compressor |
| Water leaks | Blocked drain, defrost issue |
| Error codes | Sensor, board, power issue |
Step-by-step Atosa Freezer Troubleshooting
If your Atosa freezer isn’t working, don’t panic. Most problems can be fixed with a careful, step-by-step process.
Safety First
- Unplug the freezer before you open panels or touch wiring.
- Wear gloves to protect your hands from sharp parts and extreme cold.
- If you smell burning or see smoke, leave the area and call a professional.
1. Check The Power Supply
Many issues are caused by simple power problems.
- Make sure the freezer is plugged in firmly.
- Check the circuit breaker or fuse box.
- Try another outlet if possible.
- Look for loose or damaged power cords.
If the freezer shows no lights, hum, or fans, suspect a power issue.
2. Inspect The Door And Gasket
A bad seal lets cold air escape, making the freezer work too hard.
- Close the door and look for gaps or loose spots in the gasket (the soft rubber seal).
- Try the “dollar bill test”: Close a bill in the door. If it slides out easily, the gasket may need replacing.
- Clean the gasket with warm, soapy water and check for cracks.
3. Clean The Condenser Coils
Dirty coils are a top cause of cooling problems.
- Locate the condenser coils (usually at the back or bottom).
- Unplug the freezer.
- Use a coil brush or vacuum to remove dust and debris.
- Clean at least every 6 months, or more often in dusty kitchens.
4. Check The Temperature Setting
Sometimes the thermostat is set too high or low.
- Find the temperature dial or digital control panel.
- Set the freezer to -10°F to 0°F (-23°C to -18°C) for best results.
- Wait a few hours and measure the temperature with a separate thermometer.
5. Look For Frost Or Ice Buildup
Too much frost means the defrost system may be failing.
- Open the freezer and check for ice on the back wall or shelves.
- If you see thick frost, the evaporator coils may be frozen.
- Defrost manually: Turn off the freezer and leave the door open for several hours.
- Dry out water before restarting.
If the problem returns quickly, the defrost timer, heater, or sensor may need repair.
6. Listen For Unusual Noises
Strange sounds can point to failing parts.
- A loud clicking could mean a bad start relay on the compressor.
- Grinding or squealing often means a bad fan motor.
- Humming or buzzing may signal compressor trouble.
Try to locate the sound source. Sometimes a loose panel or shelf causes rattling.
7. Examine The Control Panel
If your Atosa freezer has a digital display:
- Look for error codes or blinking lights.
- Check the manual for code meanings.
- Try resetting the unit by unplugging for 5 minutes, then plugging in again.
If problems continue, the control board or sensor may need replacement.
8. Check For Water Leaks
Water inside or under the freezer is often from a blocked drain.
- Look for a drain hole near the back, inside the freezer.
- Use a turkey baster with hot water to flush out clogs.
- Clean the drain pan under the freezer.
If leaks continue, check the door seal and defrost system.
When To Call A Professional
Some freezer repairs are best left to trained technicians.
- If you hear loud compressor noises, see oil leaks, or the freezer doesn’t run at all
- If you suspect a refrigerant leak (sweet or chemical smell)
- When wiring, control board, or sensor replacement is needed
- When the freezer is still under warranty (DIY repairs can void it)
Professional repair may cost more up front, but it prevents bigger problems and can save money in the long run.
Advanced Troubleshooting: Key Components
If you have some technical skill, you can check deeper problems. Here’s how to test major Atosa freezer parts.
Compressor Testing
The compressor is the main part that cools your freezer. If it fails, the unit won’t get cold.
- Unplug the freezer and remove the back panel.
- Find the compressor (usually black, round, and near the bottom).
- Check for warmth – it should be slightly warm, not hot.
- Listen: If you hear a constant clicking, the start relay or compressor is likely bad.
- Use a multimeter to test the compressor’s electrical terminals for continuity.
Never open the sealed compressor or refrigerant lines yourself.
Thermostat/temperature Control
If the freezer is too warm or cold, check the thermostat.
- Turn the dial and listen for a “click” as it switches on/off.
- If there’s no click, the thermostat may be faulty.
- Digital models: Use a multimeter to test for voltage at the control board.
Defrost System
A failing defrost system causes frost buildup and poor cooling.
- Locate the defrost timer (often near the compressor).
- Manually advance the timer with a screwdriver. The freezer should enter defrost mode.
- Test the defrost heater for continuity with a multimeter.
- Check the defrost thermostat for function (it should close at cold temperatures).
Fan Motors
If air doesn’t move inside the freezer, check the fans.
- Unplug the freezer.
- Spin the evaporator fan by hand – it should move freely.
- Listen for fan noise when the door is closed.
- Test voltage at the fan motor.
Replacing a fan is usually a simple repair.
Atosa Freezer Error Codes Explained
Many new Atosa models show error codes on the digital display. Understanding these codes helps you find problems faster.
Here are common codes and their meanings. Always check your owner’s manual for model-specific codes.
| Error Code | What It Means | Action to Take |
|---|---|---|
| E1 | Temperature sensor fault | Check/replace sensor, reset freezer |
| E2 | Defrost sensor fault | Check/replace defrost sensor |
| E3 | High temperature alarm | Check cooling system, door seal |
| E4 | Low temperature alarm | Check thermostat, sensor |
| E5 | Defrost timeout | Check defrost heater, timer |
If you see a code not listed here, search for your model’s service manual online or contact Atosa support.
Preventative Maintenance For Atosa Freezers
Prevention is always better than repair. Here are steps to reduce future problems and extend your freezer’s life.
1. Clean Coils Regularly
Dust on coils can raise energy use by up to 30% and cause breakdowns. Clean every 3-6 months.
2. Check Door Gaskets
Inspect for cracks, tears, or food buildup every month. Replace if the door doesn’t seal tightly.
3. Don’t Overload
Too much food blocks airflow and strains the compressor. Fill shelves evenly, but don’t pack tightly.
4. Defrost When Needed
If you see more than 1/4 inch (6 mm) of frost, defrost the freezer. Modern Atosa models defrost automatically, but manual models need regular checks.
5. Monitor Temperature
Use a separate thermometer inside to check for accuracy. Write down temperatures daily in commercial kitchens.
6. Train Staff
Make sure everyone knows how to close doors, load food, and report problems early.
7. Schedule Professional Service
A yearly check by a licensed technician catches issues you may miss.
Real-world Examples: Atosa Freezer Problems Solved
Let’s see how these steps work in real life.
Case 1: Freezer Not Cooling After Power Outage
A restaurant owner found the freezer warm after a storm. The lights worked, but the compressor was silent. Troubleshooting showed the start relay had failed. Replacing the relay fixed the problem and saved the food.
Case 2: Constant Frost Buildup
A bakery noticed thick ice inside every week. The door gasket looked fine, but staff often propped the door open during deliveries. Training staff to close the door quickly stopped the ice problem.
Case 3: Digital Display Shows “e1”
A supermarket’s Atosa freezer showed “E1” and beeped. The manual said this was a sensor fault. A technician replaced the temperature sensor, and the freezer worked normally again.
Case 4: Water On The Floor
A chef saw water pooling under the freezer. Cleaning the drain line with hot water solved the leak in minutes.
Case 5: Noisy Operation
A loud vibrating noise kept coming from the back of the unit. On inspection, a loose panel was found. Tightening the screws stopped the noise.
Atosa Freezer Troubleshooting: Tips And Insights
Most guides miss a few details that can make a big difference:
- Ambient Temperature: Freezers in hot kitchens or direct sunlight struggle to keep cool. Move the unit if possible or add fans to improve airflow.
- Voltage Issues: Atosa freezers need a stable power supply. Fluctuating voltage can damage the control board and compressor. Use a surge protector.
- Hidden Frost: Sometimes, ice forms behind the back panel, out of sight. If you see poor cooling but little visible frost, remove the panel (if safe) to check the evaporator coils.
- Replacement Parts: Always buy genuine Atosa parts or certified replacements. Cheap parts can fail quickly or void your warranty.
- Data Logging: For commercial kitchens, keep a log of temperature, cleaning, and repairs. It helps spot trends and can protect you in food safety inspections.
Comparing Atosa Freezers With Other Brands
If you’re considering an Atosa freezer or want to compare performance, here’s how Atosa stacks up against similar brands.
| Brand | Energy Efficiency | Typical Warranty | Maintenance Needs | Common Issues |
|---|---|---|---|---|
| Atosa | High | 2-3 years | Low to moderate | Sensor errors, door gaskets |
| True | Very high | 3-5 years | Low | Fan noise, thermostat |
| Turbo Air | High | 2-3 years | Moderate | Compressor, defrost |
| Continental | High | 3 years | Low | Control board, leaks |
Atosa freezers are competitive in energy use and reliability. Their most common issues are with sensors and door gaskets, which are easy to fix.
How To Find Reliable Atosa Freezer Parts
Getting the right parts is key to a successful repair. Here’s how to avoid common mistakes:
- Model Number: Always check the full model and serial number from your freezer’s sticker.
- Genuine Parts: Buy from authorized dealers or the Atosa website to ensure compatibility.
- Check Warranty: If your freezer is under warranty, parts and labor may be covered. DIY repairs might void this.
- Part Quality: Avoid “universal” parts unless recommended by Atosa. They may not fit or function properly.
If you’re unsure, ask for help from Atosa’s support team or a certified technician.
Cost Of Atosa Freezer Repairs
Knowing repair costs helps you decide between fixing or replacing your freezer.
- Compressor replacement: $400–$900 (parts and labor)
- Thermostat replacement: $100–$300
- Door gasket: $50–$150
- Fan motor: $80–$250
- Control board: $200–$500
- Simple fixes (cleaning, resetting): Usually free or under $50
Prices vary by location and technician. Always get a quote before approving repairs.
Should You Repair Or Replace Your Atosa Freezer?
When your freezer breaks, think about these factors:
- Age: If the freezer is over 10 years old, replacement may be smarter.
- Repair history: Frequent breakdowns mean it may be time for a new unit.
- Cost: If repairs are more than half the price of a new freezer, replacement is usually best.
- Energy efficiency: Newer models use less electricity and may qualify for rebates.
If you decide to buy a new freezer, recycle the old one responsibly. Some cities and dealers offer free haul-away.

Frequently Asked Questions
Why Is My Atosa Freezer Running But Not Cooling?
This usually means there is a problem with the compressor, dirty coils, or a refrigerant leak. First, clean the condenser coils and check the temperature setting. If it still doesn’t cool, call a technician to check the compressor and refrigerant.
What Does Error Code E1 Mean On My Atosa Freezer?
E1 means there is a problem with the temperature sensor. The sensor may be loose, broken, or disconnected. Try resetting the freezer. If the code returns, the sensor probably needs replacement.
How Often Should I Clean My Atosa Freezer Coils?
Clean the condenser coils every 3 to 6 months. If your kitchen is dusty or the freezer is near a fryer, clean more often. Dirty coils can cause the freezer to overheat and stop cooling.
Can I Use Universal Parts In My Atosa Freezer?
It’s best to use genuine Atosa parts or certified replacements. Universal parts may not fit or work correctly and could void your warranty. Always check your model number before ordering.
Where Can I Find Official Atosa Freezer Manuals And Support?
Visit the Atosa USA support page for manuals, troubleshooting guides, and contact information.
Whether you’re running a busy restaurant or just want to keep your food safe at home, keeping your Atosa freezer in top shape is vital. Regular maintenance, quick troubleshooting, and knowing when to call a professional will keep your freezer working for years.
With these tips, you’re ready to handle most problems with confidence and avoid costly downtime.

