

Thinking about installing laminate flooring in your home? This upgrade can dramatically change the look and feel of any room. Laminate flooring is known for being affordable, durable, and stylish. What’s even better: you do not need to be a professional to install it yourself. With some planning, a few basic tools, and the right technique, you can achieve professional results even as a beginner.
This guide explains how to install laminate flooring step by step. Whether you want to refresh your living room, bedroom, or hallway, you’ll find all the details you need right here. We’ll cover preparation, underlayment, laying the planks, tricky areas, finishing touches, and even some common mistakes to avoid.

36% off Today’s Exclusive Deals
Limited-time Exclusive Deals. Check current discount on Amazon.
Check Price on Amazon As an Amazon Associate I earn from qualifying purchases.You’ll also find tables comparing tools and materials, and answers to frequent questions at the end. Let’s get started on making your floor look brand new.
Why Choose Laminate Flooring?
Laminate flooring has become very popular in recent years. Here’s why many homeowners choose it:
- Cost-effective: Laminate costs less than hardwood but can look just as beautiful.
- Durability: It resists scratches, dents, and stains.
- Easy to clean: Just sweep and mop with a damp cloth.
- Variety: Laminate comes in many colors, patterns, and wood-look finishes.
- DIY-friendly: Most products use a click-and-lock system, making installation simple.
These benefits make laminate a smart choice, especially for families with kids or pets.
Planning And Preparation
Proper planning makes installation smoother and faster. Skipping steps here is a common beginner mistake.
Measuring Your Space
First, measure the length and width of the room. Multiply them to get the total square footage. Always buy 10% more flooring than you need. This extra covers mistakes and future repairs.
For example, if your room is 12 feet by 15 feet:
- 12 ft × 15 ft = 180 sq ft
- 10% of 180 = 18 sq ft
- Total needed: 198 sq ft
Choosing The Right Laminate
Not all laminate is the same. Thickness, wear layer, and style matter.
| Feature | Typical Range | Best For |
|---|---|---|
| Thickness | 6mm–12mm | Thicker = quieter, more solid feel |
| Wear Layer | AC1–AC5 | AC3+ for homes, AC4/5 for high traffic |
| Style | Wood, stone, tile looks | Match your décor |
Acclimating The Flooring
Laminate planks need to adjust to your home’s temperature and humidity. Stack them flat in the room for at least 48 hours before installation. This helps avoid warping or gaps later.
Gathering Tools And Materials
You’ll need more than just the flooring. Here’s a comparison of essential tools and their uses:
| Tool | Use | Estimated Cost |
|---|---|---|
| Tape Measure | Measuring room and planks | $10–$20 |
| Utility Knife | Cutting underlayment | $5–$15 |
| Jigsaw/Circular Saw | Cutting planks to size | $40–$100 |
| Rubber Mallet | Clicking planks together | $10–$15 |
| Pull Bar & Spacers | Fitting planks near walls | $10–$20 |
| Underlayment | Sound and moisture barrier | $0.30–$0.75/sq ft |
Don’t forget safety glasses and ear protection when cutting planks.
Preparing The Subfloor
A smooth, clean surface is crucial. Remove old carpet, nails, and debris. Sweep and vacuum the subfloor. The surface should be dry and level within 1/8 inch over 6 feet. Fill low spots with floor patch and sand down high spots.
Pro tip: If installing over concrete, check for moisture. Tape a plastic sheet to the floor overnight. If water collects underneath, use a vapor barrier.

Installing Underlayment
Underlayment is a thin layer placed between your subfloor and the laminate. It provides cushioning, sound reduction, and moisture protection. Some laminate planks come with attached underlayment, so check your product first.
Steps For Underlayment Installation
- Roll out underlayment across the floor, allowing it to go a few inches up the wall.
- Trim excess with a utility knife.
- Tape seams together with underlayment tape. Do not overlap the pieces.
- Avoid gaps or overlaps for a smooth finish.
If you’re installing over concrete, use an underlayment with a built-in vapor barrier for extra protection.
Laying The First Row
Getting the first row right is essential for the whole room.
Planning Your Layout
Laminate flooring looks best when planks run parallel to the longest wall or the main source of light. Dry-lay a row of planks to see how they fit. If the last plank will be less than 2 inches wide, cut the first plank narrower to balance the layout.
Installing The First Row
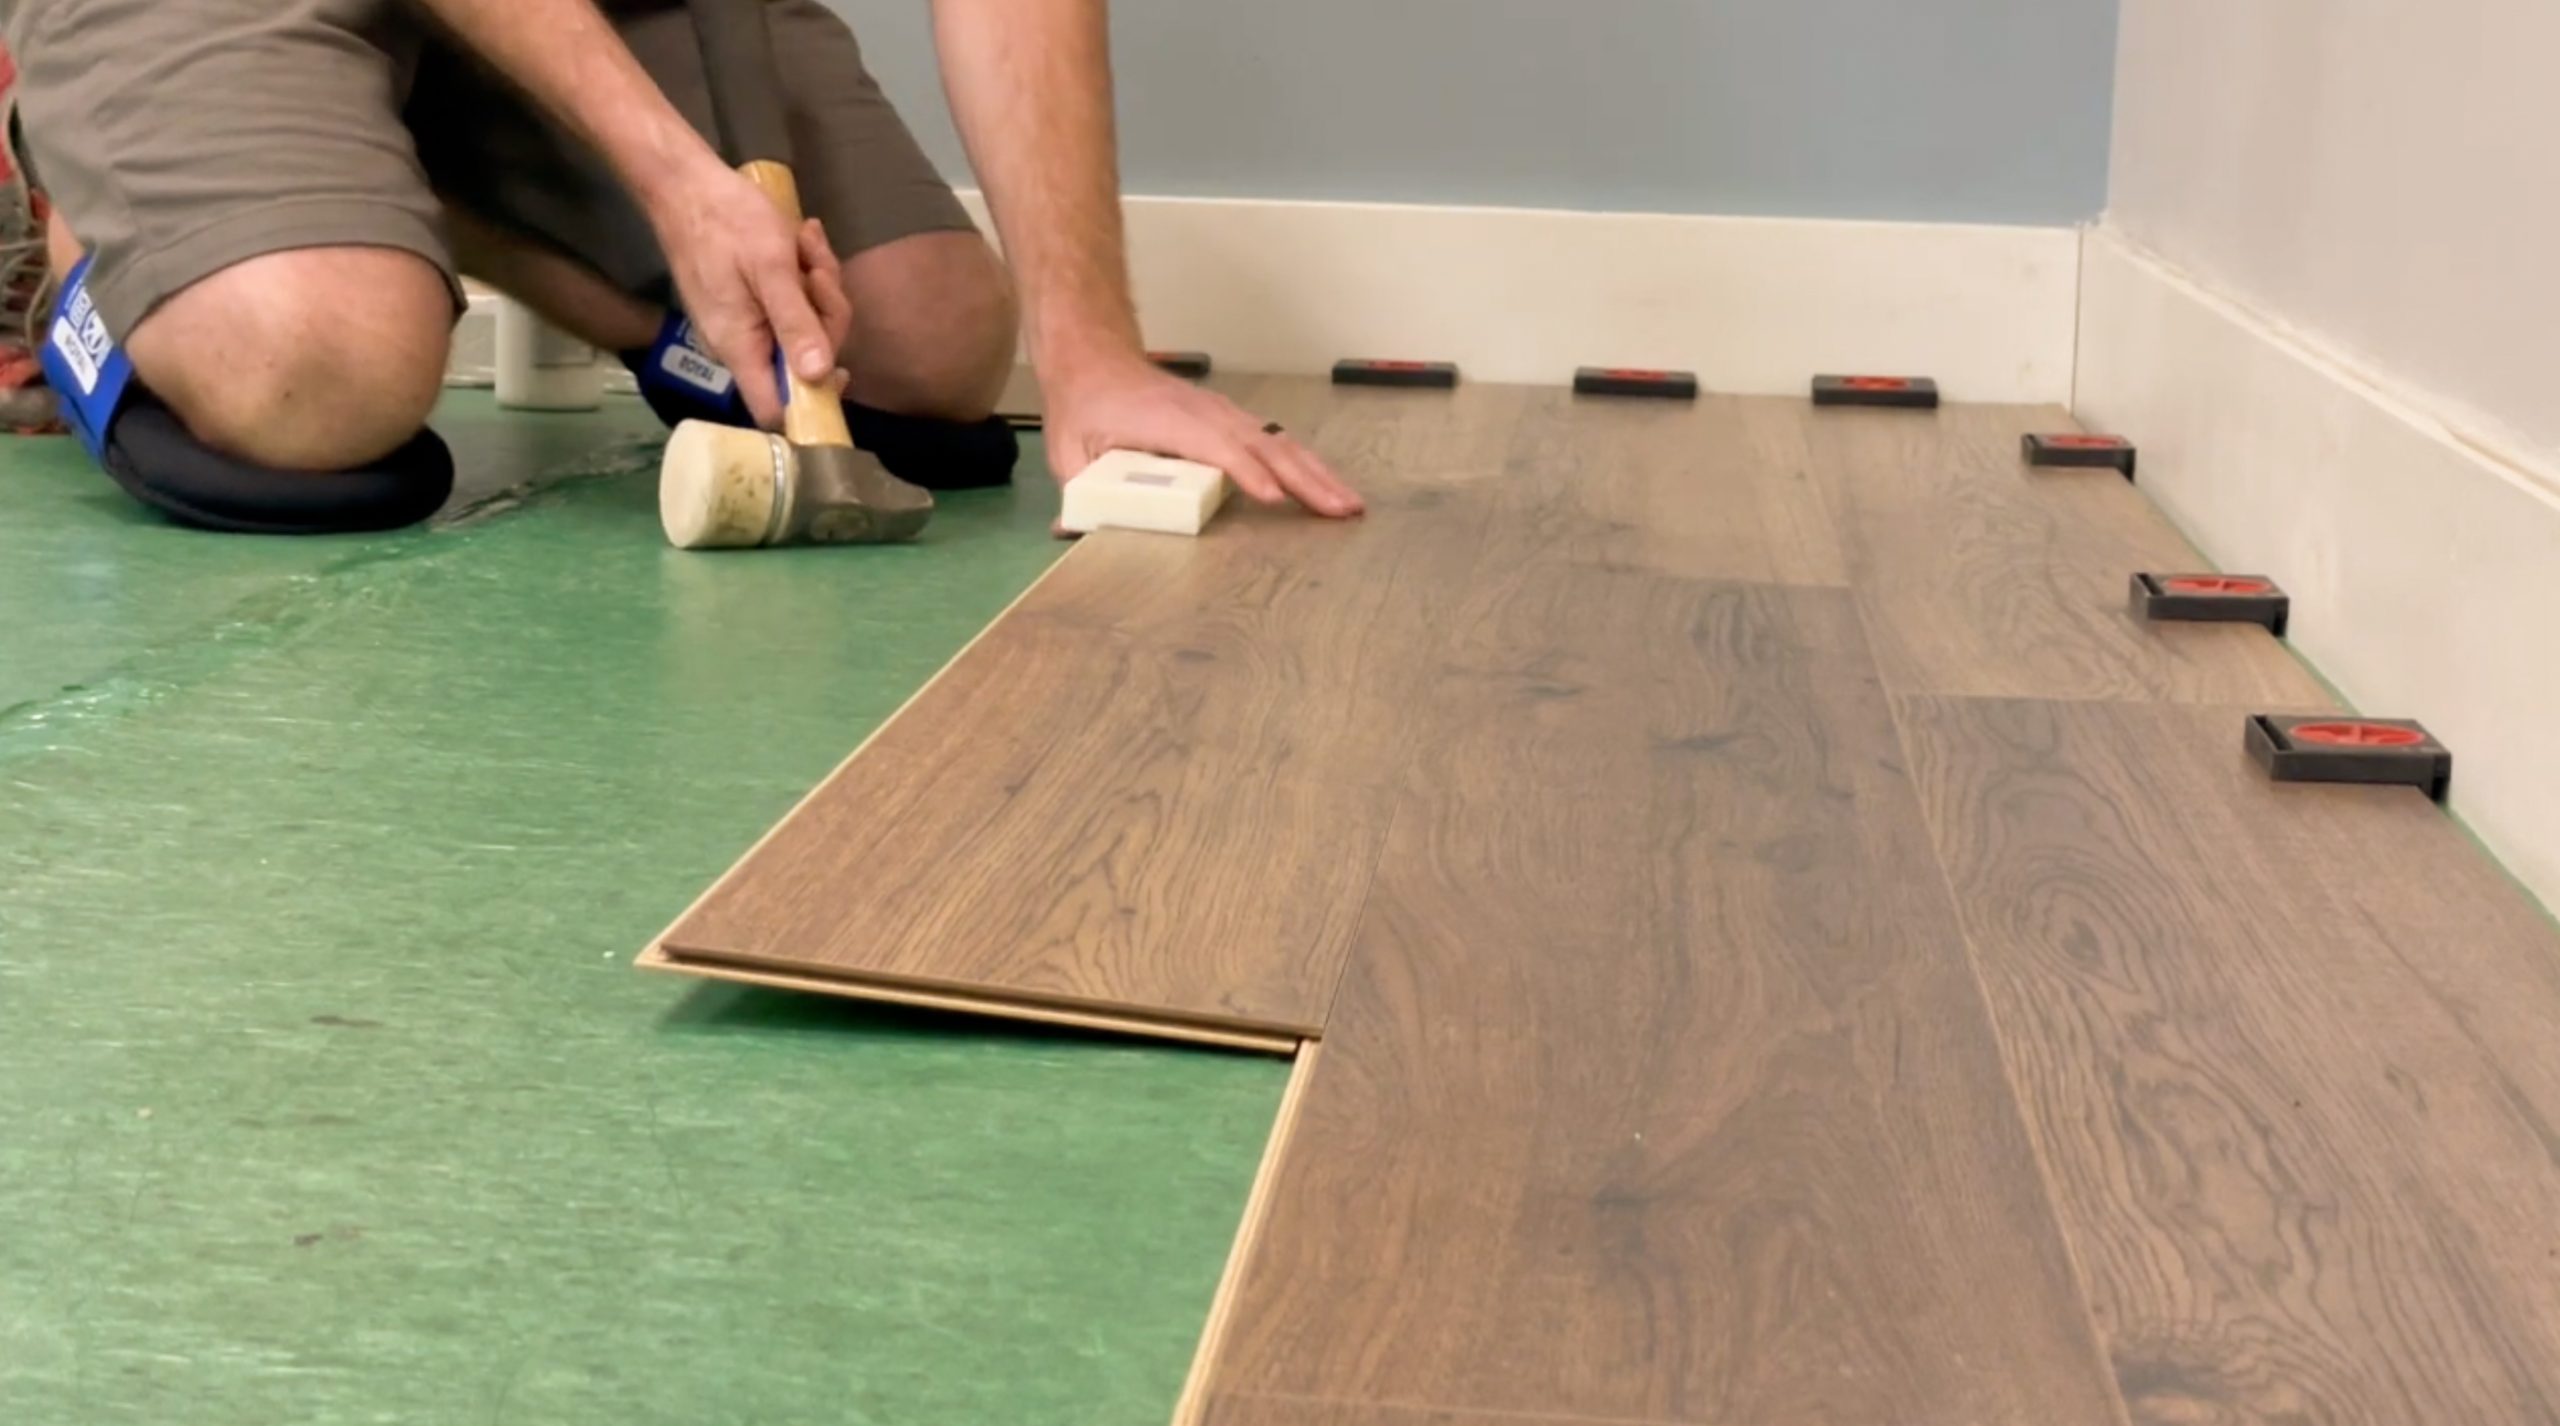
- Place spacers between the wall and the planks. This creates a 1/4-inch expansion gap, allowing the floor to move with temperature changes.
- Lay the first plank with the tongue side facing the wall.
- Attach the next plank by angling it into the previous one and snapping it down.
- Cut the last plank in the row to fit, keeping the 1/4-inch gap at the end.
Insider tip: Use the leftover piece from the last plank to start the next row. This staggers the seams and makes the floor stronger.
Continuing The Installation
Once the first row is complete, the rest of the floor goes down quickly.
Staggering The Joints
Never align joints in two adjacent rows. Stagger them by at least 12 inches for strength and looks. This pattern is called a “random stagger” and prevents weak points.
Connecting Rows
- Angle the new plank into the previous row.
- Press down to lock the tongue and groove.
- Use a rubber mallet and tapping block to tighten the fit (never hit the planks directly).
- If the last plank in a row is too short, cut a new one to avoid waste.
Cutting Around Obstacles
You’ll likely need to cut planks to fit around door frames, vents, or pipes.
- Use a jigsaw for curved or detailed cuts.
- For door frames, remove the bottom trim and slide the plank underneath for a clean finish.
- Mark your cuts carefully; measure twice, cut once.
Installing The Last Row
Often, the last row must be cut lengthwise to fit. Measure the gap, subtract the expansion gap, and mark the plank. Use a circular saw or jigsaw for a straight, clean cut.
Extra insight: Laminate expands and contracts with humidity. Never force the last row in tightly. Keep the expansion gap all around the room.
Dealing With Tricky Areas
Doorways
Doorways are often the trickiest part. The floor should slide under the door jamb for a neat look.
- Lay a piece of flooring next to the jamb and mark its height.
- Use a handsaw or jamb saw to cut the jamb.
- Slide the plank under for a seamless transition.
Pro tip: Use transition strips between rooms, especially if the flooring type changes.
Radiator Pipes Or Columns
If you have pipes or columns, measure their position and drill a hole slightly larger than the pipe. Cut a wedge from the plank to fit around it, install the plank, then glue the wedge behind the pipe for a finished look.
Finishing Touches
Now your floor is installed, but you’re not done yet. These final steps make your project look professional.
Removing Spacers
After all planks are in place, remove the wall spacers. The gaps will be covered by baseboards or quarter-round molding.
Installing Baseboards And Moldings
Replace or install new baseboards to cover the expansion gap. Nail them to the wall, not the floor, so the laminate can move.
- Use matching quarter-round molding if your baseboards are not thick enough.
- Caulk any gaps for a smooth finish.
Installing Transition Strips
Where laminate meets other flooring types (like tile or carpet), use transition strips. These create a safe, finished edge and allow movement.
Cleaning Up
Sweep or vacuum the new floor. Use a damp (not wet) mop for the first cleaning. Avoid harsh chemicals.
Fact: Laminate floors are ready to use right away. There’s no drying or curing time required.
Common Mistakes To Avoid
Even experienced DIYers make errors. Here are some to watch for:
- Skipping acclimation: This leads to buckling or gaps.
- No expansion gap: The floor may warp.
- Uneven subfloor: Planks can separate or bounce.
- Forcing planks: This can break the locking system.
- Wrong underlayment: Can cause noise or moisture problems.
- Ignoring staggered joints: Weakens the floor.
- Nailing through laminate: Prevents movement, causes damage.
Non-obvious insight: If your room gets lots of sun, consider using window coverings. Direct sunlight can fade some laminate finishes over time.
How Laminate Compares To Other Flooring
If you’re still deciding, here’s how laminate stacks up against other popular options:
| Feature | Laminate | Hardwood | Vinyl Plank | Carpet |
|---|---|---|---|---|
| Cost (per sq ft) | $1–$4 | $5–$12 | $2–$7 | $2–$5 |
| DIY Friendly | Yes | No | Yes | Yes |
| Durability | High | Medium–High | High | Medium |
| Water Resistance | Medium | Low | High | Low |
| Appearance | Many styles | Natural wood | Many styles | Many colors |
Laminate gives you an attractive floor with a high level of durability, especially for busy homes.
Care And Maintenance Tips
Laminate is low maintenance, but a few good habits will keep it looking new for years.
- Sweep often: Grit can scratch the surface.
- Use felt pads: On furniture legs to prevent dents.
- Avoid wet mops: Too much water can damage the core.
- Clean spills immediately: Even “water-resistant” floors have limits.
- No wax or polish: These leave a dull film.
A quick sweep every day and a damp mop as needed is enough. For deeper cleaning, use a laminate-specific cleaner.
Hidden tip: Never use steam cleaners on laminate. The moisture can get between the planks and cause swelling.

Frequently Asked Questions
How Long Does It Take To Install Laminate Flooring?
Most DIYers can install laminate in a standard room (about 200 sq ft) in one day. This includes prep, laying underlayment, and installing planks. Larger or complex rooms may take longer.
Can I Install Laminate Flooring Over Existing Floors?
Yes, you can install laminate over most hard surfaces like vinyl, tile, or hardwood—if the surface is flat, dry, and in good condition. Never install over carpet, as it’s too soft and unstable.
Do I Need To Glue Or Nail Laminate Flooring?
No. Most modern laminate flooring uses a click-and-lock system. This floating floor method means you don’t need glue or nails. Only use glue if recommended by the manufacturer.
What Rooms Are Suitable For Laminate Flooring?
Laminate works well in living rooms, bedrooms, hallways, and offices. Some water-resistant types are suitable for kitchens and bathrooms, but check the manufacturer’s instructions. Avoid areas with standing water.
Where Can I Find More Detailed Installation Guides?
For more in-depth tutorials, check out resources from the National Wood Flooring Association or visit Family Handyman for step-by-step photos and expert tips.
—
Installing laminate flooring is a project almost anyone can tackle with some planning and patience. By following these steps and avoiding common mistakes, you can create a beautiful, durable floor that adds value and comfort to your home. Remember: measure carefully, let the flooring acclimate, keep expansion gaps, and don’t rush the details. With the right approach, your finished floor will look like it was done by a pro. Enjoy your new space!

