

Most Keurig K-Duo Plus problems come from clogs, setup errors, water flow issues, or scaling.
If you’re looking for clear, practical Keurig K-Duo Plus coffee maker troubleshooting, you’re in the right place. I’ve seen this machine act up in the same few ways over and over, and most fixes are simpler than people expect. In this guide, I’ll walk you through the most common issues, what usually causes them, and the steps that actually help, so you can get back to making a smooth single cup or full carafe without the guesswork.

36% off Today’s Exclusive Deals
Limited-time Exclusive Deals. Check current discount on Amazon.
Check Price on Amazon As an Amazon Associate I earn from qualifying purchases.
Common Keurig K-Duo Plus problems and what they usually mean
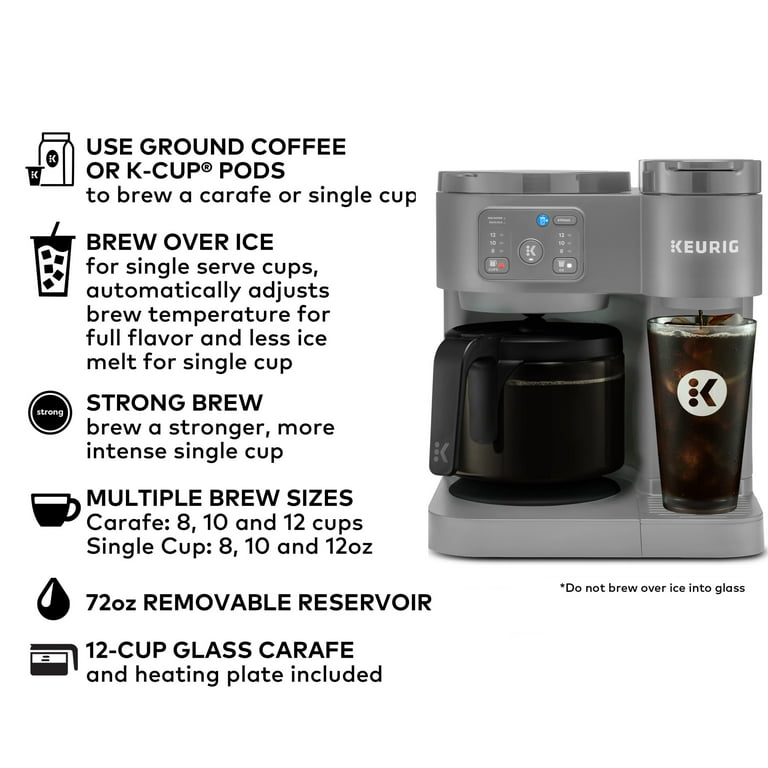
The Keurig K-Duo Plus is a handy machine because it can brew both single cups and full pots. That flexibility is great, but it also means there are more parts that can cause trouble. When something goes wrong, it is usually tied to water flow, residue buildup, incorrect settings, or a lid, pod, or filter issue.
From hands-on experience, I can say that many people assume the machine is “broken” when it is often just clogged or not assembled quite right. Think of it like a car that hesitates because of low fuel or a dirty filter. The engine is still fine, but the path is blocked.
Common signs include:
- The machine does not brew at all
- The carafe side brews too slowly
- The single-serve side gives a weak cup
- Water leaks from the reservoir or base
- The screen shows a descale or add water warning
- Coffee tastes stale, bitter, or watered down
Before you panic, check the basics first. In many cases, simple Keurig K-Duo Plus coffee maker troubleshooting solves the problem in minutes.
:max_bytes(150000):strip_icc()/K-Duo-Plus-Single-Serve-Carafe-HeroSquare-6b8e96e3fb0440c6bdbcce250bb5026f.jpg)
Keurig K-Duo Plus not turning on
If your Keurig K-Duo Plus will not turn on, the issue is often power related. Start with the outlet, power cord, and the machine’s internal reset state. It sounds obvious, but I have seen people spend 20 minutes on a “dead” brewer that was simply unplugged at the strip.
Try these steps:
- Plug the machine directly into a wall outlet
- Make sure the outlet works by testing another device
- Check the power cord for bends, cuts, or loose fit
- Press the power button firmly and hold it for a moment
- Unplug the brewer for 2 minutes, then plug it back in
If the screen stays blank after that, the machine may need service. Still, this is one of the easiest Keurig K-Duo Plus coffee maker troubleshooting checks to start with.
Keurig K-Duo Plus not brewing
When the machine powers on but will not brew, the cause is usually one of three things: a clog, a lid issue, or a setup problem. On the single-serve side, the pod holder and needles can get blocked. On the carafe side, the basket or valve can also be part of the problem.
Use this checklist:
- Make sure the water reservoir is filled and seated properly
- Confirm the lid is closed all the way
- Check that the brew size is selected
- Remove and reinsert the K-Cup pod or carafe basket
- Run a water-only cycle to see if flow improves
– Clean the entrance and exit needles if single-serve brewing fails
One mistake I made early on was assuming the pod itself was bad every time. More often, it was a needle clog from fine coffee grounds or mineral buildup. That is why routine cleaning matters so much in Keurig K-Duo Plus coffee maker troubleshooting.
Weak coffee or watery coffee
Weak coffee usually means the water is moving too fast, the grounds are not extracting well, or the brew settings are too large for the amount of coffee used. It can also happen if the machine needs descaling. A clogged spray path can sometimes make the brew uneven, which gives you a thin cup.
Try these fixes:
- Use the correct brew size for the pod or grounds
- Shake the pod gently before brewing if the contents are settled
- Use fresh coffee pods or fresh ground coffee
- Clean the single-serve needle area
- Descale the machine if it has been a while
- For the carafe side, use the right coffee-to-water ratio
If your coffee tastes like flavored water, do not blame the beans first. In many cases, Keurig K-Duo Plus coffee maker troubleshooting points back to scale buildup or brew size settings.
Coffee tastes bad or has an off smell
Bad taste can come from stale grounds, residue inside the machine, old water sitting in the reservoir, or oils that have built up over time. Coffee makers are a lot like kitchen sponges: if they are not cleaned, they hold onto smells. That smell can show up in the cup.
What to do:
- Empty and wash the reservoir with warm, soapy water
- Rinse the carafe and brew basket after each use
- Use fresh water every day
- Clean removable parts weekly
- Descale regularly to remove mineral deposits
- Replace a water filter if your model uses one
I have found that old water is a sneaky culprit. If the brewer sits for a few days, dump the reservoir and refill it before your next cup. That simple habit improves taste more than many people expect.
Water is leaking from the brewer
Leaks can happen from a misaligned reservoir, an overfilled basket, cracked parts, or a clogged path that forces water back out. Sometimes the issue is as simple as the reservoir not being fully locked into place. Other times, a worn seal or internal crack may be involved.
Check these areas:
- Reservoir placement and alignment
- Carafe basket seating
- Overfilled water tank
- Cracks in the tank or carafe
- Drip tray fullness
- Loose or damaged seals
If water leaks only during brewing, watch where it starts. That clue helps narrow down the cause fast. In my experience, the most common fix is reseating parts and cleaning out buildup before assuming there is a major failure.
Single-serve side is not piercing pods
If the K-Cup pod is not being pierced, the upper or lower needle may be clogged or misaligned. This is very common in Keurig K-Duo Plus coffee maker troubleshooting because tiny coffee particles can block the needle opening. Sometimes the pod holder also does not sit correctly.
Try this:
- Turn off and unplug the machine
- Remove the pod holder carefully
- Rinse the holder under warm water
- Clear visible debris from the needles
- Use a paper clip only if the manual allows it and you do it gently
- Reassemble the parts and test with a fresh pod
Do not force the lid shut if the pod is stuck or misaligned. That can damage the mechanism. Gentle cleaning usually works better than brute force.
Carafe side brewing too slowly
Slow carafe brewing often means scale buildup, a clogged brew basket, or coffee grounds packed too tightly. Water should move through the system at a steady pace. If it drips instead of flows, something is blocking the path.
Helpful steps:
- Clean the brew basket and showerhead area
- Use medium grind coffee, not extra fine
- Avoid packing grounds too tightly
- Descale the machine
- Make sure the carafe lid is not blocking flow
- Check for residue around the warming or flow area
A slow brew is usually a warning sign, not just an annoyance. If you fix it early, you can often avoid bigger problems later.
Descale light will not turn off
The descale light is there for a reason. It usually means mineral deposits have built up inside the brewer. If the light stays on after cleaning, the descale process may not have been completed fully, or the machine may need a second cycle.
What works best:
- Run the full descale cycle as directed
- Use only the recommended descaling solution or a safe equivalent
- Rinse the machine with fresh water after descaling
- Repeat if the light stays on
- Reset only if the model instructions support it
This is one of the most important parts of Keurig K-Duo Plus coffee maker troubleshooting because scale affects taste, speed, and reliability. If you live in an area with hard water, you may need to descale more often.
How to clean and descale the Keurig K-Duo Plus
Regular cleaning keeps the brewer working like it should. I tell people to treat it like a reusable water bottle: if you use it every day, you need to wash it often. Descaling is different from basic cleaning because it removes mineral buildup inside the system.
Follow this simple routine:
- Unplug the machine and let it cool
- Remove the reservoir, lid, and removable brew parts
- Wash removable parts in warm, soapy water
- Wipe the exterior with a damp cloth
- Run the descale process using the machine’s instructions
- Flush with plain water when the cycle is done
For best results:
- Clean the drip tray weekly
- Rinse the carafe after each use
- Empty old water from the reservoir daily
- Descale every 3 to 6 months, or more often if water is hard
Good maintenance is the easiest form of Keurig K-Duo Plus coffee maker troubleshooting because it prevents many problems before they start.
Resetting the Keurig K-Duo Plus
Sometimes a simple reset helps clear minor glitches. This can be useful when the display acts oddly, the machine stops mid-cycle, or buttons seem unresponsive. A reset does not fix every problem, but it is worth trying before deeper troubleshooting.
Try this:
- Turn the brewer off
- Unplug it for at least 2 minutes
- Remove and refill the reservoir
- Re-seat all removable parts
- Plug it back in and test a normal brew
If the issue returns right away, focus on flow, cleaning, or setup instead of repeating the same reset. A reset is a restart, not a cure-all.
Preventing future problems
The best Keurig K-Duo Plus coffee maker troubleshooting is the kind you never need because the machine stays in good shape. Small habits make a big difference here. A brewer that is cleaned and descaled on schedule will usually run better, taste better, and last longer.
Good habits to keep:
- Use filtered water when possible
- Empty leftover water from the reservoir
- Clean needles, basket, and carafe parts often
- Use the right grind size for the carafe side
- Avoid overfilling the basket or reservoir
- Descale before buildup becomes heavy
I have learned that coffee makers are a bit like shoes. If you keep them clean and use them correctly, they hold up much longer. If you ignore small signs, the problems stack up fast.
When to contact support or replace the brewer
Not every issue can be fixed at home. If the brewer has electrical problems, repeated leaks, cracked parts, or a dead display after checking the outlet and cord, professional help may be the next step. That is especially true if the machine is still under warranty.
Consider support or replacement when:
- The power will not stay on
- Water leaks from internal areas
- The display stays blank after reset attempts
- The machine makes loud grinding or clicking sounds
- Cleaning and descaling no longer help
Be honest about the age and condition of the brewer. Sometimes repair is worth it, but sometimes replacement is the smarter choice. Trustworthy Keurig K-Duo Plus coffee maker troubleshooting includes knowing when to stop troubleshooting.
Frequently Asked Questions of Keurig K-Duo Plus Coffee Maker troubleshooting
Why is my Keurig K-Duo Plus not brewing coffee?
This usually happens because of a clog, low water, or a lid or pod issue. Start by checking the reservoir, then clean the needles and run a water-only test.
How often should I descale my Keurig K-Duo Plus?
A good rule is every 3 to 6 months, but hard water may require more frequent descaling. If the descale light stays on, repeat the process and flush with fresh water.
Why does my coffee taste weak from the Keurig K-Duo Plus?
Weak coffee often means the brew size is too large, the pod is old, or the machine needs cleaning. Scale buildup can also make extraction less effective.
Can I use vinegar to descale the Keurig K-Duo Plus?
Some people do, but the manufacturer typically recommends a descaling solution made for coffee makers. A proper descaler is usually safer and more consistent for long-term care.
Why is water leaking under my Keurig K-Duo Plus?
Leaks often come from a reservoir that is not seated right, an overfilled basket, or a damaged seal. Check the removable parts first, since many leaks are caused by simple alignment issues.
What should I do if the display is frozen?
Unplug the brewer for a few minutes, then plug it back in and try again. If the display still does not respond, the unit may need service.
Conclusion
Keurig K-Duo Plus coffee maker troubleshooting is usually about checking the simple things first: water flow, cleaning, descaling, alignment, and power. Most problems do not appear out of nowhere. They build up slowly from everyday use, which means many of them can be fixed with a calm step-by-step approach.
If your brewer is acting up, start with the basics, clean the parts that matter most, and pay attention to the signs the machine is giving you. That small bit of care can save time, money, and a lot of frustration. If this guide helped, save it for later, try the steps on your machine, and leave a comment with the issue you are seeing.

