Most sprinkler valve problems are fixable with basic checks and affordable parts.
I have spent years repairing and tuning irrigation systems for homes and small businesses. This guide on Sprinkler Valve Troubleshooting walks you through how valves work, common symptoms, step-by-step fixes, and when to call a pro. Read on for clear, hands‑on advice you can use today.
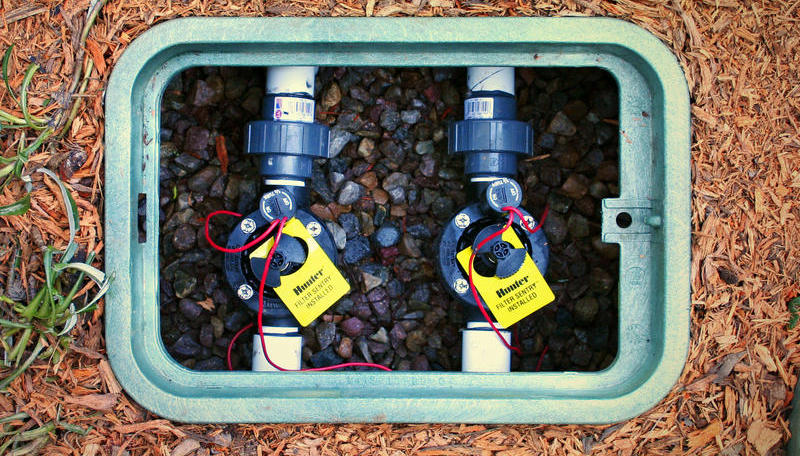
How sprinkler valves work and why they fail
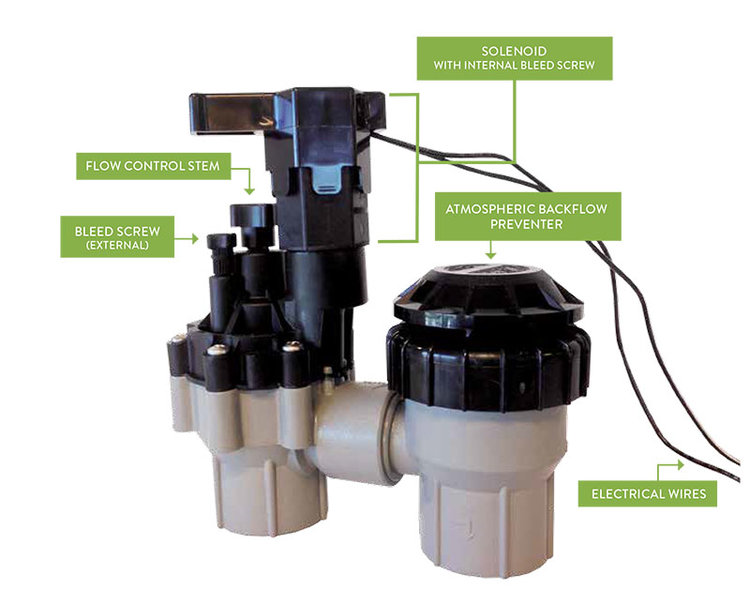
A sprinkler valve controls water flow to each zone. It opens and closes using a diaphragm and either a solenoid (electric) or a manual screw. Valves fail from dirt, worn diaphragms, electrical issues, or water pressure problems.
Understanding valve basics helps with Sprinkler Valve Troubleshooting. I’ll show how parts interact and where faults hide. This makes fixes faster and avoids wasted parts.

Common symptoms that point to valve problems
There are clear signs a valve needs attention. Watch for zones that won’t turn on, zones that won’t shut off, weak spray, or a valve that clicks but does nothing. A slow leak at the valve or soggy ground near the box is also a clue.
Each symptom narrows down the Sprinkler Valve Troubleshooting path. Note what you see before you take tools to the system. That saves time and keeps repairs simple.
Tools and parts you’ll need
Gathering the right tools speeds up Sprinkler Valve Troubleshooting. Typical items include:
- A multimeter to test solenoid coils and voltage.
- A screwdriver set for solenoid screws and manual screws.
- Pliers and channel locks for fittings and clamps.
- A replacement diaphragm and solenoid for common repairs.
- Teflon tape and PVC primer/cement for pipe seals.
Having parts on hand reduces downtime. I keep a small kit in the truck for quick fixes.

Step-by-step sprinkler valve troubleshooting guide
Follow a clear sequence. This keeps work safe and efficient.
- Visual check
- Inspect the valve box for standing water, broken parts, or debris.
- Look for cracked housings or washouts that could affect seals.
- Manual open test
- Turn the solenoid screw counterclockwise one full turn to force open the valve.
- If the zone runs, the valve body is likely fine and the problem is electrical.
- Electrical test
- Use a multimeter to check voltage at the solenoid during a controller call. You should see roughly 24 VAC.
- Measure coil resistance; typical values range from 20–60 ohms. Infinite or zero ohms means a bad solenoid.
- Pressure and flow check
- Measure water pressure at the main and at the valve. Low supply pressure causes poor spray.
- Check for clogged filters or emitter problems downstream.
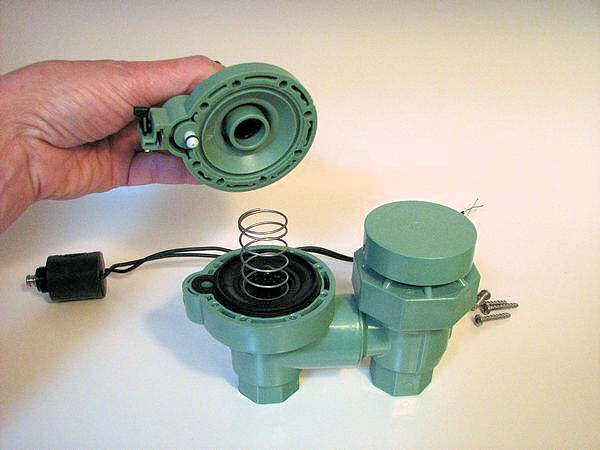
- Diaphragm and internal parts
- Turn off water and relieve pressure before disassembly.
- Inspect diaphragm for rips, mineral buildup, or deformation. Replace if damaged.
- Reassemble and test
- Clean all parts and replace seals. Reinstall and test multiple cycles.
- Monitor for leaks and correct operation over a few days.
These steps are the backbone of effective Sprinkler Valve Troubleshooting. Move from simple tests to complex fixes to avoid needless work.
Common valve issues and exact fixes
Here are typical problems and what to do.
- Valve won’t open
- Cause: No power, bad solenoid, or stuck diaphragm.
- Fix: Check controller settings, test voltage, replace solenoid, manually open to test diaphragm.
- Valve won’t close
- Cause: Debris under diaphragm, damaged diaphragm, or broken return spring.
- Fix: Clean internals, replace diaphragm, inspect pilot tube and ports.
- Valve cycles rapidly (short cycles)
- Cause: Low incoming pressure or a broken diaphragm pilot port.
- Fix: Adjust pressure, replace diaphragm, check for leaks.
- Continuous leak at valve
- Cause: Cracked body, worn seals, or broken internal parts.
- Fix: Replace seals or valve body if cracked. Use correct vendor parts.
- Weak spray or poor coverage
- Cause: Partially closed valve seat, clogged filters, low water supply.
- Fix: Clean filters and strainers, inspect supply line, check for closed shutoff.
I once replaced a diaphragm that cost $8 and fixed a zone that had run continuously for weeks. Small parts often solve big problems.

Electrical vs. hydraulic (wet) valve troubleshooting
Electrical valves use a controller and solenoids. Hydraulic systems use water pressure and master valves.
- Electrical checks
- Verify controller programming and wiring. Look for corrosion on terminal screws.
- Confirm 24 VAC at the solenoid during a station call.
- Hydraulic checks
- Inspect master valve and pressure switches. Air trapped in lines or a faulty master valve can mimic valve failure.
Sprinkler Valve Troubleshooting must match your system type. I find homeowners often miss wiring faults that mimic mechanical failures.
Maintenance tips to prevent valve problems
Routine care reduces repairs and extends valve life.
- Inspect valve boxes monthly for debris and pests.
- Flush lines at season start to clear grit that damages diaphragms.
- Replace diaphragms and solenoids every 3–5 years as preventative maintenance.
- Winterize in cold climates by draining lines or using compressed air to blow out water.
- Keep spare parts: diaphragms, solenoids, screws, and Teflon tape.
A little care goes a long way. I keep a maintenance log for each property I service. It saves surprises.

When to replace a valve or call a professional
Some issues are DIY, others need a pro.
- Replace the valve if the body is cracked, corroded, or repeatedly fails after parts swaps.
- Call a pro when:
- The valve is buried in a large concrete area.
- The wiring uses uncommon voltages or runs long distances.
- You find multiple failing zones tied to the main supply.
Estimate replacement costs range based on valve type. A basic valve swap often costs modestly for parts and a bit more if a pro digs down to the pipe.
:max_bytes(150000):strip_icc()/irrigation-troubleshooting-bad-valve-symptoms-2718892-12-46c2b26359734052a39c371f11c801fb.jpg)
Safety and common mistakes to avoid
Safety keeps projects trouble-free.
- Always shut off the main water before opening a valve.
- Relieve pressure by running the zone briefly after shutoff.
- Avoid forcing parts; plastic threads strip easily.
- Don’t guess on wiring—label wires or take photos before disconnecting.
A common mistake is skipping the manual open test. That simple step tells you if the problem is electrical or mechanical.
Advanced diagnostics and troubleshooting tips
When simple fixes fail, try these methods.
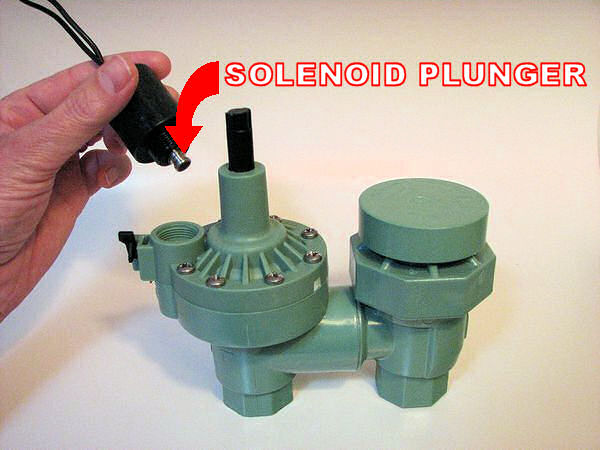
- Swap a known-good solenoid from another zone. That isolates coil vs. controller issues.
- Use a clamp-on ammeter to inspect current draw when the solenoid is energized.
- Check for inline check valves causing backpressure or sticky valves.
- Use a pressure gauge on both sides of the valve to find drops that indicate flow restrictions.
Advanced tests often reveal subtle faults. I used coil swapping to find a failing controller output once, saving a full valve replacement.
Frequently Asked Questions of Sprinkler Valve Troubleshooting
Why does my sprinkler zone click but not run?
A click usually means the controller is sending voltage but the solenoid or diaphragm is failing. Test voltage at the solenoid and try manually opening the valve to isolate the issue.
How do I test a sprinkler solenoid?
Use a multimeter to check for roughly 20–60 ohms resistance and 24 VAC during a run command. Replace the solenoid if resistance is open or shorted, or if no voltage is present.
Can debris cause a valve to stay open?
Yes. Small grit lodged under the diaphragm or in the pilot port can prevent the valve from sealing. Cleaning the valve internals often stops the leak.
How often should I replace valve diaphragms?
Replace diaphragms every 3–5 years or sooner if you notice tearing, stiffness, or poor sealing. Hard water and debris shorten diaphragm life.
Is a noisy valve a sign of failure?
Noise can indicate high flow, cavitation, or worn internals. Check pressure and inspect the diaphragm and seat. Persistent noise often precedes a leak.
Conclusion
Sprinkler Valve Troubleshooting is a skill you can learn with simple tools and systematic checks. Start with visual and manual tests, then move to electrical and internal inspections. Regular maintenance prevents most failures and keeps your system efficient.
Take action today: inspect your valves, prepare a small repair kit, and try the basic tests listed here. If you prefer, book a professional check to avoid bigger problems later. Leave a comment with your valve issue and I’ll share specific tips.