
Run the manufacturer descaling cycle with solution, rinse thoroughly, and clean needles afterward.
I’ve worked on and tested many Keurig brewers, including the Keurig Duo, so I know the common snags and fixes for Keurig Duo Descaling Troubleshooting. This guide walks you through why descaling matters, clear step‑by‑step fixes, tips I learned from real use, and ways to avoid repeat problems so your Duo brews reliably and tastes great.
Why descaling matters for your Keurig Duo Descaling Troubleshooting
Mineral build-up from hard water reduces flow and heats poorly. Keurig Duo Descaling Troubleshooting focuses on removing scale to restore brew strength and extend the machine’s life.
Regular descaling keeps sensors and heaters working. It also prevents off-tastes and slow brews, which are signs scale is present.

Common signs and causes of scale buildup
Scale forms over time and shows up in predictable ways. Keurig Duo Descaling Troubleshooting often starts by recognizing these signs.
- Slow brew or weak coffee. Scale blocks water flow and reduces extraction.
- Machine shows “descale” light or error messages. Alerts mean mineral deposits need removal.
- Strange noises or sputtering. Air pockets or clogged passages cause odd sounds.
- Water leaks or overflowing. Blocked exits or misaligned parts can cause spills.
- Bitter or metallic taste. Minerals and residue change coffee flavor.

Step-by-step Keurig Duo Descaling Troubleshooting guide
Follow this clear, safe routine when tackling Keurig Duo Descaling Troubleshooting. Use the manufacturer’s solution if possible. If you use vinegar, check your model manual first.
- Prepare
- Turn off and unplug the brewer.
- Remove K-cup, empty the brew basket, and remove the water filter if present.
- Fill the reservoir with the descaling solution mixed per instructions or a 1:1 mix of white vinegar and water if allowed.
- Start the descale cycle
- Place a large cup or container under the brew spout.
- Power on and run brew cycles using the largest cup size until the reservoir is nearly empty.
- Let the machine sit for 15–30 minutes to let the solution work on scale.
- Repeat and rinse
- Finish emptying and refill the reservoir with fresh water.
- Run several full cycles with clean water until no vinegar or solution smell remains.
- Replace the water filter and re-seat the reservoir.
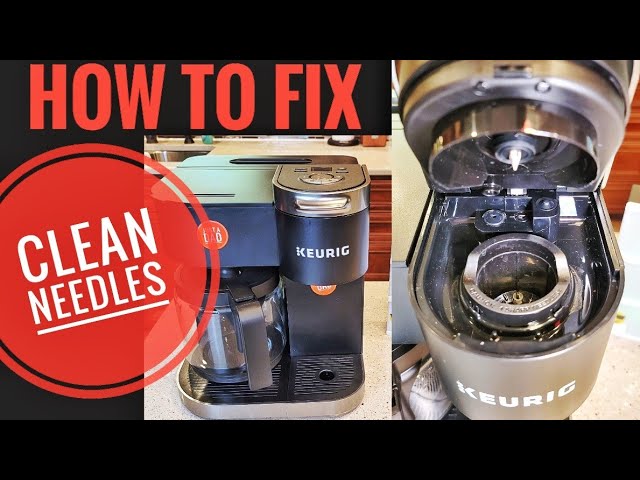
- Clean needles and parts
- Use a paper clip or needle tool to clear the entrance and exit needles.
- Remove and wash the drip tray and carafe parts in warm soapy water.
- Test brew
- Brew plain hot water once, then brew a coffee to confirm flow and taste are restored.
I once skipped the soak step and saw only partial improvement. Letting the solution sit was the real game changer for stubborn scale.

Deep cleaning: needles, reservoir, and carafe during descaling
Keurig Duo Descaling Troubleshooting often fails if the needles and reservoir remain dirty. Clean them as part of the process.
- Clean the entrance needle. Turn off the machine and use a straightened paper clip to remove grounds and mineral flakes.
- Clean the exit needle. Use a soft brush or the Keurig needle tool gently to avoid bending.
- Wash the reservoir and lid. Remove mineral film by soaking in warm soapy water for 5–10 minutes.
- Clean removable parts. The carafe base, pod holder, and drip tray can hide scale and residue.
From my experience, a small brush and patience beat brute force. Be gentle when cleaning needles to avoid damage.

When the descale light won’t reset or alerts persist
If you finished descaling yet the descale light stays on, follow these checks specific to Keurig Duo Descaling Troubleshooting.
- Confirm full descale process. Some models require two full solution cycles and a final power cycle to clear the alert.
- Power cycle the brewer. Unplug for 5 minutes, then plug back in and test; this often resets electronics.
- Check water sensor and filter. Replace an old filter and ensure the reservoir is seated flush.
- Re-run the descale step. Stubborn scale may need a second treatment.
- Call support if needed. Persistent errors may indicate a faulty sensor or heater.
I had a unit where repeated descale cycles and a filter change finally cleared the light. Persistence matters, but don’t force power or hardware.

Preventive maintenance and best practices to reduce descaling frequency
Good habits keep Keurig Duo Descaling Troubleshooting minimal. These steps save time and protect your brewer.
- Use filtered or softened water. This reduces mineral load and extends time between descales.
- Replace water filters as recommended. Filters trap minerals and slow scale.
- Empty and dry the reservoir if unused for long. Stagnant water invites buildup.
- Schedule descaling every 3–6 months. Frequency depends on water hardness and usage.
- Keep the area and parts clean. Wiping resin and removing grounds prevents clogs.
I switched to filtered water and cut descaling visits in half. Small changes give big results.

Common mistakes and how to avoid them during Keurig Duo Descaling Troubleshooting
Avoid pitfalls that make descaling less effective or cause damage.
- Mistake: Using too-strong vinegar. Strong acid can harm seals. Follow proper dilution or use the manufacturer solution.
- Mistake: Skipping rinse cycles. Residual solution affects taste and can harm internal parts.
- Mistake: Forcing needles or parts. Use gentle tools; metals can bend or puncture.
- Mistake: Ignoring the filter. A clogged filter can mimic scale symptoms; replace before descaling if dirty.
- Mistake: Not letting solution sit. Immediate rinses often leave stubborn deposits untouched.
Learning from these mistakes saved me multiple service calls. Take methodical steps and avoid shortcuts.
Troubleshooting quick checklist for common problems
Use this short checklist for fast Keurig Duo Descaling Troubleshooting before calling support.
- Is the reservoir seated and full of clean water? If no, refill and reseat.
- Has the descale cycle been run fully with recommended solution? If no, run it.
- Are needles clear of grounds and scale? If no, gently clean them.
- Have you rinsed with multiple fresh water cycles? If no, flush thoroughly.
- Is the machine still under warranty? If yes and issues persist, contact support.
A checklist saves time and proves you’ve done basic troubleshooting when speaking to technicians.
PAA-style questions (people also ask)
What is the best way to descale a Keurig Duo?
Run the full manufacturer-recommended descale cycle using Keurig descaling solution or an approved vinegar mix, let the solution sit, then flush with several full reservoirs of fresh water.
How often should I perform Keurig Duo Descaling Troubleshooting?
Every 3–6 months, depending on water hardness and frequency of use. Heavy use or hard water may require more frequent descaling.
Can I use white vinegar to descale the Keurig Duo?
Many users use a 1:1 white vinegar and water mix, but some newer models recommend the official descaling solution—check your manual before using vinegar.
Why does my Keurig Duo still show descale after cleaning?
Typically because a full descale cycle wasn’t completed, the machine needs a power reset, or scale remains in a part that needs manual cleaning.
Will descaling remove bad taste from coffee?
Yes; descaling removes mineral and residue buildup that often causes off-flavors, so your coffee should taste cleaner after a proper descaling.
Frequently Asked Questions of Keurig Duo Descaling Troubleshooting
How long does a full descale take on a Keurig Duo?
A full descale typically takes 30–60 minutes, including soak time and rinse cycles. Time varies by solution and how heavy the scale is.
Is Keurig descaling solution better than vinegar?
The Keurig solution is formulated for safe descaling and is often recommended by the manufacturer; vinegar works in many cases but may be less gentle on certain seals.
Can I run a descaling cycle without the water filter installed?
Yes, you can descale without the filter, but reinstall a fresh filter and rinse well after descaling for best water taste. Filters should be replaced if clogged or old.
Will descaling void my Keurig Duo warranty?
Using the manufacturer-recommended solution usually does not void the warranty. Using harsh chemicals not approved by Keurig could risk warranty coverage, so check warranty terms.
What if my Keurig Duo leaks after descaling?
Leaks can result from misaligned parts or damaged seals. Check that the reservoir, pod holder, and carafe are seated correctly and inspect seals for wear.
My descale light resets but the brew is still weak—what now?
Weak brews after descale often mean needles or passages still have residue. Clean the entrance and exit needles and run more rinse cycles to clear remaining deposits.
Conclusion
Keeping your Keurig Duo in top shape means regular Keurig Duo Descaling Troubleshooting, gentle cleaning, and small habit changes like using filtered water. Follow the step-by-step routine here, clean needles and filters, and repeat when needed to restore brew strength and flavor. Take action today: schedule your next descale, replace an old filter, or try a rinse cycle now—then share your experience or questions below.

