Building a poker table at home is an exciting project for anyone who loves card games. It’s not just about saving money, but also about creating a unique table that fits your space and style. Many people think it’s too difficult or expensive, but with the right plan, tools, and guidance, almost anyone can build a poker table in their own home. In this article, you’ll learn everything you need to know—from planning and materials to step-by-step instructions and common mistakes to avoid. If you’re ready for a fun DIY challenge, keep reading.
Why Build A Poker Table At Home?
A homemade poker table brings several benefits:
- Customization: You can choose the size, color, and features.
- Cost savings: Building is usually cheaper than buying a ready-made table.
- Quality control: You decide which materials to use.
- Social value: A custom table makes gatherings more memorable.
For example, a basic store-bought poker table can cost $300–$800, but a DIY table often costs less than $200, depending on your choices.
Planning Your Poker Table
Before starting, you need to decide a few key things:
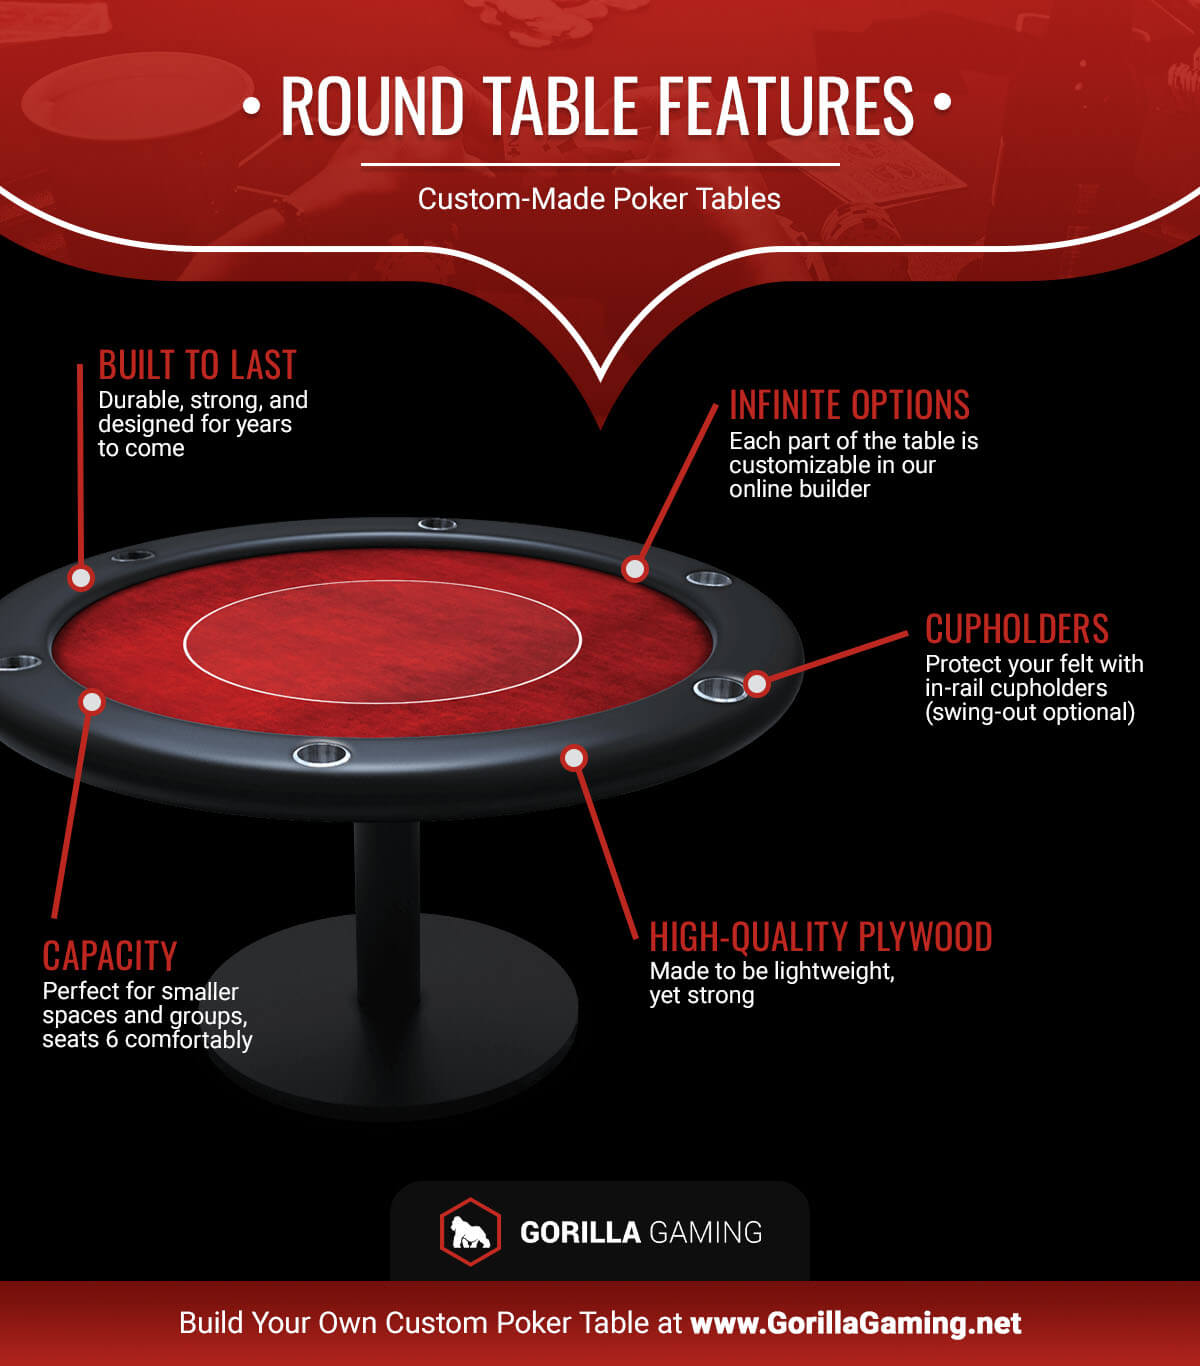
Size And Shape
Most poker tables are oval or round. Oval tables are popular for Texas Hold’em and home games because they seat more people.
Common sizes:
- Oval: 84 x 42 inches (seats 8–10)
- Round: 48–60 inches diameter (seats 6–8)
Measure your room to make sure the table fits comfortably, allowing space for chairs and movement.
Budget
A basic DIY table costs about $120–$200. Costs depend on materials and extras like cup holders or padded rails.
Design Features
Decide if you want:
- Cup holders
- Padded rail
- Custom felt color
- LED lighting
Adding features increases difficulty and cost, but also makes the table more special.
Materials And Tools Needed
You’ll need several materials and tools. Here’s a comparison of common options:
| Material | Purpose | Estimated Cost | Notes |
|---|---|---|---|
| Plywood (¾ inch) | Main table top | $35–$50 | Strong and stable |
| Foam (1 inch) | Padded playing surface | $20–$30 | Comfort for players |
| Felt (speed cloth) | Playing surface cover | $25–$40 | Resists spills and cards slide easily |
| Vinyl | Rail covering | $25–$35 | Durable and easy to clean |
| Wood (for rail) | Building padded rail | $15–$25 | Optional, adds comfort |
| Cup holders | Drinks safety | $3–$8 each | Optional |
Basic tools:
- Jigsaw or circular saw
- Power drill
- Staple gun
- Tape measure
- Sandpaper
- Screwdriver
Advanced tools (optional):
- Router
- Electric sander
Step-by-step Guide To Building A Poker Table
Follow these steps carefully for best results. This method works for most oval tables.
1. Cut The Plywood
Buy a ¾ inch thick sheet of plywood. Mark an oval (or circle) using a string and pencil. Cut the shape using a jigsaw. Sand the edges to remove splinters.
Tip: Use a template or print a guide to ensure symmetry.
2. Add The Foam Layer
Place the foam over the plywood. Trace and cut it to match the table shape. Attach the foam with spray adhesive. Make sure it’s smooth, with no bumps.
Beginners often use mattress foam, but poker table foam is firmer and lasts longer.
3. Attach The Playing Surface Felt
Lay the felt or speed cloth over the foam. Stretch it tightly. Use a staple gun to fix it underneath the plywood, starting at the center and working outward. This prevents wrinkles.
Speed cloth is more water-resistant than regular felt and helps cards slide smoothly. Many first-timers use cheap felt, but it wears out quickly.
4. Build The Padded Rail
Cut another oval ring from plywood, about 6 inches wide, to form the rail. Cover it with foam and vinyl. Staple vinyl underneath for a tight fit. Attach the rail to the table with screws or bolts.
If you want cup holders, mark their positions and drill holes before covering with vinyl.
5. Install Legs
Choose folding table legs, pedestal legs, or even repurpose old dining table legs. Bolt or screw them securely. Test stability before finishing.
| Leg Type | Cost | Stability | Best For |
|---|---|---|---|
| Folding legs | $40–$60 | Good | Portable tables |
| Pedestal legs | $60–$120 | Excellent | Permanent tables |
| DIY wood legs | $20–$40 | Fair | Budget builds |
6. Final Touches
Check for loose staples or screws. Clean the surface. Add extras like LED lights for style or custom embroidery for a professional look.

Practical Tips For Success
- Measure twice, cut once: Mistakes often happen from rushing.
- Stretch felt tightly: Wrinkles can ruin the playing experience.
- Use quality foam: Cheap foam tears and feels uncomfortable.
- Check leg stability: Wobbly tables spoil games.
- Protect from spills: Speed cloth resists water better than felt.
Many beginners forget about the height. The standard poker table height is about 30 inches. Too low or too high will make playing uncomfortable.
Common Mistakes To Avoid
- Using thin plywood: It bends or breaks under weight.
- Skipping foam: Leads to a hard, uncomfortable surface.
- Not anchoring legs properly: The table may tip during games.
- Choosing regular felt instead of speed cloth: Cards don’t slide and stains appear quickly.
- Forgetting cup holders: Drinks can spill and ruin the felt.
Should You Build Or Buy?
Building a poker table is great for DIY lovers, but buying is easier if you lack time or tools. Here’s a quick comparison:
| Factor | Build | Buy |
|---|---|---|
| Cost | $120–$200 | $300–$800 |
| Customization | High | Low |
| Time | 6–8 hours | Instant |
| Skill Needed | Moderate | None |
| Quality | Varies | Consistent |
If you enjoy hands-on projects and want a unique table, building is the best choice. If you prefer convenience, buying might be better.
Safety And Legal Considerations
Building a poker table is safe if you follow basic guidelines:
- Wear safety goggles when cutting wood.
- Keep tools away from children.
- Work in a well-ventilated area.
Playing poker at home for fun is legal in most places. However, hosting games for money can have legal limits. Check local laws if you plan to run regular games or tournaments.
For more on poker legality, visit Wikipedia: Legality of Poker.
Maintenance And Longevity
A well-built poker table lasts 5–10 years, sometimes longer. To keep yours in good shape:
- Clean the felt regularly with a soft brush.
- Avoid food and drinks on the playing surface.
- Tighten screws and bolts every few months.
- Store in a dry place to prevent warping.
Speed cloth is easier to clean than regular felt. Vinyl rails can be wiped with a damp cloth. Some people use a poker table cover to protect from dust.
Frequently Asked Questions
How Much Does It Cost To Build A Poker Table At Home?
Most DIY poker tables cost $120–$200. This includes plywood, foam, felt, and legs. Adding extras like cup holders or LED lights increases the cost.
What Size Poker Table Should I Build?
For home games, an oval table around 84 x 42 inches seats 8–10 people. A round table (48–60 inches diameter) is good for 6–8. Always measure your room before deciding.
Is It Difficult To Build A Poker Table?
Building a poker table is moderately difficult. You need basic tools and DIY skills. With careful planning and step-by-step instructions, most people can finish in a weekend.
What Is The Best Material For The Playing Surface?
Speed cloth is best. It’s water-resistant, durable, and cards slide easily. Regular felt is cheaper but stains and wears out faster.
Can I Add Cup Holders Or Led Lights?
Yes, you can add cup holders by drilling holes in the rail. LED lights can be attached under the rail for style. Both features require extra work but make the table more fun.
Building a poker table at home is a rewarding project. It saves money, lets you customize, and makes poker nights more enjoyable. With the right materials and careful steps, you’ll have a table that lasts for years. Whether you’re a card game beginner or a regular host, a homemade table brings your friends together and adds excitement to every game.