
Cleaning a fish is a skill that connects you to nature and your food in a unique way. Whether you fish for sport, food, or as a hobby, learning how to clean a fish is both practical and rewarding. Many people find the process intimidating at first, but with the right steps and a bit of practice, it becomes a simple routine.
Clean fish taste fresher, cook better, and are safer to eat. This guide is designed to make the process easy, clear, and safe—even if you’ve never held a fish knife before. By the end, you’ll have the confidence to clean almost any fish you catch or buy.
Why Clean Your Own Fish?
Cleaning fish yourself gives you control over quality and freshness. A fish starts to lose its flavor and texture soon after it dies. Cleaning it quickly preserves the taste and nutrients. It also lets you remove bones and scales more carefully than most commercial processors do. For people who fish for sport or food, cleaning your own catch is also a way to respect the animal and avoid waste.
Commercially cleaned fish can sometimes hide spoiled spots or miss parts that should be removed for health reasons. By cleaning your own fish, you can spot issues like parasites, bruises, or bad smells that signal the fish isn’t fresh. This helps you avoid food poisoning and ensures your meals are safe.
What You Need: Tools And Preparation
Before you start, gather everything you need. The right tools make the job safer and more efficient. Here’s a quick list:
- Cutting board: Non-slip, large enough for the fish.
- Fillet knife: Flexible, sharp, and about 6–9 inches long.
- Scaling tool or spoon: For removing scales.
- Kitchen gloves: Optional, but help with grip and hygiene.
- Fish scaler or pliers: For skinning certain species.
- Clean water: For rinsing.
- Trash bag or bucket: For waste.
- Paper towels: For drying the fish and cleaning up.
- Tweezers or pliers: To remove small bones.
Choose a well-lit place. Outdoor cleaning is common, especially near water, but a kitchen sink works if it’s large enough. Always sanitize your area before and after cleaning to prevent bacteria from spreading.
Step-by-step: How To Clean A Fish
Cleaning a fish can be broken into clear stages. Each fish species is a little different, but these steps work for most freshwater and saltwater fish.
1. Humanely Kill The Fish
If your fish is still alive, act quickly and humanely. A sharp blow to the head with a club or the back of a heavy knife is effective. Some people use a method called “ikejime” (a spike through the brain), which is considered the most humane and preserves flavor.
Always check local regulations about humane dispatch.
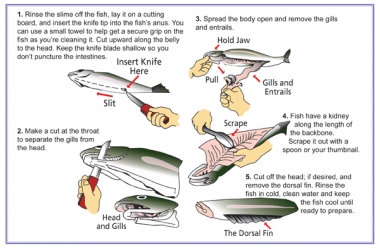
2. Rinse The Fish
Rinse the fish under cold running water. This removes slime, mud, and loose scales. Cold water helps keep the fish fresh and firms up the flesh, making it easier to handle.
3. Scaling The Fish
Lay the fish flat on the cutting board. Hold the tail firmly. With a scaler or the back of a spoon, scrape from the tail towards the head. Use short, firm strokes. Be sure to remove all scales, especially near the fins and belly.
Some fish, like catfish, don’t have scales and can be skinned instead.
Pro tip: Scaling can be messy. To reduce flying scales, keep the fish slightly wet and do this under a bit of running water or inside a large plastic bag.
4. Remove The Fins (optional)
Some people prefer to remove the dorsal (top), anal, and pelvic fins. Use kitchen scissors or your knife. This makes filleting easier and keeps small bones out of your food.
5. Gutting The Fish
With the fish on its side, insert the knife tip into the vent (the small hole near the tail) and cut up to the base of the gills. Keep the blade shallow to avoid cutting organs and making a mess.
Pull the cavity open and gently remove all the innards. Use your fingers or a spoon. Check for the dark kidney along the backbone and scrape it out. Rinse the cavity well with cold water.
Non-obvious tip: Some people miss the bloodline or kidney (a dark, soft line along the backbone). Leaving it in can cause a bitter taste and spoilage. Always scrape it out completely.
6. Remove The Head (optional)
For whole-cooked dishes, you might want to leave the head on. If you prefer to remove it, cut just behind the gills in a downward motion. This is easier with a sharp, sturdy knife. Some species (like trout) are often cooked with the head for flavor.
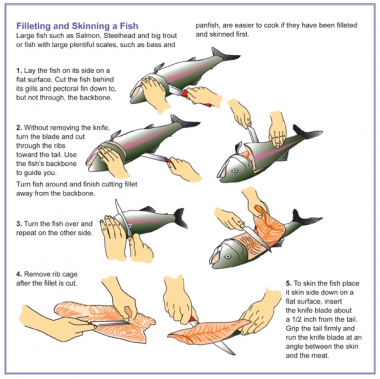
7. Filleting The Fish (if Desired)
Filleting lets you remove the bones and get clean pieces of fish. Here’s how:
- Lay the fish flat. Cut behind the gills down to the backbone.
- Turn the knife flat and slide it along the backbone toward the tail, keeping the blade as close as possible to the bones.
- Lift the fillet as you cut, separating it from the bones in one smooth motion.
- Flip the fish and repeat on the other side.
Extra insight: Beginners often waste good meat by cutting too far from the bones or leaving flesh attached to the skin. Practice helps, but always keep your knife against the bone for the most yield.
8. Skinning The Fillet (if Needed)
Some fish taste better with the skin on, but others (like catfish) are best skinned. To skin:
- Lay the fillet skin-side down.
- Hold the tail end and slide your knife between the flesh and the skin, angling slightly downward.
- Work the knife forward, pulling the skin back as you go.
9. Remove Pin Bones
Feel along the fillet for small, hard pin bones. Use tweezers or pliers to pull them out. These can be sharp and unpleasant if left in the cooked fish.
10. Rinse And Dry
Give your fillets or whole fish a quick rinse in cold water. Pat dry with paper towels. Too much water can make the flesh mushy, so dry gently and thoroughly.
Cleaning Different Types Of Fish
Different fish require slight changes in technique. Here’s a simple comparison of how to clean a few popular species:
| Fish Type | Scaling Needed | Filleting Difficulty | Notes |
|---|---|---|---|
| Trout | Yes | Easy | Often cooked whole |
| Catfish | No (Skin instead) | Moderate | Tough skin, use pliers |
| Bass | Yes | Moderate | Thick bones, sturdy knife |
| Salmon | Yes | Challenging | Large size, more pin bones |
| Panfish (Bluegill, Crappie) | Yes | Easy | Small, quick to clean |
Example: Catfish are usually skinned instead of scaled. Make a shallow cut behind the head, grab the skin with pliers, and pull it off in one piece.
Safety And Hygiene Tips
Handling raw fish requires care to avoid illness. Follow these simple but important rules:
- Wash your hands before and after handling fish.
- Use separate utensils and boards for fish and other foods.
- Clean all surfaces with hot, soapy water after use.
- Chill fish or fillets as soon as possible (below 40°F/4°C).
- Discard any fish with a strong ammonia smell or slimy texture.
Bacteria like Salmonella and Vibrio can grow quickly on raw fish. Keep everything clean and cold to reduce the risk.
Storing And Freezing Fish
Proper storage keeps your fish fresh and tasty. Here’s a quick comparison of different storage methods:
| Method | How Long Fish Lasts | Best For | Tips |
|---|---|---|---|
| Refrigerator (32-39°F) | 1–2 days | Immediate use | Keep fish on ice, drain water daily |
| Freezer (-0.4°F or below) | 2–6 months | Long-term storage | Wrap tightly to avoid freezer burn |
| Vacuum Sealing | 6–12 months | High-quality fillets | Remove all air for best results |
When freezing, use freezer bags or vacuum sealers. Label each package with the date and type of fish. Avoid freezing fish that has been stored in the refrigerator for more than two days.
Non-obvious tip: If you plan to freeze fish, do not rinse fillets right before freezing. Extra water can cause ice crystals that ruin the texture. Instead, pat them dry and wrap tightly.
Common Mistakes To Avoid
Even experienced fish cleaners make mistakes. Here are some to watch out for:
- Using a dull knife: This makes cutting harder and increases the risk of slipping.
- Not removing the bloodline/kidney: This can leave a bitter taste.
- Cutting too deep: Puncturing the intestines spreads bacteria and makes a mess.
- Leaving scales on: Scales can ruin the texture of cooked fish.
- Not chilling fish quickly: Warm fish spoils fast, especially in hot weather.
- Over-washing fillets: Too much water can make fillets mushy and wash away flavor.
- Ignoring pin bones: These can be a choking hazard.
Practical example: Many beginners try to rush. Take your time, especially with the first few fish. Careful, slow cuts save more meat and reduce waste.
Cleaning Fish For Different Cooking Styles
How you clean a fish depends on how you plan to cook it. Here’s how to prepare for the most popular methods:
Whole Roasting Or Grilling
For recipes that use whole fish, scale and gut the fish but keep the head and tail. Make diagonal slashes in the flesh to help seasoning penetrate. Remove the gills if possible, as they can taste bitter.
Pan-frying Or Deep-frying
Small fish like bluegill or perch can be scaled, gutted, and fried whole. For larger fish, fillets work best. Removing the skin helps prevent curling during cooking.
Steaming
Delicate fish like trout or snapper are often steamed whole. Clean as above, but leave the skin for flavor. Stuff the cavity with herbs or lemon for extra taste.
Sushi Or Sashimi
Raw fish for sushi must be extremely fresh and handled with care. Remove all bones and skin, and use a dedicated clean knife. Only use saltwater species, as freshwater fish can carry parasites. For home sushi, always freeze fish at -4°F/-20°C for at least 7 days to kill parasites, as recommended by the FDA (FDA guidance).
Environmental And Ethical Considerations
Cleaning your own fish also means thinking about the environment. Here are some responsible practices:
- Dispose of guts and waste properly. Never throw them into public water or trash bins where animals can get them. Bury them or follow local disposal laws.
- Use as much of the fish as possible. Heads and bones make excellent stock.
- Know the local fishing regulations. Only keep fish that are legal size and species, and respect catch limits.
- Consider catch-and-release for rare or threatened species.
Tools: What To Buy (and What Not To Waste Money On)
It’s easy to spend too much on fancy gear, but only a few tools are truly needed. Here’s a comparison to help you decide:
| Tool | Must-Have | Optional | Not Needed | Notes |
|---|---|---|---|---|
| Fillet Knife | ✔️ | Sharp, flexible blade is key | ||
| Fish Scaler | ✔️ | A spoon works for most fish | ||
| Pliers/Tweezers | ✔️ | Helpful for pin bones and skinning | ||
| Electric Fillet Knife | ✔️ | Speeds up large batches | ||
| Gloves | ✔️ | Improve grip and protect hands | ||
| Fish Cleaning Table | ✔️ | Great for outdoor cleaning | ||
| Bone Puller | ✔️ | Standard pliers do the job |
Tip: Start with the basics. Upgrade as you clean more fish or catch larger species.
Frequently Asked Questions
How Do I Know If A Fish Is Fresh Before Cleaning?
Look for clear eyes, bright red gills, and firm flesh. A fresh fish smells clean, not fishy or sour. Press the body gently—the flesh should bounce back, not leave an indentation.
Do I Need To Remove The Skin From Every Fish?
No. Some fish taste better with skin on, especially when grilling or roasting. But for frying or recipes where texture matters, skinning can improve flavor and appearance.
What’s The Easiest Fish For Beginners To Clean?
Panfish like bluegill or crappie are small and simple to clean. They have thin bones and soft flesh, making them ideal for practice.
Can I Use The Fish Heads And Bones For Anything?
Yes. Heads, bones, and even fins are great for making fish stock, which adds rich flavor to soups and sauces. Just simmer with vegetables and herbs, then strain.
How Do I Dispose Of Fish Waste Safely?
Follow local rules. In many places, you can bury fish guts away from water sources or use special disposal bins. Never throw waste in lakes, rivers, or public trash cans where it can attract pests.
Cleaning a fish is a skill that gets easier every time you try. With good tools, a steady hand, and a respect for the animal, you’ll soon be preparing fresh, delicious fish at home. The process might feel slow at first, but the reward is worth it—better flavor, safer meals, and a deeper connection to your food.

