Are you frustrated with that annoying dead spot on your air hockey table? You’ve invited friends over for a game night, and suddenly, the puck just stops dead in its tracks.
It’s a momentum killer, isn’t it? But don’t worry, you’re not alone. Many air hockey enthusiasts face this common problem. The good news is, fixing it is easier than you might think. In this guide, we’ll walk you through simple steps to breathe new life into your air hockey table.
Get ready to bring back the fast-paced fun and excitement to your games. Stay with us, because by the end, you’ll have the solution you need to make your table as good as new!
Identify The Dead Spot
Discovering a dead spot on an air hockey table can disrupt gameplay. First, clean the surface thoroughly to remove dust and debris. Next, check and fix any blockages in the air holes using a small pin or needle. Regular maintenance ensures a smooth, enjoyable game.
Identifying a dead spot on an air hockey table can make the difference between a thrilling game and a frustrating experience. Dead spots disrupt the flow of the puck, turning an exciting match into a series of awkward pauses. But how do you pinpoint these elusive culprits? Knowing what to look for is the first step to restoring your table to its former glory.Signs Of A Dead Spot
Dead spots are areas where the puck slows down or stops abruptly. You might notice the puck losing speed unexpectedly or veering off course when it hits a particular spot. If you’ve ever found yourself grumbling about a game that seems off, it might be due to these pesky spots. Listen carefully as you play. A sudden silence or a low thud can indicate a dead spot. Pay attention to the puck’s behavior—does it stop gliding smoothly? These are tell-tale signs that need your attention.Tools For Testing
Testing for dead spots doesn’t require high-tech gadgets. A straight edge, like a ruler, helps check the table’s surface for uneven areas. Simply slide the ruler across the table; any tilt or gap indicates a potential problem area. A lightweight puck is another useful tool. Glide it gently across the table and watch its movement. If it stops or changes direction suddenly, note that area for further inspection. By identifying the dead spots, you can take steps to fix them, ensuring your air hockey table is always ready for action. Have you ever found a surprising solution to an unexpected problem? Share your story in the comments!
Clean The Surface
Clean the air hockey table surface regularly to fix dead spots. Dust and debris often block air holes, affecting puck movement. Use a soft cloth and mild cleaner for best results.
Air hockey is a thrilling game that brings excitement and friendly competition. But a dead spot on your table can quickly ruin the fun. One of the first steps to reviving the action is to clean the surface. A clean table ensures consistent puck movement and a seamless gaming experience. Let’s roll up our sleeves and get your table back to its prime condition.Materials Needed
Cleaning your air hockey table doesn’t require a trip to the store. You probably have all the materials needed at home. – Microfiber cloths: These are perfect for picking up dust without scratching the surface. – Mild detergent: A gentle cleaner that won’t harm the table’s surface. – Warm water: Essential for creating a cleaning solution. – Soft brush: Useful for reaching into the air holes. – Vacuum with a hose attachment: Helps to remove debris from small crevices.Step-by-step Cleaning Process
1. Prepare the Cleaning Solution Start by mixing a small amount of mild detergent with warm water. Use just enough detergent to create a gentle solution. 2. Dust Off the Table Surface Take a dry microfiber cloth and wipe the table surface. This initial step removes any loose dust and debris. 3. Wipe with the Cleaning Solution Dip another cloth into the cleaning solution and wring it out well. Wipe the surface in a circular motion to avoid streaks. 4. Focus on Air Holes Use a soft brush to gently clean the air holes. This step is crucial to ensure the air flows freely during play. 5. Vacuum the Crevices Attach the hose to your vacuum and clean around the table edges. This removes any dust trapped in the corners. 6. Dry the Surface Thoroughly With a dry microfiber cloth, wipe down the surface to remove any moisture. Ensure no water seeps into the table, which could damage the surface. 7. Test the Surface Place the puck on the table and give it a gentle push. Notice how it glides smoothly, bringing life back to your game. Have you ever thought about how regular cleaning can preserve your table and enhance your game? Ensuring your air hockey table is in top condition not only boosts your game but also adds years to the table’s life. So, next time you notice a dead spot, remember that a simple cleaning could be the key to a perfect game.Check The Air Flow
Air hockey tables rely on consistent air flow for smooth gameplay. Dead spots can ruin the fun. Checking the air flow is crucial to fixing these issues. Ensuring proper air circulation helps maintain the table’s performance.
Inspecting The Fan
The fan is the heart of the air hockey table. Inspect it closely. Make sure it is running smoothly and not making unusual noises. If the fan is faulty, it may need replacement. Check the power connection. Ensure the fan receives adequate power.
Clearing Blockages
Blockages can disrupt air flow. Dust and debris may accumulate over time. Check the air holes on the table surface. Use a vacuum or a soft brush to clean these holes. Ensure all holes are free from obstructions. This will improve air circulation and fix dead spots.
Repair The Fan Motor
Repairing the fan motor on your air hockey table can breathe new life into your game nights. A faulty motor can lead to frustrating dead spots, ruining the fun and competitive spirit. Fixing it is not only rewarding but also ensures every puck slide is smooth and exhilarating. Let’s dive into how you can diagnose and repair the motor effectively.
Diagnosing Motor Issues
First things first, you need to pinpoint the problem. Is your table’s airflow weak or nonexistent? Listen for any unusual noises coming from the motor. A whirring or grinding sound is often a sign of trouble. Dust or debris could be clogging the motor. Be sure to examine the fan blades and the motor housing for buildup.
If the motor doesn’t start at all, check the power connection. Ensure all cables are securely plugged in and the outlet is functioning. Sometimes, a simple reset can work wonders. Turn off the table for a few minutes and then power it back up.
Replacing Or Repairing The Motor
If the motor is beyond repair, replacing it might be your best option. Search for a compatible replacement online or at a local electronics store. Make sure to match the specifications with your current motor to avoid mismatches.
Feeling adventurous? Consider repairing it yourself if you’re handy with tools. Open the motor housing carefully and inspect for any damaged parts. Look for frayed wires or burnt components. If you find any, replacing these small parts could save you from buying a whole new motor.
Remember, safety is key. Disconnect power before attempting any repairs. Would you rather call a professional? That’s perfectly fine too. Sometimes, a skilled hand is all you need to revive your beloved air hockey table.
Have you ever tried fixing a fan motor? What challenges did you face? Share your experiences, and let’s get your air hockey table back in action!
Seal Air Leaks
Identify dead spots on your air hockey table by observing puck movement. Seal air leaks using tape or glue. Ensuring proper airflow helps maintain consistent play and enjoyment.
Is your air hockey table not delivering the thrill it once did? Dead spots can ruin the game, leaving you frustrated as the puck slows down unexpectedly. Often, these dead spots are due to air leaks. Sealing these leaks can revitalize your table, returning it to its former glory. Let’s dive into how you can effectively seal air leaks and bring back the excitement to your games.Common Leak Locations
Air leaks on an air hockey table can often be sneaky. The first step is identifying where these leaks are occurring. Common locations include the seams where the table pieces join together. These areas can shift slightly over time, creating gaps. Another typical spot is around the blower motor. If the motor isn’t tightly secured, air can escape, reducing the pressure on the table surface. Lastly, check the air holes on the playing surface. Clogged or damaged holes can affect air distribution, creating dead spots.Methods To Seal Leaks
Once you’ve identified the leaks, it’s time to seal them. A simple yet effective method is using silicone caulk. Apply a thin layer along the seams and let it dry. This creates a flexible seal that can withstand the vibrations of intense games. For leaks around the blower motor, tighten any loose screws or bolts. If the issue persists, consider using rubber gaskets to create a tighter seal. They are inexpensive and can make a big difference. If you find blocked air holes, gently clear them with a toothpick or a small wire. This ensures that air flows evenly across the table, eliminating dead spots. Have you ever fixed a dead spot and noticed immediate improvement in your game? Addressing these leaks not only enhances performance but also extends the life of your air hockey table. Why not give it a try and see the difference it makes in your gaming experience?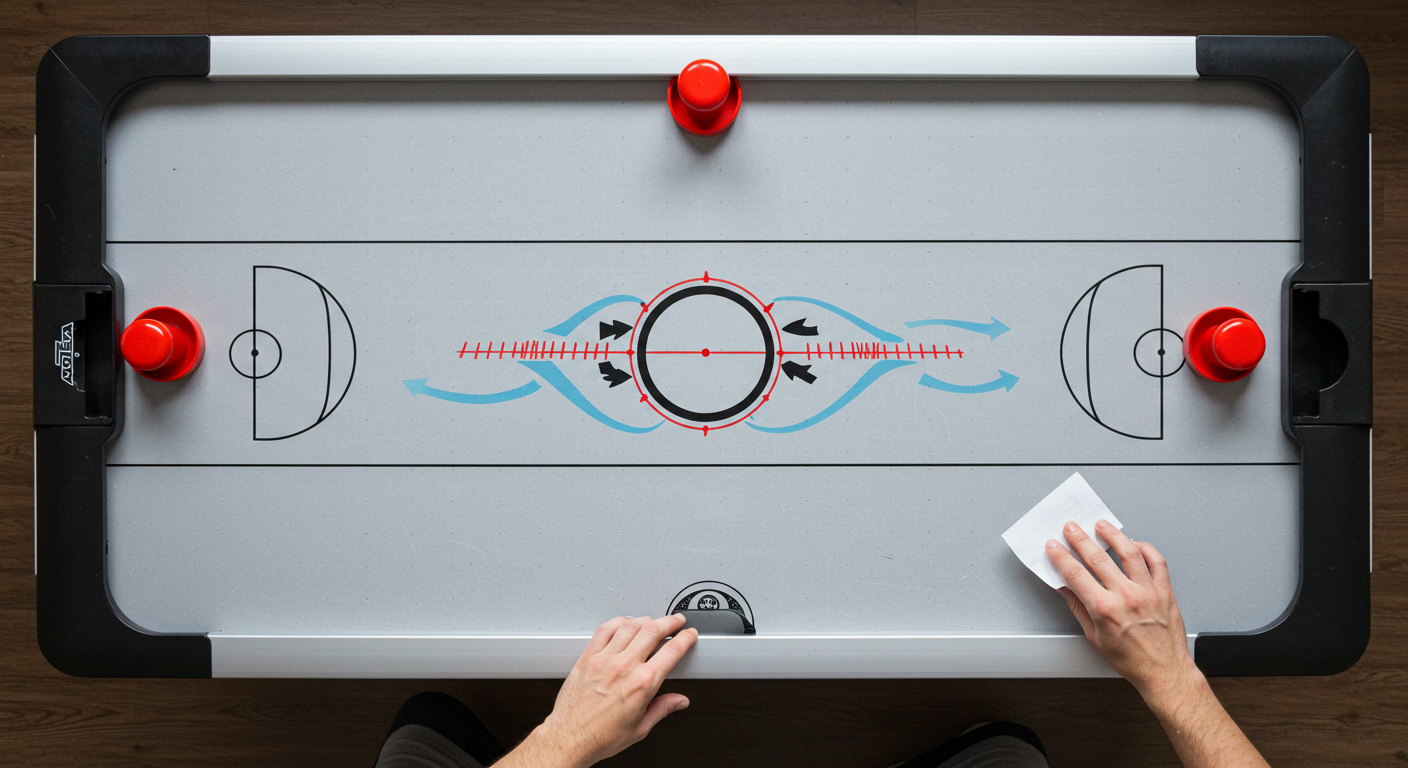
Level The Table
Fixing a dead spot on an air hockey table requires ensuring the surface is level. Adjust the table’s legs to distribute airflow evenly. Regular maintenance can help prevent uneven play and enhance game enjoyment.
Air hockey is a thrilling game that can quickly turn frustrating if your table has dead spots. These areas where the puck stubbornly refuses to glide smoothly can dampen your enthusiasm. Often, the culprit is an uneven table surface. Leveling your air hockey table can transform your gameplay experience. Let’s dive into the practical steps you can take to ensure your table is perfectly balanced.Tools For Leveling
Before you start adjusting your air hockey table, gather the right tools to make the process smooth and efficient. A carpenter’s level is essential. It helps you identify any uneven spots on your table with precision. You might also need shims—small wedges used to level furniture. These are particularly useful if your floor isn’t perfectly flat. Finally, keep a measuring tape handy to check the height consistency across the table surface.Adjusting The Table
Start by using the carpenter’s level to check the table surface. Place it at various points to identify areas where the table might be tilted. If you notice discrepancies, consider adjusting the legs. Most air hockey tables come with adjustable leg levelers. Twist them to raise or lower each leg until the table is balanced. Think about how often you play and where your table is situated. If it’s on a carpeted surface, the weight might cause it to sink over time, impacting the level. Shims can be a quick fix. Slide them under the legs that need elevation. This simple trick can help maintain the table’s level without constant adjustments. Have you ever experienced a sudden improvement in your gameplay after leveling your table? It’s like night and day. You might find that previously tricky shots suddenly become effortless. The puck glides with ease, and you can enjoy the game without interruptions. Taking the time to level your air hockey table can enhance your game nights significantly. Are uneven surfaces causing dead spots in your gameplay? Address them by leveling your table, and watch your skills soar.Test The Repairs
Testing your repairs is crucial to ensure the air hockey table works well. After fixing a dead spot, it’s important to check if the table’s surface is even. This step guarantees a smooth gaming experience. Proper testing helps identify any missed issues that need further attention.
Ensuring Even Air Distribution
Turn on the table and observe the airflow. Check if the air is evenly spread across the surface. Use a light material like tissue paper to detect uneven air distribution. Place the tissue on various spots. Note any areas where the tissue doesn’t flutter. A consistent air flow is vital for smooth puck movement.
Playing To Confirm Fix
Invite a friend for a quick game. Start playing and focus on the repaired spot. Observe if the puck moves smoothly over it. Ensure no slowdowns or hesitations occur. This practical test confirms if the repairs were effective. Adjust if needed and test again for perfection. Enjoy your improved table!

Frequently Asked Questions
How To Fix Dead Spots On An Air Hockey Table?
Clean the air holes with a vacuum or a pin to clear blockages. Ensure the fan is working efficiently. Check for obstructions under the table. Regular maintenance prevents dead spots.
How To Fix A Dent In An Air Hockey Table?
Place a damp cloth over the dent and iron it gently to expand the material. Use wood filler if needed. Sand smooth, then apply paint to match the surface. Test airflow to ensure smooth play. Always follow manufacturer guidelines for repairs to avoid further damage.
How To Unclog Air Hockey Table Holes?
Use a vacuum cleaner to clear air hockey table holes. Gently vacuum each hole to remove dust and debris. For stubborn clogs, use a toothpick or compressed air to clean individual holes. Regular cleaning ensures smooth gameplay and maintains table performance.
Always unplug the table before starting the cleaning process.
How Do I Make My Air Hockey Table Slick Again?
Clean the surface with a soft cloth and mild cleaner. Apply silicone spray to reduce friction. Ensure air holes are clear. Regularly maintain for optimal performance.
Conclusion
Fixing a dead spot on an air hockey table isn’t difficult. Start by cleaning the table surface thoroughly. Check for any blockages in the air holes. Use a small pin to clear them. Ensure the fan is working properly. Replace or repair if needed.
Test the table after each step. This approach helps identify the issue. Regular maintenance can prevent future problems. Enjoy smoother, more exciting games. Keep your table in top shape. Happy playing!