
Every parent wants to keep their child safe on the road, but installing a car seat can feel overwhelming—even for experienced drivers. Each year, thousands of children are injured in car accidents, often because their car seats were not installed correctly. In fact, studies show that nearly 60% of car seats are used incorrectly. That’s why understanding exactly how to install a car seat is not just a good idea—it’s essential.
You don’t need to be a mechanic or have special tools. What you do need is clear guidance, patience, and a little practice. This article will walk you through everything you need to know, from choosing the right car seat to securing it in your car, checking your work, and fixing common mistakes.
You’ll also find practical tips, real-world examples, and advice most beginners miss. By the end, you’ll feel confident every time you buckle in your little one.
Understanding Car Seat Types
Before you start installation, it’s important to choose the right car seat type for your child’s age, weight, and height. Car seats are not one-size-fits-all. Using the wrong type can put your child at risk.
| Car Seat Type | Age Range | Weight Range | Direction |
|---|---|---|---|
| Rear-Facing Only (Infant) | Birth to 2 years | Up to 35 lbs | Rear-facing |
| Convertible | Birth to 4 years | Up to 65 lbs | Rear- or forward-facing |
| Forward-Facing with Harness | 2 to 7 years | Up to 65 lbs | Forward-facing |
| Booster Seat | 4 to 12 years | Up to 100 lbs | Forward-facing |
Key Factors To Consider
- Age and size: Always check the car seat’s label for limits.
- Vehicle compatibility: Not all car seats fit all vehicles.
- State laws: Laws vary. Check local requirements.
- Expiration date: Car seats expire (usually after 6–10 years).
Non-obvious insight: Many parents move children to the next seat too soon. Keeping your child in each stage as long as possible is safer.
Preparing For Installation
A successful installation starts with good preparation. Skipping these steps is a common mistake.
Read Both Manuals
Take time to read both your car seat manual and your vehicle manual. Each car and car seat is different, and the manuals explain exactly where and how to install.
Choose The Safest Location
The safest place is usually the back seat, middle position. This spot is furthest from possible impact zones. However, not every car allows safe installation in the middle. Use a side position if the middle has no seat belt or LATCH anchors.
Gather What You Need
You’ll need:
- The car seat and all its parts
- Car seat and vehicle manuals
- Your vehicle’s seat belts or LATCH system
- Towel or pool noodle (to adjust angle for rear-facing seats)
Expert tip: Don’t use extra padding, pillows, or add-ons unless approved by the car seat manufacturer.
Car Seat Installation Methods
Most car seats can be installed using either the seat belt or the LATCH (Lower Anchors and Tethers for Children) system. Both are equally safe if used correctly—but never use both at the same time unless the manufacturer says so.
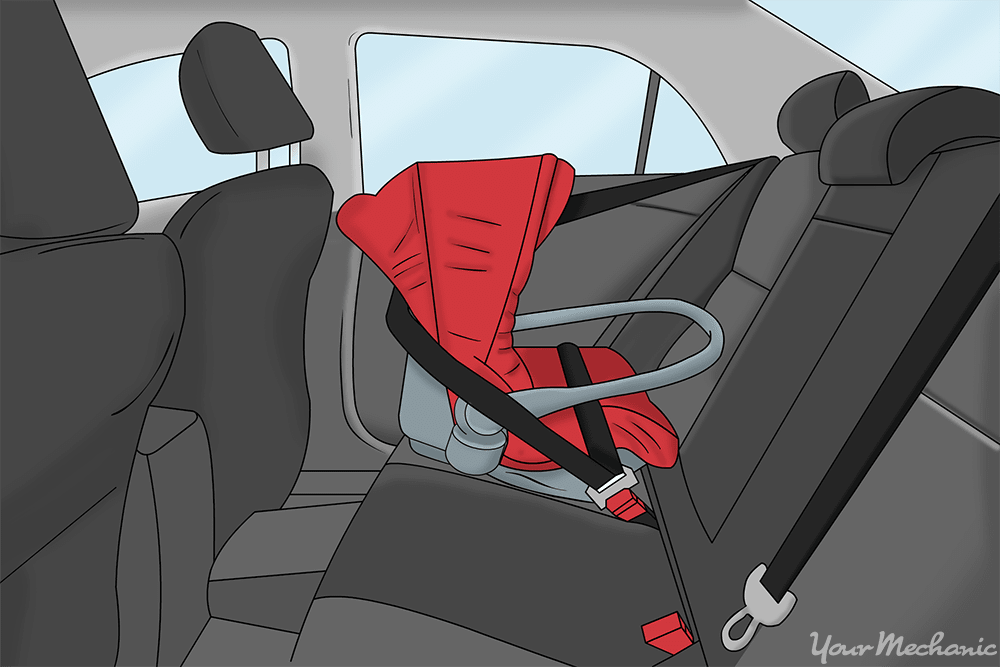
Using The Seat Belt
- Place the car seat in the correct position (rear- or forward-facing).
- Thread the seat belt through the path shown in your car seat’s instructions. Each seat has a specific path.
- Buckle the seat belt.
- Lock the seat belt. Most new cars have seat belts that lock by pulling the belt all the way out, then letting it retract. Check your car’s manual.
- Press down firmly on the car seat and tighten the belt until the seat does not move more than 1 inch side-to-side or front-to-back.
Using The Latch System
LATCH is found in vehicles made after 2002. It uses built-in anchors and tethers.
- Locate the lower anchors in your car’s seat.
- Attach the car seat’s lower connectors to these anchors.
- Tighten the straps while pressing down on the seat.
- For forward-facing seats, attach the top tether to the anchor behind the seat and tighten.
Non-obvious insight: The LATCH system has a weight limit (child plus car seat, usually 65 lbs). If your child is heavier, switch to the seat belt method.
| Installation Method | Pros | Cons |
|---|---|---|
| Seat Belt | Universal, works in any seating position | Can be tricky to lock properly |
| LATCH | Often simpler and faster | Weight limit; not in all seat positions |
Rear-facing Car Seat Installation
Rear-facing is safest for young children. Install this way as long as the car seat allows.
Step-by-step Guide
- Place the seat in the back seat, facing the rear.
- Adjust the recline angle. Most infant seats have a level indicator. For newborns, the seat should be more reclined to keep the airway open.
- Install using the seat belt or LATCH, as above.
- Press down on the car seat (not just the base) while tightening.
- Test movement: Grab the seat at the belt path and shake. It should not move more than 1 inch.
Practical tip: If the seat is too upright, use a tightly rolled towel or pool noodle under the base to get the correct angle.
Common Mistakes
- Using the wrong belt path
- Not tightening enough
- Using both seat belt and LATCH together (unless allowed)
- Placing in the front seat
Airbags can injure or kill a child in a rear-facing seat. Always use the back seat.
Forward-facing Car Seat Installation
Once your child outgrows rear-facing, move to a forward-facing seat with a harness.
Step-by-step Guide
- Place the seat in the back seat, facing forward.
- Attach the top tether to the tether anchor. This reduces forward movement in a crash.
- Use the seat belt or LATCH to secure the seat.
- Tighten until the seat moves less than 1 inch at the belt path.
Important: Always use the tether for forward-facing seats, even if you use the seat belt.
Common Mistakes
- Forgetting the top tether
- Loose installation
- Switching too soon from rear-facing
Booster Seat Installation
Boosters are for older children who have outgrown forward-facing seats but are not yet big enough for the car’s seat belt.
Types Of Booster Seats
- High-back booster: Offers head and neck support; good for cars without headrests.
- Backless booster: For cars with built-in headrests.
Installing A Booster
- Place the booster in the back seat.
- Teach your child to sit up straight.
- The lap belt should go low across the hips, not the stomach.
- The shoulder belt should cross the chest and shoulder, not the neck or face.
Booster seats are not attached to the car—they position the seat belt correctly. Only some high-back boosters have LATCH connectors to keep them in place when empty.

Securing Your Child Properly
Even if the seat is installed perfectly, your child must also be buckled in the right way.
Harness Straps
- Should be at or below the shoulders for rear-facing, at or above for forward-facing.
- Should be snug—so you can’t pinch any strap at the shoulder.
- The chest clip must be at armpit level.
Coat And Clothing Safety
Bulky coats and thick clothes can make the harness too loose in a crash. Put coats on after strapping in, or use a blanket.
Insight: Many parents overtighten the harness and cause discomfort. It should be snug but not painful.
Checking Your Work
After installing the car seat, double-check everything.
- Movement test: Grab the seat at the belt path and move side-to-side and front-to-back. It should move less than 1 inch.
- Angle check: Make sure the seat is at the correct angle (especially rear-facing).
- Harness check: Straps are snug, chest clip is at armpit level.
- Tether check: For forward-facing, is the top tether attached and tight?
Get A Professional Check
In the US, you can have your car seat installation inspected for free by a certified technician. Find one near you through the National Highway Traffic Safety Administration (NHTSA) website or local health departments.
Real-world example: Even experienced parents make mistakes. A 2020 NHTSA study found that 46% of car seats have at least one installation error.
Special Situations And Vehicles
Not all cars are the same. Here’s how to handle some less common situations.
Installing In Pickup Trucks
- Never place a car seat in front of an active airbag.
- If the back seat is too small, check the truck manual for car seat options.
Three Car Seats In One Row
Fitting three car seats can be tough. Choose narrow car seats and install them tightly. Some cars can’t fit three across. Test before buying.
Using Car Seats In Taxis Or Ride-share Cars
- Bring your own car seat.
- Most infant seats can be installed with a seat belt without the base.
- Some ride-shares now provide car seats, but always check.
Using Car Seats On Airplanes
Most car seats are approved for air travel. Look for “FAA Approved” on the label.
Maintenance, Cleaning, And Expiry
Car seats need regular care.
Cleaning
- Follow the car seat manual for cleaning.
- Never use harsh chemicals or machine-dry harness straps.
- Remove crumbs and wipe with a damp cloth.
Checking For Recalls And Expiry
Car seats expire after 6–10 years due to material breakdown and safety standards changes. Check the label for the expiry date.
Tip: Register your car seat with the manufacturer to get recall notices.
Replacing After A Crash
Replace your car seat after any moderate or severe crash. For minor crashes, check the manufacturer’s rules.
Common Car Seat Installation Mistakes
Even careful parents make mistakes. Here are the most common:
- Loose installation: Seat moves more than 1 inch at the belt path.
- Harness too loose: Can pinch extra webbing at the shoulder.
- Wrong angle: Especially for rear-facing seats—head can fall forward.
- Chest clip too low or high: Should be at armpit level.
- Moving to next stage too soon: Keep your child in each stage as long as possible.
- Using unapproved accessories: Only use what comes with the seat or is approved by the manufacturer.
- Not reading both manuals: Vehicle and car seat manuals are both needed.
- Forgetting the top tether: Essential for forward-facing safety.
- Installing in the front seat: Back seat is safest for all children under 13.
Car Seat Laws And Recommendations
Laws vary by state and country. In the US, most states require:
- Rear-facing until at least age 2
- Forward-facing with harness until at least age 5
- Booster until seat belt fits properly (usually age 8–12)
The American Academy of Pediatrics recommends keeping children rear-facing as long as possible.
External reference: For the latest legal requirements, check your state’s laws on the NHTSA official site.

Car Seat Comparison: Key Features
Choosing the best car seat depends on your needs. Here’s a look at how major features compare:
| Feature | Rear-Facing Only | Convertible | All-in-One |
|---|---|---|---|
| Installation | Easy, base stays in car | More complex, multi-use | Most complex, grows with child |
| Portability | Very portable | Less portable | Not portable |
| Lifespan | 12–24 months | Up to 5 years | Up to 10 years |
| Price | Low–Medium | Medium | Medium–High |
| Best for | Newborns | All ages (with weight/height limits) | Families wanting one seat |
Practical Tips For Success
- Practice installing the seat before your baby arrives.
- Ask a certified technician to check your work.
- Register your car seat for recall alerts.
- Don’t rush to the next seat stage.
- Keep installation tools (manuals, extra towels) in the car for travel.
- Explain car seat rules to anyone who drives your child.
Frequently Asked Questions
How Do I Know If My Car Seat Is Installed Correctly?
The car seat should not move more than 1 inch at the belt path, the harness should be snug, and the seat should be at the correct angle. You can also have it checked by a certified technician.
Can I Install A Car Seat In The Front Seat?
It’s safest to install all car seats in the back seat. Only use the front seat if the back is full and you can turn off the airbag. Never place a rear-facing seat in front of an active airbag.
When Should I Switch My Child To A Booster Seat?
Switch to a booster when your child outgrows the forward-facing harness (usually over 65 lbs or 49 inches tall) and is mature enough to sit properly for the whole ride.
Can I Use A Secondhand Car Seat?
Only use a secondhand seat if you know its history (no crashes, not expired, no missing parts, and not recalled). Check the expiration date on the label.
What If My Car Doesn’t Have The Latch System?
You can always use the vehicle’s seat belt instead. Seat belts are just as safe if installed correctly. Read both manuals for instructions.
Installing a car seat can seem complicated, but once you know the steps and pay attention to the details, it becomes a routine part of keeping your child safe. Remember, the right seat, installed the right way, can make all the difference in an accident.
Take your time, read the manuals, and don’t hesitate to ask for help. With careful installation and regular checks, you’ll have peace of mind every time you drive. Safe travels!

