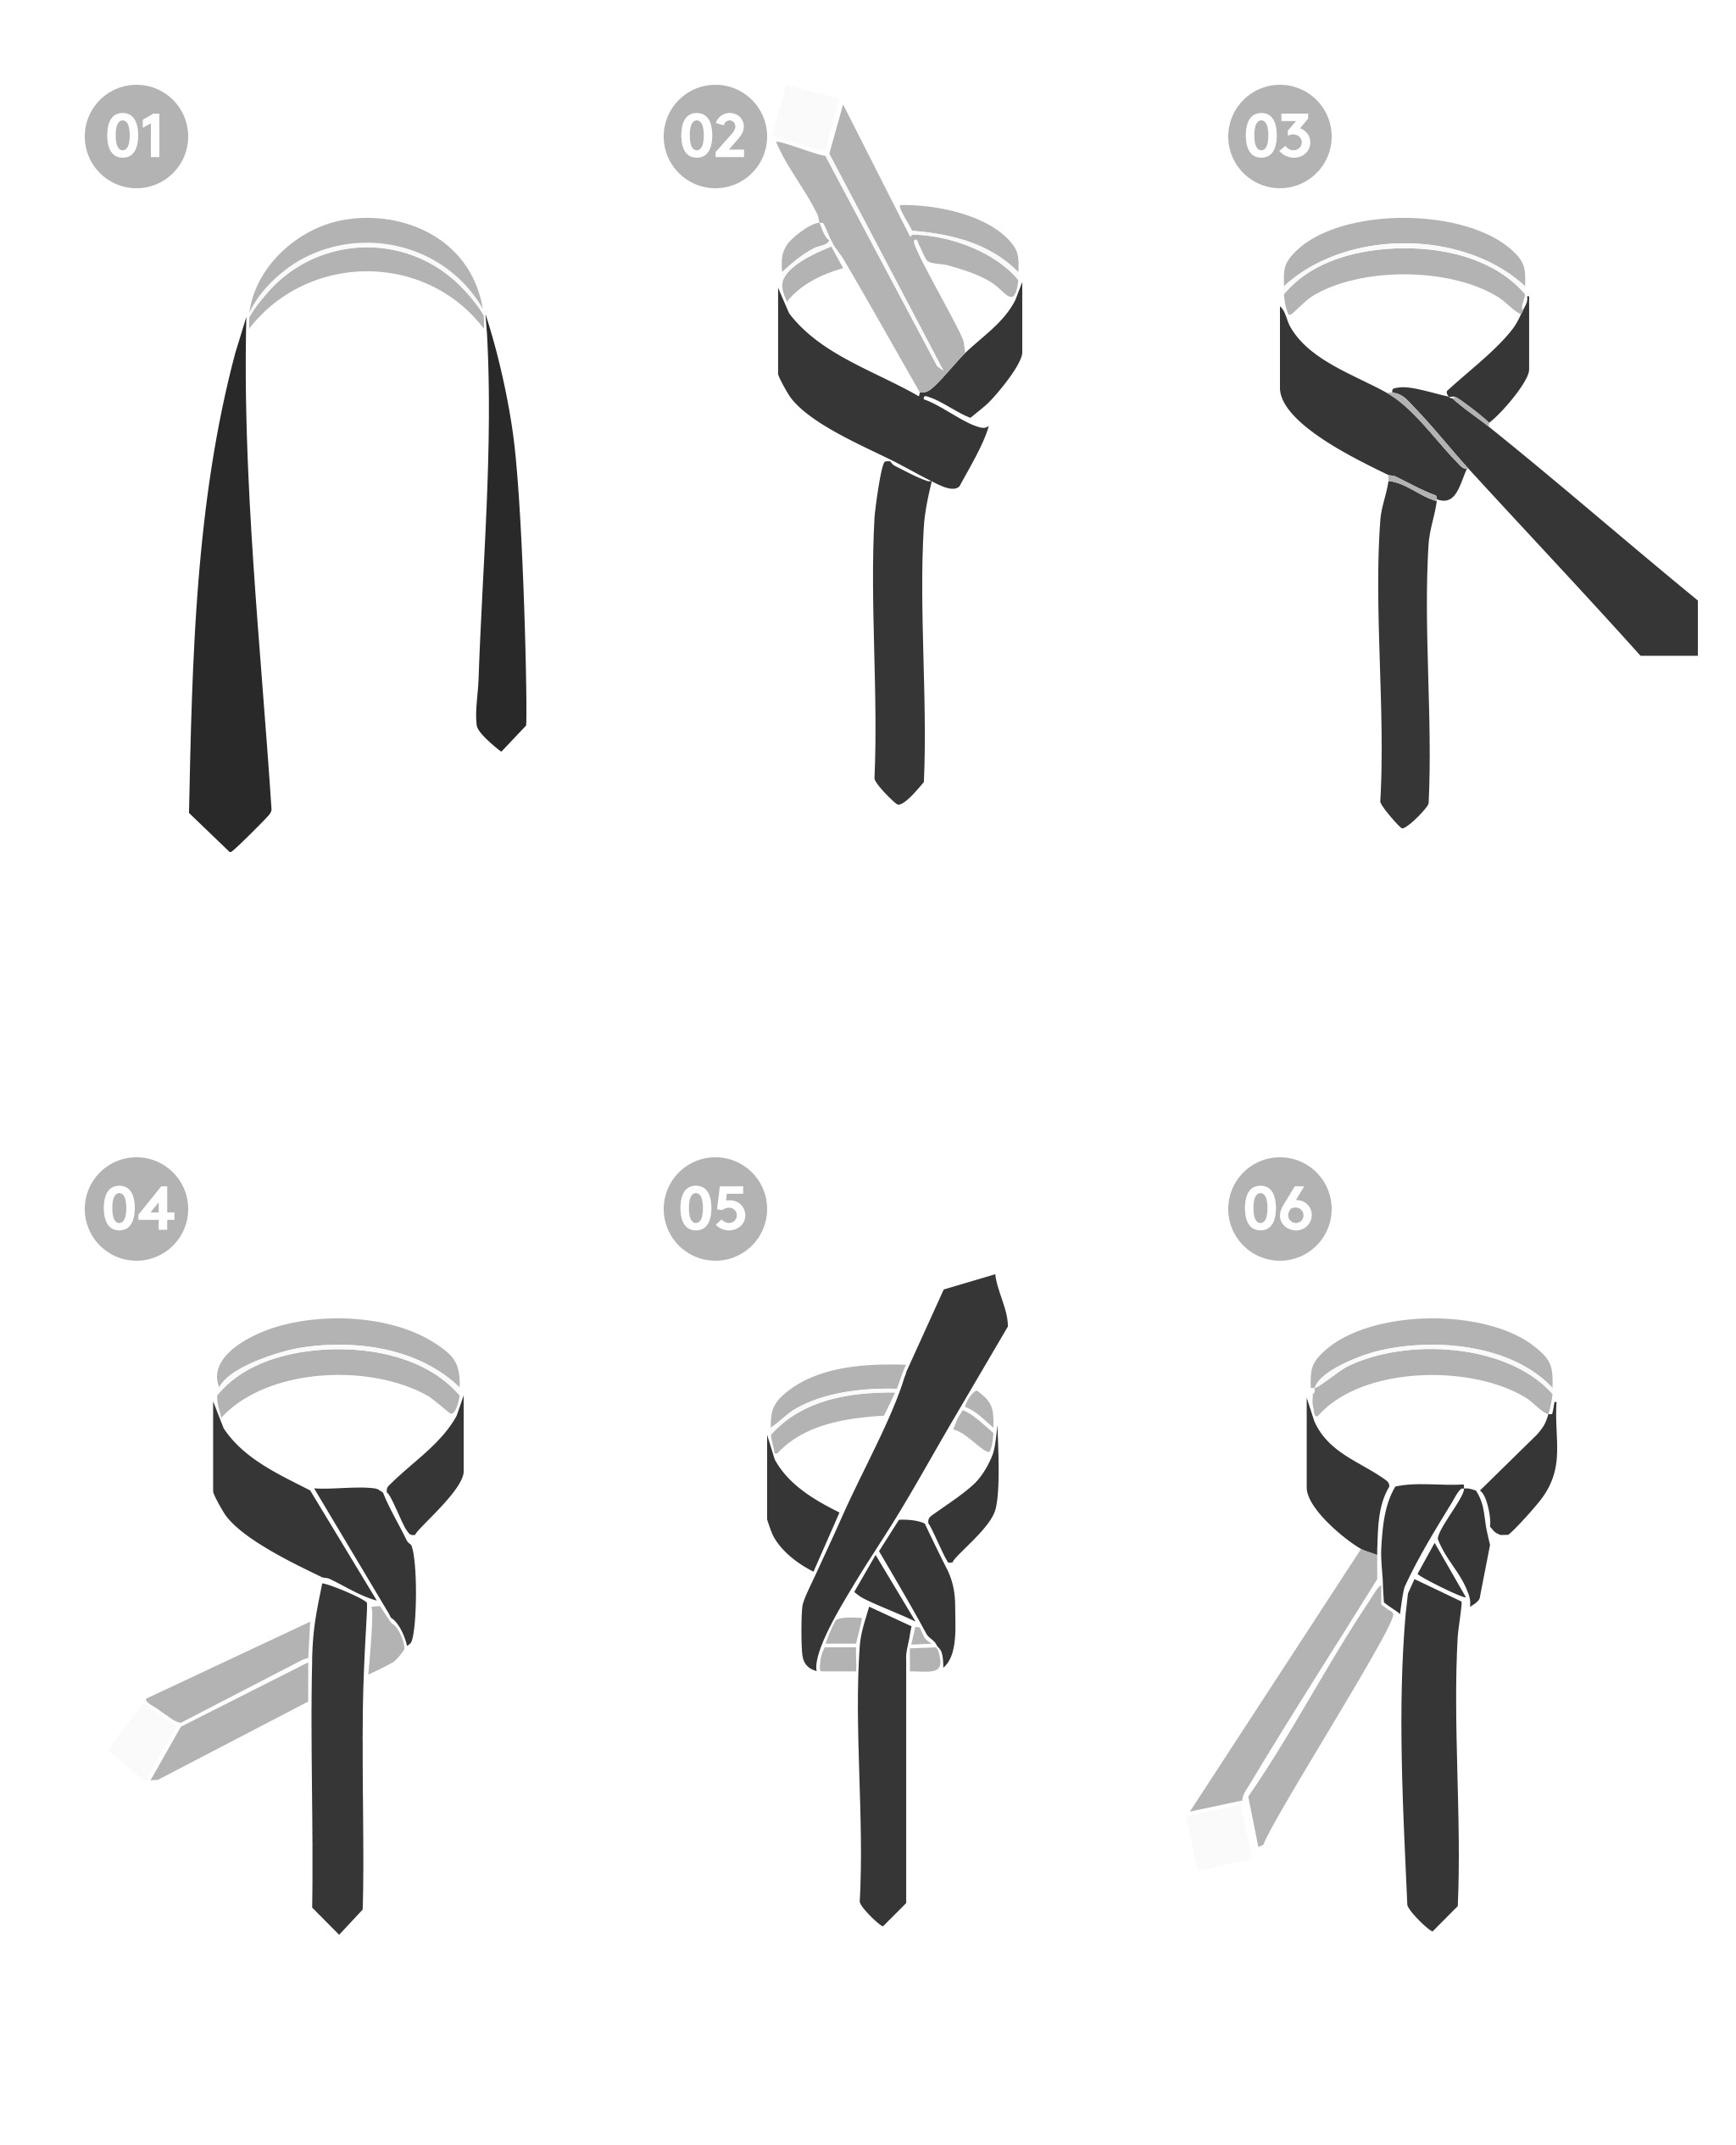
Tying a tie is a timeless skill that shows attention to detail and personal style. Whether it’s for a job interview, a wedding, or a formal dinner, knowing how to tie a tie can boost your confidence and make a lasting impression.
Many people find it tricky at first, but with clear steps, practice, and a few tips, anyone can learn to tie a perfect knot. This guide will help you master several popular tie knots, understand when to use each one, and avoid common mistakes.

36% off Today’s Exclusive Deals
Limited-time Exclusive Deals. Check current discount on Amazon.
Check Price on Amazon As an Amazon Associate I earn from qualifying purchases.Even if you’ve never tied a tie before, you’ll have everything you need to look sharp and feel prepared for any occasion.
Why Learning To Tie A Tie Matters
Wearing a tie is more than just tradition—it’s a symbol of professionalism and respect. In many workplaces and events, a well-tied tie is expected. Studies show that first impressions are formed in just seven seconds, and your appearance plays a big role. For example, a 2015 survey by the Center for Talent Innovation found that 83% of senior executives believe how you dress affects your career success.
A tie knot can also express personality. A simple knot suggests practicality, while a unique knot shows creativity. When you know how to tie different knots, you can choose the best look for each situation.
Types Of Tie Knots And When To Use Them
There are many ways to tie a tie, but some knots are more popular and useful than others. Here’s a look at the most common knots and what makes each one unique.
| Knot Name | Difficulty | Best For | Collar Types |
|---|---|---|---|
| Four-in-Hand | Easy | Everyday, Interviews | Narrow, Button-down |
| Half Windsor | Medium | Business, Formal Events | Standard, Spread |
| Full Windsor | Challenging | Weddings, Important Meetings | Wide, Cutaway |
| Pratt (Shelby) | Medium | Business, Casual | Standard |
| Simple (Oriental) | Easy | Quick Dress, Tall People | Narrow |
Choosing the right knot depends on tie width, collar style, and the event. For example, the Four-in-Hand works well with most shirts and is easy to learn. The Full Windsor gives a bold, wide knot that fits big-collar shirts and formal events.
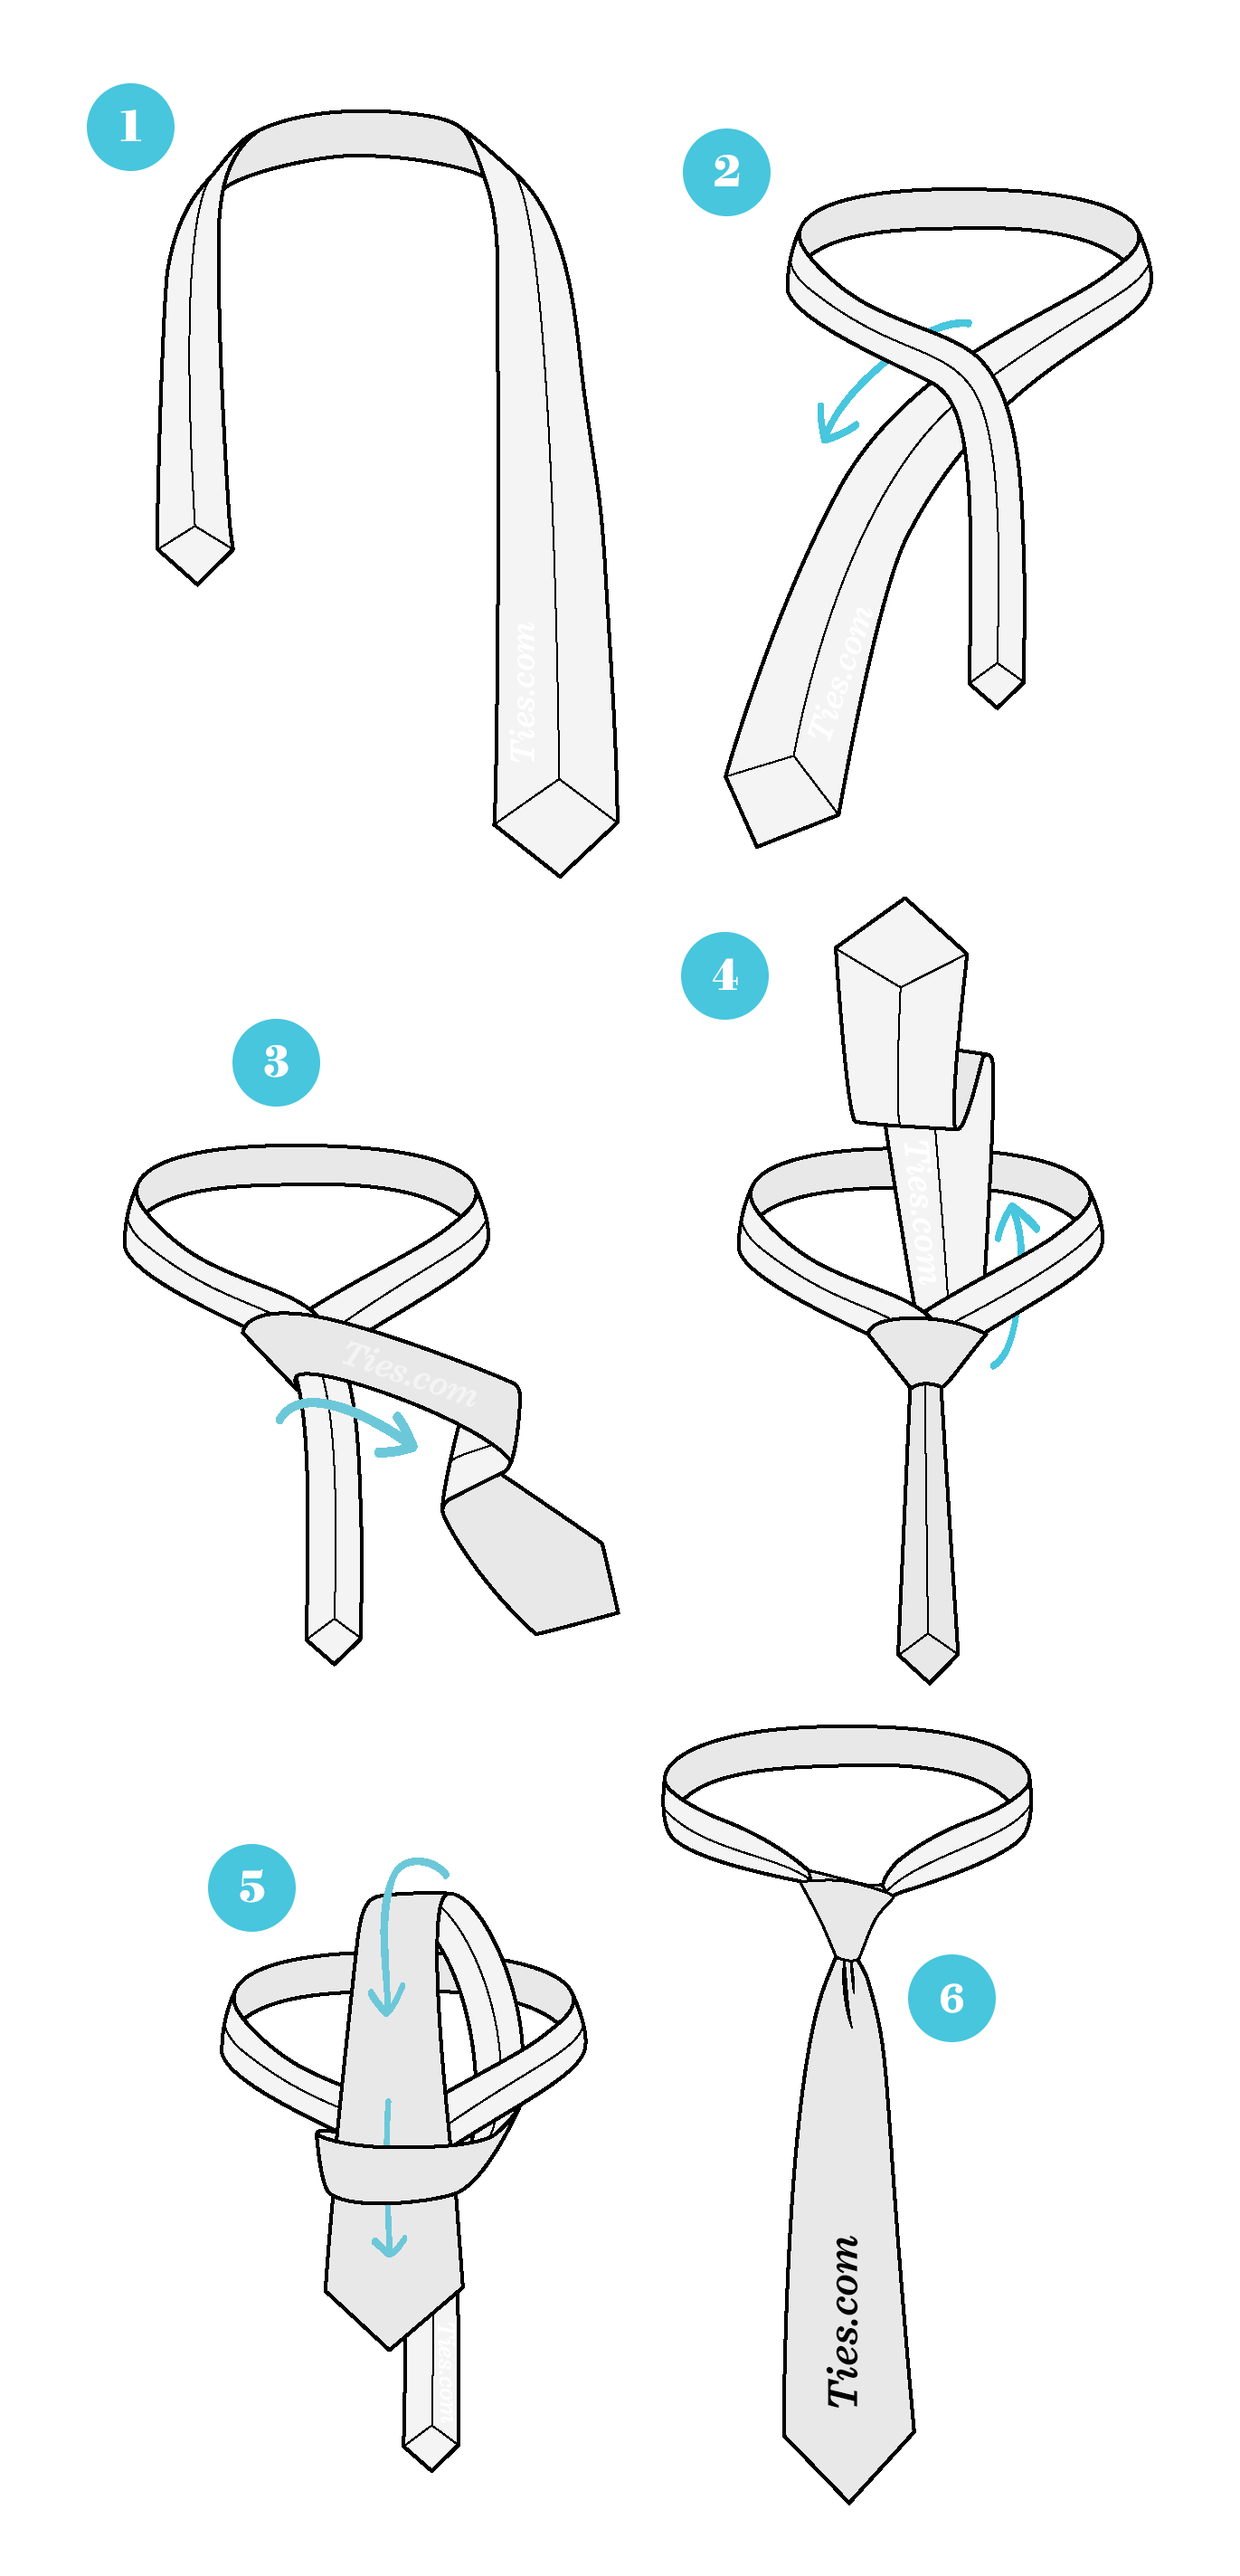
What You Need Before You Start
Before you tie a tie, make sure you have:
- A standard-length necktie (about 57–60 inches for most adults)
- A collared shirt
- A mirror for checking your progress
If you’re tall (over 6’2”), consider a longer tie. If you’re shorter, a regular tie will work. Avoid skinny ties for formal events unless the dress code allows.
The Four-in-hand Knot
The Four-in-Hand is the most common tie knot. It’s simple, slightly narrow, and a bit asymmetrical, which suits most shirt collars.
Steps To Tie The Four-in-hand Knot
- Drape the tie around your neck with the wide end on your right and the narrow end on your left. The wide end should hang about 12 inches lower.
- Cross the wide end over the narrow end.
- Bring the wide end under the narrow end.
- Cross the wide end over the front again.
- Pull the wide end up through the neck loop.
- Slip the wide end down through the front loop you’ve created.
- Hold the narrow end and slide the knot up to your collar.
Tips: Keep the knot tight by holding the narrow end as you adjust. The tip of the tie should just touch your belt buckle.
Common Mistakes With The Four-in-hand
- Making the knot too loose—this looks sloppy.
- Leaving the tie too short or too long.
- Twisting the tie, which can make wrinkles.
The Half Windsor Knot
The Half Windsor is more symmetrical and slightly larger than the Four-in-Hand. It works well for business settings and medium-width ties.
How To Tie The Half Windsor Knot
- Place the tie around your neck, wide end on the right about 12 inches lower.
- Cross the wide end over the narrow end.
- Bring the wide end under the narrow end and up through the neck loop from the front.
- Pull the wide end down to the right.
- Wrap the wide end across the front (left to right).
- Bring it up through the neck loop from behind.
- Pull the wide end through the loop in front.
- Adjust the knot and slide it up.
Tips: The Half Windsor creates a neat triangle. It’s perfect for job interviews and business meetings.
Extra Advice
If you have a thick tie or a shirt with a narrow collar, the Half Windsor can feel bulky. In that case, try the Four-in-Hand instead.
The Full Windsor Knot
The Full Windsor is a large, bold, and perfectly triangular knot. It’s best for wide-collar shirts and formal occasions.
How To Tie The Full Windsor Knot
- Drape the tie around your neck, wide end on the right, much lower than the narrow end.
- Cross the wide end over the narrow end.
- Bring the wide end up through the neck loop and down to the left.
- Bring the wide end under the narrow end and up through the neck loop again, but on the right side.
- Pull the wide end across the front (right to left).
- Bring it up through the neck loop from below.
- Pull the wide end down through the front loop.
- Tighten the knot by holding the narrow end and sliding the knot up.
Tips: This knot uses more tie length, so it’s best for taller people or longer ties.
Special Insight
Many beginners try the Full Windsor with skinny ties, but this can make the knot look awkward. Use a standard or wide tie for the best effect.
The Pratt (shelby) Knot
The Pratt Knot is neat and medium in size, perfect for most shirts and ties. It’s less common but easy to learn.
How To Tie The Pratt Knot
- Start with the tie inside-out, wide end on the right.
- Cross the wide end under the narrow end.
- Bring the wide end up through the neck loop.
- Pull it down and to the left.
- Bring the wide end over the narrow end from left to right.
- Bring it up through the neck loop from below.
- Pull the wide end down through the front loop.
- Tighten and adjust.
Tips: The Pratt knot uses less tie length than Windsor knots, making it good for short people or short ties.
The Simple (oriental) Knot
This is the quickest knot and very easy for beginners.
How To Tie The Simple Knot
- Place the tie around your neck, wide end on the right, inside out.
- Cross the wide end under the narrow end.
- Bring the wide end over the front.
- Pull the wide end up through the neck loop.
- Slip it down through the front loop.
- Tighten and adjust.
Tips: The Simple knot is small and works best with narrow-collar shirts.
Comparing The Main Tie Knots
Understanding the differences helps you pick the right knot for the right occasion.
| Knot | Size | Shape | Symmetry | Best For |
|---|---|---|---|---|
| Four-in-Hand | Small | Narrow | No | Everyday, Casual |
| Half Windsor | Medium | Triangular | Yes | Business |
| Full Windsor | Large | Wide Triangle | Yes | Formal |
| Pratt | Medium | Symmetrical | Yes | Versatile |
| Simple | Small | Slim | Yes | Quick Dress |
Matching Tie Knots To Shirt Collars
Each shirt collar works best with certain knots. Here’s how to match them:
| Shirt Collar | Best Knot | Why |
|---|---|---|
| Narrow/Point Collar | Four-in-Hand, Simple | Smaller knots fit best |
| Standard Collar | Half Windsor, Pratt | Medium knots look balanced |
| Spread/ Cutaway Collar | Full Windsor | Wide knots fill the space |
| Button-Down Collar | Four-in-Hand | Casual knot for casual collar |
Wearing the wrong knot with the wrong collar can look awkward. For example, a small knot with a wide collar leaves empty space, which looks unfinished.

How To Practice And Improve
Learning to tie a tie takes practice, but it gets easier each time. Here are some tips:
- Start slow. Focus on each step until you remember the sequence.
- Practice in front of a mirror. This helps you see what you’re doing.
- Watch videos. Visual guides can clarify confusing steps.
- Try different knots. See which one feels most comfortable.
- Check your results. The knot should be neat, centered, and the tie tip at your belt.
A non-obvious tip: Practice with a cheap tie first. This way, if you wrinkle or stretch it while learning, you won’t damage your best tie.
Common Problems And How To Fix Them
Even experienced tie-wearers make mistakes. Here are solutions to the most frequent problems:
- Uneven tie length: If the wide end is too short, start over with the wide end hanging lower at the start.
- Loose knot: Tighten slowly by holding the narrow end and sliding the knot up.
- Twisted tie: Make sure each fold is flat as you go.
- Sloppy dimple: Pinch the fabric under the knot as you tighten to make a neat dimple.
Many beginners overlook the importance of the dimple—a small crease under the knot. This detail makes your tie look sharp and professional.
Caring For Your Ties
Good ties can be expensive. Proper care keeps them looking good for years.
- Untie your tie after each wear. Leaving it tied causes wrinkles.
- Hang ties on a tie rack or roll them loosely for storage.
- Spot clean stains with a damp cloth. Avoid harsh chemicals.
- Steam out wrinkles if needed—never iron directly.
- Rotate your ties to avoid wearing out one too quickly.
A little care goes a long way. If you ever get a tough stain, check out GQ’s tie cleaning guide.
Advanced Tie Knotting Tips
As you get comfortable, try these advanced techniques:
- Double dimple: Use your thumb and forefinger to pinch two creases below the knot.
- Tie bar placement: Place a tie bar between the third and fourth buttons of your shirt for a classic look.
- Matching patterns: If your shirt is patterned, choose a solid or subtle tie, and vice versa.
Some people experiment with fancy knots like the Eldredge or Trinity. These are fun but not always suitable for business or formal events. Always match your knot choice to the occasion.
When And Where To Wear A Tie
Ties aren’t just for offices and weddings. Here are common situations where a tie is a good idea:
- Job interviews: Shows professionalism and respect.
- Business meetings: Sets you apart as someone who cares.
- Formal events: Weddings, graduations, funerals.
- Court appearances: Demonstrates seriousness.
- Certain school uniforms: Many private schools require ties.
Some creative fields are more casual. If you’re unsure, it’s better to be slightly overdressed than underdressed.
Mistakes To Avoid When Tying A Tie
Many people make the same errors when learning. Avoid these:
- Ignoring tie length: If the tie is too short or long, adjust your starting position.
- Crooked knot: Center your knot with the shirt buttons.
- Wearing a wrinkled tie: Always check for creases before wearing.
- Overly bold knots for the event: Use simple knots for business, save creative knots for parties.
- Mismatched tie and shirt: Make sure colors and patterns complement each other.
These mistakes are easy to fix with a little attention.
Real-world Examples
Consider the 2012 US presidential debate: Candidate Mitt Romney wore a classic Full Windsor with a spread collar, sending a message of confidence and authority. In contrast, tech CEOs often choose no tie or a simple knot, suggesting a relaxed culture.
In some cultures, the tie style can even signal group membership or school affiliation. For example, regimental stripes in the UK often show alumni ties to certain schools or clubs.
Teaching Children And Teens To Tie A Tie
Young people often need to wear ties for special occasions or school uniforms. Here are some tips for teaching them:
- Use the Four-in-Hand—it’s the easiest for small hands.
- Show, don’t just tell. Demonstrate each step and let them try.
- Practice together before the event day.
- Give positive feedback for their efforts.
Patience matters. Many parents rush this lesson before a big event, but practicing early makes it easier.
The History And Cultural Meaning Of Ties
Neckties date back to the 17th century, when Croatian soldiers wore colorful cloth around their necks. This inspired the French cravat, which evolved into today’s tie. Over the centuries, ties have signaled everything from military rank to school pride.
Today, ties are a global symbol of formality and professionalism. In Japan, for example, wearing a tie is standard for salarymen. In the US and UK, ties are common in law, banking, and government.
Learning to tie a tie connects you to a long tradition of style and self-expression.
Frequently Asked Questions
How Long Should My Tie Be?
A properly tied tie should reach the middle of your belt buckle. The tip should not hang above or below your belt. If your tie is too short or long, adjust the starting position before you tie.
Can I Wash A Tie In The Washing Machine?
No, never machine wash a tie. Most ties are made of silk or delicate fabrics. Hand clean stains with a damp cloth or have them professionally cleaned.
What Knot Should I Use For A Job Interview?
The Half Windsor is a safe, professional choice for most interviews. It looks neat and works with most shirt collars.
How Do I Make A Dimple In My Tie?
After pulling the wide end through the knot, pinch a small crease just under the knot and tighten. This creates the classic dimple.
What If My Tie Has A Pattern Or Logo?
Keep the knot simple, like the Four-in-Hand or Pratt. This helps the pattern or logo stand out without looking too busy.
Looking sharp is about more than just the knot—it’s about confidence, care, and attention to detail. With the right technique, you’ll always be ready for any event that calls for a tie.