
Most Macbook Pro screen issues are fixable with simple checks, settings fixes, and targeted repairs.
I have spent years fixing and testing Macbook Pro screen problems for friends and clients. This guide walks you through Macbook Pro Screen Troubleshooting step by step. You will get clear diagnosis tips, easy software fixes, safe hardware checks, and real-world repair advice. Read on to learn how to find the cause and fix the screen problem confidently.

Quick checklist for Macbook Pro Screen Troubleshooting
Start with a short list to save time and avoid unnecessary repairs. Follow these items in order to diagnose most screen problems.
- Check for obvious damage. Look for cracks, dents, or liquid on the screen or hinge.
- Restart your Macbook Pro. A full restart clears many software glitches.
- Test with an external monitor. This helps tell if the issue is the display or the graphics system.
- Boot in Safe Mode. Safe Mode loads only essential drivers and can isolate software conflicts.
- Reset NVRAM/PRAM and SMC. These resets fix display and power-related oddities on many models.
- Update macOS and display drivers. Patches often fix display bugs.
- Inspect brightness and accessibility settings. Sometimes the issue is a setting, not hardware.
Use this checklist as the first step in any Macbook Pro Screen Troubleshooting effort. It saves hours in many cases.

Common symptoms and what they mean
Macbook Pro Screen Troubleshooting starts with observing what you see. Symptoms point to likely causes.
Screen is black but Mac is on
If the machine sounds active but the screen is black, the backlight or display connector could be faulty. Use a flashlight at an angle to check for a faint image; a faint image means backlight failure.
Flickering or flashing screen
Flicker often points to a loose cable, failing backlight inverter on older models, or graphics driver issues. Note when it happens: on wake, during sleep, or randomly.
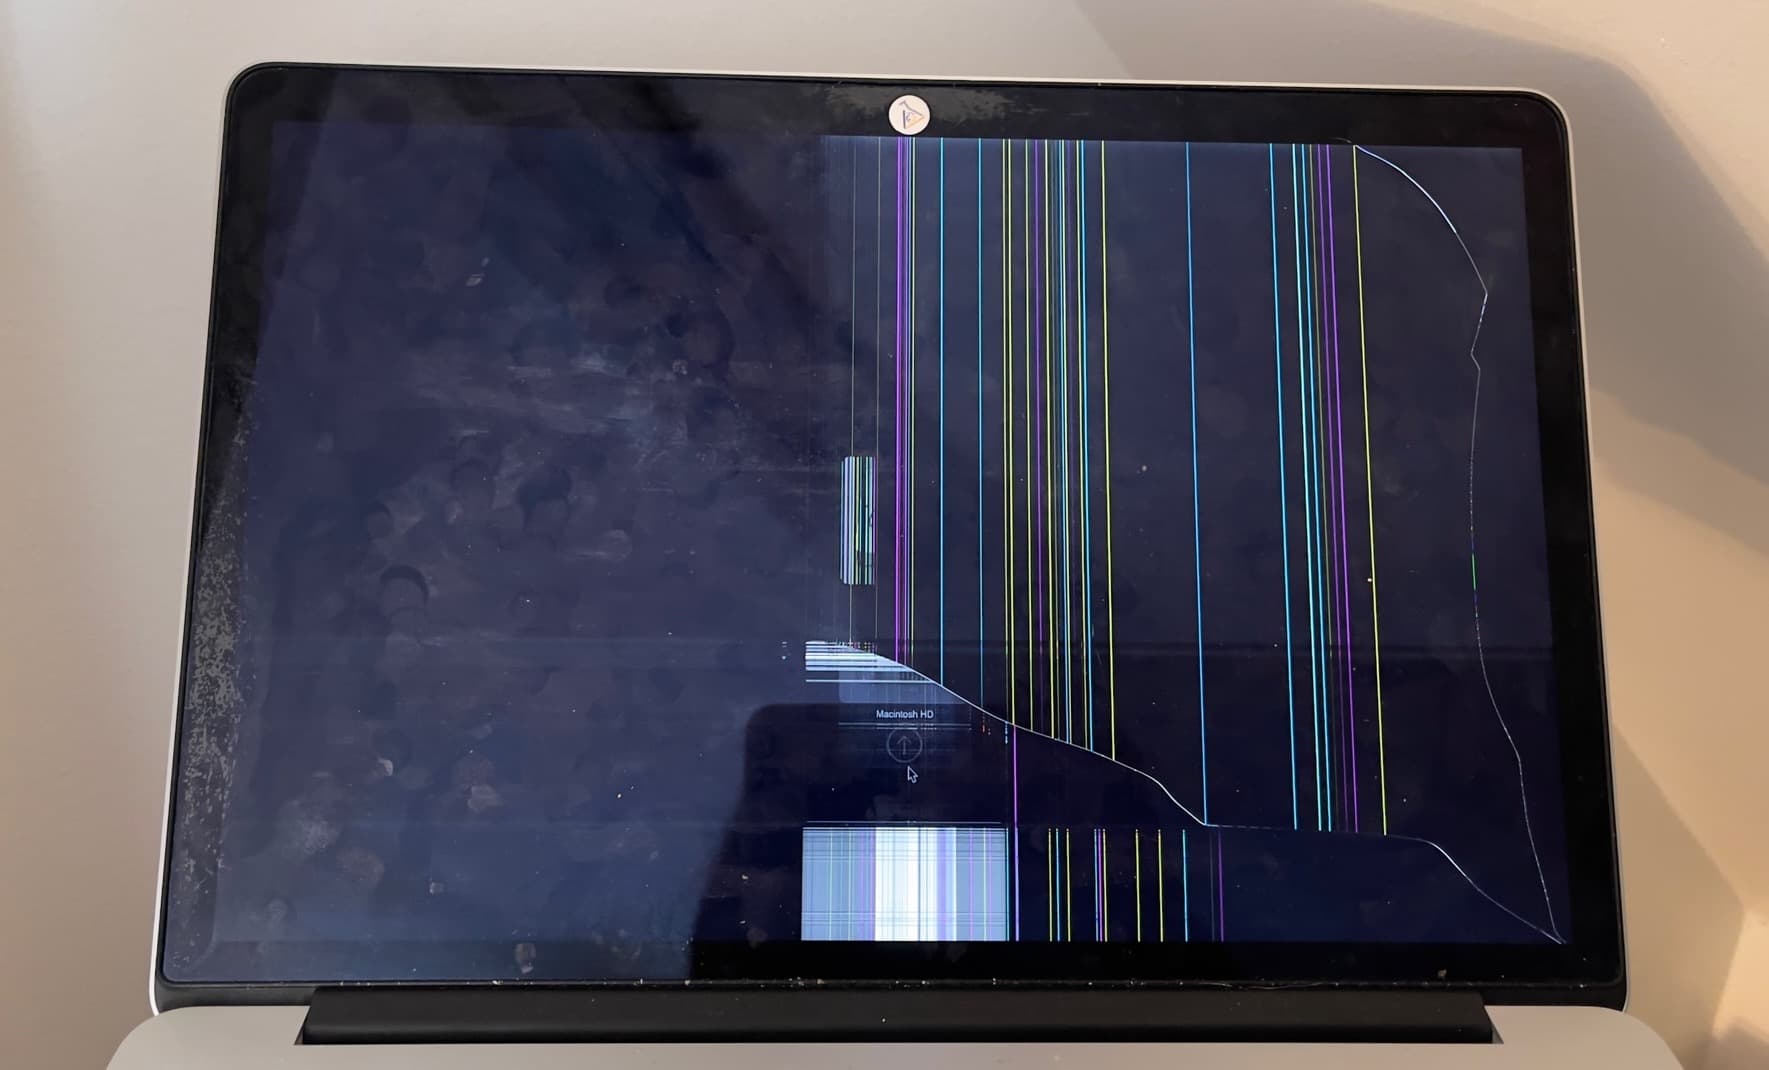
Lines or colored artifacts on screen
Persistent lines suggest panel damage or a GPU/display cable fault. If lines appear only on one area, the LCD panel may be failing.
Dim screen or brightness too low
Settings or sensor issues are common. Ambient light sensors, software brightness limits, or failing backlight can cause low brightness.
Distorted colors or washed-out image
Color calibration, GPU errors, or a failing display panel may be the cause. Try an external monitor to rule out GPU issues.
Screen responds poorly to touch (for touch-enabled models)
Layer or connector issues can cause erratic touch behavior. Clean the surface and check for pressure points.
These symptoms are the map for effective Macbook Pro Screen Troubleshooting. Note when each issue started and what changed before it began.
Software fixes to try first
Software problems are often the simplest to fix. Try these steps before opening the case.
- Restart into Safe Mode
- Hold the Shift key during boot to enter Safe Mode. Test the screen; if the issue stops, a third-party app or driver may cause it.
- Reset NVRAM/PRAM
- Power off. Hold Option + Command + P + R during boot for about 20 seconds. This can fix display resolution and startup screen issues.
- Reset SMC
- The SMC controls power to the display. Reset steps vary by model; check manufacturer guidance for the exact method.
- Update macOS
- Install the latest stable updates. Display and GPU bugs are often fixed in updates.
- Create a new user account
- Log into a fresh account to see if the issue is user-specific.
- Disable Night Shift and True Tone
- These features alter color and brightness and can seem like a screen fault.
- Run Apple Diagnostics
- Restart and hold the D key to run hardware diagnostics. Note any reference codes for repair centers.
These software fixes are safe for most users and often resolve display issues without hardware work. They are essential steps in any Macbook Pro Screen Troubleshooting plan.
Hardware troubleshooting and safe inspection
When software checks fail, a careful hardware check is next. Safety first: power down and disconnect power before inspecting internal parts.
- Inspect the hinge and bezel
- Check for loose screws, gaps, or pressure marks. Hinge damage can pinch the display cable.
- Look for liquid or corrosion
- Liquid signs require immediate power down and professional service. Corrosion can cause intermittent faults.
- Test with a flashlight for backlight
- If you see an image under strong light, the backlight or its power is the issue.
- Check the display cable
- A loose or damaged LVDS/eDP cable often causes flicker or no image. Re-seating can fix the problem but requires case opening.
- Listen for unusual sounds
- Buzzing or clicking may indicate power or inverter issues on older models.
- Avoid experimentation if under warranty
- Opening the case may void warranty or AppleCare. Use an authorized technician if covered.
In my experience, a loose cable caused flicker in a late-2015 Macbook Pro I repaired. A careful reseat fixed it in minutes. But I always caution non-experts: if you are not comfortable, seek a pro.

External display testing and diagnostic tips
Using an external monitor is one of the fastest ways to narrow down the problem.
- Connect via HDMI or USB-C
- Use a known-good cable and adapter. If the external display works fine, the GPU and logic board are likely OK.
- Mirror vs Extended mode
- Test both modes. If only one mode fails, software or resolution settings may be the cause.
- Boot from external drive
- Booting from a clean system can rule out software on the internal drive.
- Video loop test
- Play a video or drag windows around to see if the issue follows the external screen or stays on the built-in display.
If the external display shows no issues, you can focus Macbook Pro Screen Troubleshooting on the internal panel, wiring, or hinge assembly.
![]()
Repair options, costs, and what to expect
Deciding how to fix a faulty screen depends on age, warranty, and budget.
- DIY repair
- Pros: lower parts cost. Cons: risk of damage, time, and no warranty. Good only for confident users with the right tools.
- Authorized repair (Apple or service provider)
- Pros: genuine parts, warranty. Cons: higher cost and wait time. Best if under AppleCare.
- Third-party repair shop
- Pros: often cheaper and faster. Cons: part quality varies. Ask about warranties and parts used.
- Parts to replace
- Small issues: cable or inverter. Large issues: whole display assembly or top case. Newer models often require replacing the entire top shell.
- Typical cost ranges (varies by model and region)
- Cable or minor repair: lower cost. Full display assembly: several hundred dollars to over a thousand for premium models. Always get a written estimate.
Be transparent about limitations. Third-party parts can be fine, but genuine parts ensure the best fit and function. Get quotes from multiple places and weigh cost versus the Macbook Pro’s value.

Preventive care and maintenance
Avoiding screen issues is cheaper and less stressful than repair. Use simple habits to protect the screen.
- Use a slim sleeve or case
- Protects from pressure and drops while commuting.
- Avoid placing heavy objects on the closed laptop
- Pressure can warp the lid or damage the panel.
- Clean carefully
- Use a microfiber cloth and gentle cleaner designed for screens. No sprays directly on the screen.
- Keep liquids away
- Even small spills can cause big problems.
- Update software regularly
- Patches reduce bugs that can affect display behavior.
Small daily habits make Macbook Pro Screen Troubleshooting less likely in the future.

People also ask
Why is my Macbook Pro screen flickering after macOS update?
A macOS update can change graphics drivers or settings. Try Safe Mode and a system update or driver fix; if flicker persists, test with an external display to rule out hardware.
How do I tell if the backlight is broken?
Shine a flashlight at the screen at an angle; if you see the desktop faintly, the backlight is likely broken. Backlight failures need professional repair or panel replacement.
Can I replace the display cable myself?
You can if you have the right tools and experience. Be aware that opening newer Macbook Pros is delicate and may void warranty.
Frequently Asked Questions of Macbook Pro Screen Troubleshooting
What should I try first when my Macbook Pro screen goes black?
Restart your Macbook Pro and try an external monitor. Then reset NVRAM/PRAM and SMC before opening or seeking repair.
How do I know if it is a GPU or screen issue?
Connect an external display. If the external screen shows the same problems, the GPU or logic board is likely at fault. If only the built-in screen is affected, the panel or cable is suspect.
Is it safe to open my Macbook Pro to check the display cable?
Only if you are comfortable with tiny screws and delicate connectors. Opening can void warranty, so consider professional help if you have coverage.
Will software updates fix display issues?
They can if the issue is driver or software related. Always test updates, Safe Mode, and a clean boot before assuming hardware failure.
How long does screen repair usually take?
Authorized service centers often take several days. Independent shops can sometimes complete repairs the same day, depending on parts availability.
Can pressure cracks spread if I keep using the laptop?
Yes, pressure can make cracks worse and damage internal layers. Stop using the device to prevent additional harm and data loss.
Conclusion
Macbook Pro Screen Troubleshooting is a practical process of observation, safe testing, and informed repair decisions. Start with easy software steps and an external display test, then move to careful hardware checks or professional repair when needed. Keep your Macbook Pro safe with simple daily habits to reduce future problems. Try the steps here, note what you observe, and share your results or questions below — and consider subscribing or leaving a comment if you found this guide helpful.

