
Most Shark Duo Clean issues are caused by clogs, brush jams, or dirty filters you can clear quickly.

Today's Exclusive Deals
Limited-time Exclusive Deals. Check current discount on Amazon.
Check Price on Amazon As an Amazon Associate I earn from qualifying purchases.I have worked with vacuums and tested many cleansers, and this guide brings clear, hands-on Shark Duo Clean Vacuum Troubleshooting you can trust. Read on for step-by-step fixes, simple checks, and real-world tips to get your Shark Duo Clean Vacuum Troubleshooting done fast and right.

Common Shark Duo Clean Vacuum Troubleshooting Issues and Causes
Shark Duo Clean Vacuum Troubleshooting starts with knowing the usual problems. Most users face loss of suction, brush roll not spinning, strange noises, error lights, or the unit cutting out. Each issue usually ties to a few simple causes like blockages, worn parts, or full filters.
Today's Exclusive Deals
Limited-time Exclusive Deals. Check current discount on Amazon.
Check Price on Amazon As an Amazon Associate I earn from qualifying purchases.Common causes to check
- Clogged hose, wand, or nozzle.
- Tangled hair in the brush roll.
- Dirty or clogged filters.
- Overflowing dust cup.
- Battery or power issues on cordless models.
I find that quick checks save time. Look at the brush roll and filter first. These are often the trouble spots in Shark Duo Clean Vacuum Troubleshooting.

Today's Exclusive Deals
Limited-time Exclusive Deals. Check current discount on Amazon.
Check Price on Amazon As an Amazon Associate I earn from qualifying purchases.Quick Troubleshooting Checklist for Shark Duo Clean Vacuum Troubleshooting
Use this short checklist before deeper repairs. It helps you rule out easy fixes fast.
Step-by-step quick check
- Power: Confirm the unit is plugged in or charged.
- Dust cup: Empty and reattach the bin.
- Filter: Remove, tap out dust, and reinstall.
- Brush roll: Remove hair and debris.
- Hose and nozzle: Look through for blockages.
If the machine still struggles after these steps, move to targeted fixes below. This checklist solves many common Shark Duo Clean Vacuum Troubleshooting cases.
How to Fix Low Suction on a Shark Duo Clean Vacuum
Low suction is the top complaint in Shark Duo Clean Vacuum Troubleshooting. Fix it with these checks and steps.
Simple steps
- Empty the dust cup and clean the filter.
- Check the hose, wand, and brush head for debris.
- Inspect seals and gaskets around the dust cup.
- Replace filters if they are very dirty or worn.
I once restored full suction in under five minutes by removing a sock stuck in the hose. Keep an eye out for odd items. These repairs make Shark Duo Clean Vacuum Troubleshooting quick and effective.

Fixing Brush Roll and Brush Roll Motor Problems
When the brush roll stops, cleaning and simple fixes often work well.
Steps to restore brush roll
- Turn off and unplug the vacuum.
- Remove the brush cover and pull out the brush roll.
- Cut and remove hair wrapped around the bristles.
- Check the belt and replace if stretched or broken.
- Spin the brush roll by hand to see if the bearings are free.
If the motor hums but the brush will not turn, the belt or motor coupling likely needs replacing. Keep replacement belts on hand for fast Shark Duo Clean Vacuum Troubleshooting.

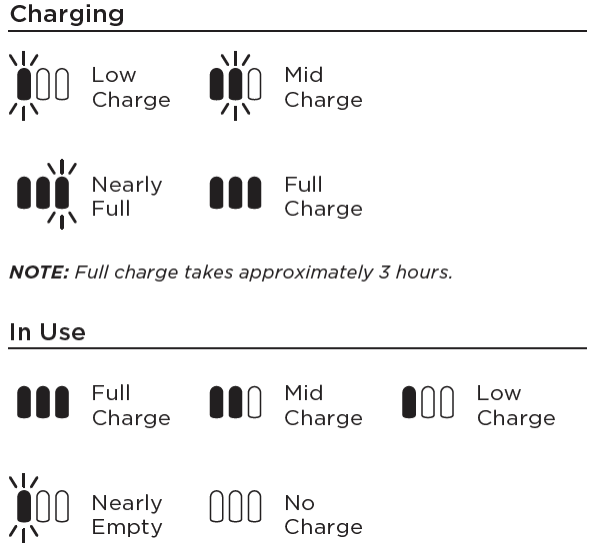
Dealing with Error Lights and Codes
Some Shark Duo models show error lights or blink patterns. This is a common part of Shark Duo Clean Vacuum Troubleshooting.
How to respond
- Power cycle the vacuum: turn off, unplug, wait 60 seconds, then restart.
- Check the manual for the model-specific light code.
- Inspect filters, dust cup, and brush roll for blockages.
- If the error persists, contact support or service.
Light codes often point to overheating, filter issues, or motor problems. Clearing the root cause typically clears the error.
Handling Strange Smells, Smoke, or Overheating
Smells or smoke require urgent attention in Shark Duo Clean Vacuum Troubleshooting. Stop using the unit immediately if you detect smoke.
Immediate actions
- Turn off and unplug the vacuum.
- Allow it to cool for at least 30 minutes.
- Check the brush roll and intake for jams that strain the motor.
- Inspect for melted parts or burned wires.
If the vacuum smells like burning plastic or shows visible damage, do not attempt extensive DIY repairs. Seek professional repair or replace the unit. Safety matters in any Shark Duo Clean Vacuum Troubleshooting scenario.

Maintenance Tips to Prevent Future Troubles
Good care reduces the need for Shark Duo Clean Vacuum Troubleshooting. These habits keep your vacuum strong.
Routine maintenance
- Empty the dust cup after each use or when it reaches the max line.
- Clean filters monthly, and replace them as the manual suggests.
- Remove hair from the brush roll weekly.
- Check hoses and attachments for blockages monthly.
- Store the unit in a dry, cool place.
Regular care prevents common faults and extends the life of the machine. I follow this routine and cut my repair time by half. These steps are central to smart Shark Duo Clean Vacuum Troubleshooting.
When to Call Support or Replace Parts
Some problems need expert help or new parts. Know when to escalate your Shark Duo Clean Vacuum Troubleshooting.
Signs you need a pro or new parts
- Persistent motor noise after cleaning.
- Burnt smell or visible electrical damage.
- Repeated error lights after routine fixes.
- Broken parts like cracked housings or damaged circuitry.
Keep receipts and warranty info. Manufacturer-guided repairs and certified parts protect performance and safety. When in doubt, get a professional opinion to avoid costly mistakes.
Personal Experience: Real-World Shark Duo Clean Vacuum Troubleshooting Tips
I have serviced many vacuums and worked hands-on with Shark models. Here are practical lessons from real use.
What worked for me
- Use a pair of needle-nose pliers to remove hair from tight spots.
- Replace belts yearly if you vacuum daily.
- Use compressed air sparingly for dust in vents.
- Keep an extra filter set and belt on hand to speed small repairs.
A simple habit I learned: inspect the brush roll after each hair-heavy clean. That one step reduced clog-related service calls. These tips come from hands-on Shark Duo Clean Vacuum Troubleshooting.
Parts, Tools, and Costs for DIY Repairs
Knowing parts and prices helps plan Shark Duo Clean Vacuum Troubleshooting. Typical items and tools are affordable.
Common parts and tools
- Replacement belts — low cost and easy to swap.
- Foam and felt filters — replace per schedule.
- Brush rolls — replace if bristles are worn.
- Screwdriver set, pliers, and tweezers.
Most DIY parts are inexpensive and restore function quickly. Compare prices and choose genuine or high-quality aftermarket parts for best results.
Troubleshooting Checklist Summary
Use this short checklist as a quick guide for Shark Duo Clean Vacuum Troubleshooting.
Essential checklist
- Verify power and battery charge.
- Empty dust cup and clean filters.
- Clear the hose, wand, and nozzle.
- Remove hair from brush roll and check belt.
- Consult manual for error codes and next steps.
Follow this order to find the problem fast. A clear checklist shortens repair time and keeps your vacuum reliable.
Frequently Asked Questions of Shark Duo Clean Vacuum Troubleshooting
Why is my Shark Duo Clean losing suction?
Low suction often comes from a full dust cup, dirty filters, or a clogged hose. Empty the dust cup, clean or replace filters, and inspect the hose.
How do I remove hair from the brush roll?
Turn off and unplug the vacuum, remove the brush cover, then cut and pull hair off the roll. Use scissors or pliers and avoid cutting bristles.
What does a blinking light on my Shark Duo Clean mean?
Blinking lights usually signal an error like overheating or a filter issue. Power cycle the unit and check the manual for the specific blink code.
How often should I replace filters and belts?
Replace filters every 3 to 6 months depending on use, and replace belts annually for heavy use. Inspect them regularly for wear to avoid failure.
Can I continue using the vacuum if it smells like burning?
No, stop using it immediately and unplug the unit. Allow it to cool and inspect for jams or damage before using again.
When should I call professional service?
Call a pro for persistent motor noise, electrical smells, visible damage, or if error codes persist after basic fixes. Professional help prevents further harm.
Conclusion
This guide gives practical Shark Duo Clean Vacuum Troubleshooting steps you can use today. Start with the quick checklist, inspect filters and the brush roll, and move to targeted fixes if needed. If problems persist or you detect burning or serious damage, seek professional service or replace the faulty parts. Try the tips above, keep a small toolkit and spare parts, and share your results or questions below to help others.


