
Most Sloan flush valve issues come from worn seals, debris, or misadjusted parts.
I have spent years fixing commercial toilets and teaching building staff how to do Sloan Flush Valve Troubleshooting. This guide cuts through jargon and shows clear steps you can follow. You will learn how the valve works, common faults, quick fixes, tools to carry, and when to call a pro. Read on to get confident and save time and money.
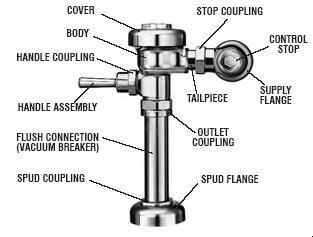
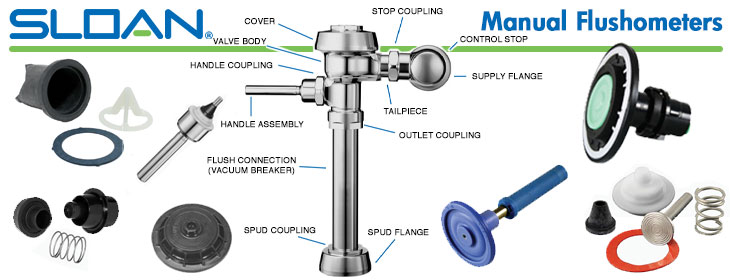
How a Sloan flush valve works and why that matters
A Sloan flush valve controls water flow from the tank or supply to the bowl. It uses a diaphragm or piston and a return spring to stop and start water flow. Small parts inside can wear or trap debris. Knowing how it works helps with Sloan Flush Valve Troubleshooting.
From my years in facilities work, valves fail most often from hard water scale and worn seals. A small bit of grit can stop a diaphragm from seating. That makes the valve run or leak. Quick checks often find the issue fast.

Common problems and quick fixes
Below are problems I see most. Each item lists a simple cause and a fix you can try.
- Constant running
- Cause: Damaged diaphragm or stuck inlet.
- Fix: Turn off water, inspect diaphragm, clean or replace it.
- Weak flush
- Cause: Low supply pressure or clogged inlet screen.
- Fix: Check supply, clear screen, test again.
- Intermittent flush or partial flush
- Cause: Air in line or misadjusted handle.
- Fix: Open and close water supply to bleed air. Adjust handle linkage.
- Noisy operation
- Cause: Worn piston or high pressure surge.
- Fix: Replace piston assemblies or add a pressure regulator.
- Water on floor near valve
- Cause: External leak at nut, coupling, or body crack.
- Fix: Tighten fittings, replace seals, or replace valve body if cracked.
These quick fixes cover most Sloan Flush Valve Troubleshooting needs. Try the easy steps first before replacing major parts.

Tools and parts to have on hand
Carry these for safe and fast repairs. They help with most Sloan Flush Valve Troubleshooting jobs.
- Adjustable wrench for flats and couplings.
- Screwdrivers, small picks, and needle-nose pliers.
- Replacement diaphragm or piston kit specific to Sloan models.
- O-rings, gaskets, and plumber’s grease.
- A small acidic descaler for heavy scale, used sparingly.
- Teflon tape and a cloth to catch drips.
Buying genuine Sloan repair kits cuts the risk of mismatch. I learned this after a few failed field swaps. The right part saves time.

Step-by-step Sloan Flush Valve Troubleshooting guide
Follow these steps in order. Work safely and shut off water when needed.
- Observe the symptom for 1–2 flush cycles. Note when the leak or fault happens.
- Shut off the water supply to the valve. This makes inspection safe and dry.
- Remove the valve cover or access cap. Look for scale, debris, or torn parts.
- Check the diaphragm or piston for tears, hardening, or distortion.
- Clean inlet screens and small orifices with a soft brush or water.
- Replace worn seals and test the valve before full reassembly.
- Turn the water back on slowly and watch for proper seating and no leaks.
- Adjust handle or trip arm height if flush volume is wrong.
I once fixed a hospital restroom by simply cleaning a grit-filled inlet screen. That one step solved a weeks-long running issue. This step-by-step approach works in most cases and makes Sloan Flush Valve Troubleshooting clear and repeatable.
Preventive maintenance and best practices
Routine care reduces breakdowns and saves money. Use a short checklist each month or quarter.
- Inspect valves for leaks and listen for constant run sounds.
- Clean screens and external parts to remove scale and grit.
- Replace diaphragms on a schedule in hard water areas.
- Record water pressure and report spikes to facility staff.
- Use OEM parts and avoid over-tightening metal parts.
Preventive work cut my repair calls by half in one year. Small actions prevent big failures. These tips make Sloan Flush Valve Troubleshooting mostly a maintenance task rather than an emergency.

When to call a pro or replace the valve
Some faults need a plumber or full valve replacement. Look for these signs.
- Cracked valve body or persistent leaks from the housing.
- Repeated diaphragm failures despite clean water.
- Complex supply line or concealed plumbing that you cannot access.
- Local codes that require licensed technicians for work.
If you lack the right parts or the leak risks property damage, call a pro. A trained plumber can test supply pressure and fit correct parts. This keeps liability low and repairs reliable.

Frequently Asked Questions of Sloan Flush Valve Troubleshooting
What is the first thing I should check when a Sloan valve runs?
Listen and observe the valve for a full cycle. Then shut off water and inspect the diaphragm and inlet screen for debris or tears.
How long do Sloan diaphragms last?
Diaphragm life depends on water quality and use. In hard water, expect 1 to 3 years; in soft water, they can last much longer.
Can I use generic parts for a Sloan flush valve?
You can, but matching OEM parts reduces fit and function issues. Generic parts may save cost short term but cause more repairs long term.
Is hard water the main cause of failures?
Hard water is a common cause of scale and wear, but debris and age also matter. Regular cleaning helps regardless of water type.
How do I know if the valve needs replacement?
Replace when the body is cracked, repairs fail repeatedly, or parts are obsolete. Frequent leaks after part swaps signal the need for replacement.
Can I troubleshoot a Sloan flush valve without shutting off building water?
No. Always shut off the local supply to avoid overflow and to inspect parts safely. Brief testing with low pressure may be OK, but shutoff is best.
Conclusion
Sloan Flush Valve Troubleshooting is a skill you can learn. Start with simple checks: listen, shut off water, inspect diaphragms, and clean screens. Keep basic tools and OEM parts on hand and follow a short maintenance routine. If issues repeat or the body is cracked, call a licensed plumber.
Take action today: inspect one valve, try a simple fix, and note results. Share your experience or questions below and subscribe for more practical maintenance guides.

