

If you use Instagram or Facebook, you’ve probably seen short, catchy videos called Reels. They’re everywhere—on your feed, Explore page, and even shared by friends. Brands, creators, and everyday users make Reels to get more attention, share stories, or just have fun. But how do you actually make a Reel that people want to watch? It’s not just about hitting ‘record’—there’s an art and a process behind it.
In this guide, you’ll learn how to make Reels from start to finish—even if you’ve never made one before. We’ll cover planning, shooting, editing, and posting, plus practical tips that most beginners overlook. Along the way, you’ll see real examples, common mistakes, and smart ways to make your Reels stand out.

36% off Today’s Exclusive Deals
Limited-time Exclusive Deals. Check current discount on Amazon.
Check Price on Amazon As an Amazon Associate I earn from qualifying purchases.Ready to start creating?
What Are Reels And Why Do They Matter?
Reels are short, vertical videos—usually 15 to 90 seconds—that you create and share on platforms like Instagram and Facebook. They’re designed for fast, engaging viewing. Reels use music, effects, and quick editing to grab attention.
Why do Reels matter? Because they get more reach than regular posts. Instagram’s algorithm favors Reels, meaning your video is likely to show up on more people’s screens. For creators and businesses, this means more visibility and sometimes, viral growth.
But it’s not just about numbers. Reels let you be creative, share your story, and connect with people. Whether you’re showing a quick recipe, a travel moment, or a funny skit, Reels give you a stage.
Planning Your Reel: The Key To Success
Jumping straight into shooting is a common mistake. Planning sets you up for a better result.
Know Your Goal
Ask yourself: What do you want from this Reel? It could be:
- Entertain your audience (funny moments, dances)
- Educate (quick tips, how-tos)
- Promote something (product, event)
- Inspire (motivational stories, quotes)
Being clear helps you focus your message.
Define Your Audience
Think about who will watch your Reel. Are they teens, adults, or professionals? What do they like? Tailor your content for them. For example, Gen Z often prefers fast, funny, or relatable videos, while professionals might want quick tips or industry insights.
Brainstorm Ideas
List out ideas that fit your goal and audience. Search Instagram’s Explore page for trends in your niche. Notice which Reels get lots of views—what makes them work? Is it the music, the editing, or the message?
Write A Simple Script Or Outline
You don’t need a movie script, but a rough outline saves time. Map out:
- Hook: How will you grab attention in the first 3 seconds?
- Body: What’s the main content?
- Ending: How will you close? (call to action, punchline, tip)
This simple structure makes your Reel clear and focused.
Prepare Your Materials
Gather what you need: props, outfits, ingredients, or tools. Check your lighting and space. Prepare your phone or camera with enough battery and storage.
Pro Tip: Save links to trending sounds or effects you want to use. This helps when you edit later.
Shooting Your Reel: Getting The Footage Right
Now that you have a plan, it’s time to shoot. Most people use their smartphone—it’s all you need for great Reels.
Set Up For Vertical Video
Always shoot in vertical (portrait) mode. Reels are designed to fill a phone screen, so horizontal videos look awkward.
Find Good Lighting
Natural light is best. Face a window or go outside. If that’s not possible, use a ring light or lamp. Avoid strong backlighting, which makes your face dark.
Choose A Clean Background
A messy background distracts viewers. Tidy up or use a simple wall. Some creators use curtains or colored paper for a pop of color.
Stabilize Your Phone
Shaky videos are hard to watch. Use a tripod or rest your phone on a steady surface. If you hold your phone, keep your elbows close to your body.
Record Multiple Takes
Don’t expect perfection in one try. Record several takes so you can pick the best one. Try different angles or expressions.
Use The In-app Camera Or Your Phone’s Camera
You can shoot directly in the Instagram or Facebook app, or use your phone’s camera and upload the clips later. Shooting in the app gives you access to effects right away, but your phone’s camera may give higher quality video.
Insider Tip: If you use your phone’s camera, record at 1080p or 4K for clearer videos.
Add Movement
Even small movements—like stepping closer, turning, or using your hands—add interest. Don’t be afraid to move around.
Respect Time Limits
Most Reels are 15, 30, 60, or 90 seconds. Check the limit before you start. Staying under the maximum is usually better; short and snappy works best.
Editing Your Reel: Bringing It All Together
Editing is where your Reel comes alive. Most editing happens in the Instagram or Facebook app, but you can also use third-party apps for more features.
Import Or Arrange Your Clips
Upload your recorded clips into the app. Arrange them in the order you want. Trim the start and end of each clip to remove mistakes or unnecessary pauses.
Add Music Or Sounds
Sound is a big part of Reels. You can:
- Use trending music for more reach
- Record your own voice
- Add sound effects
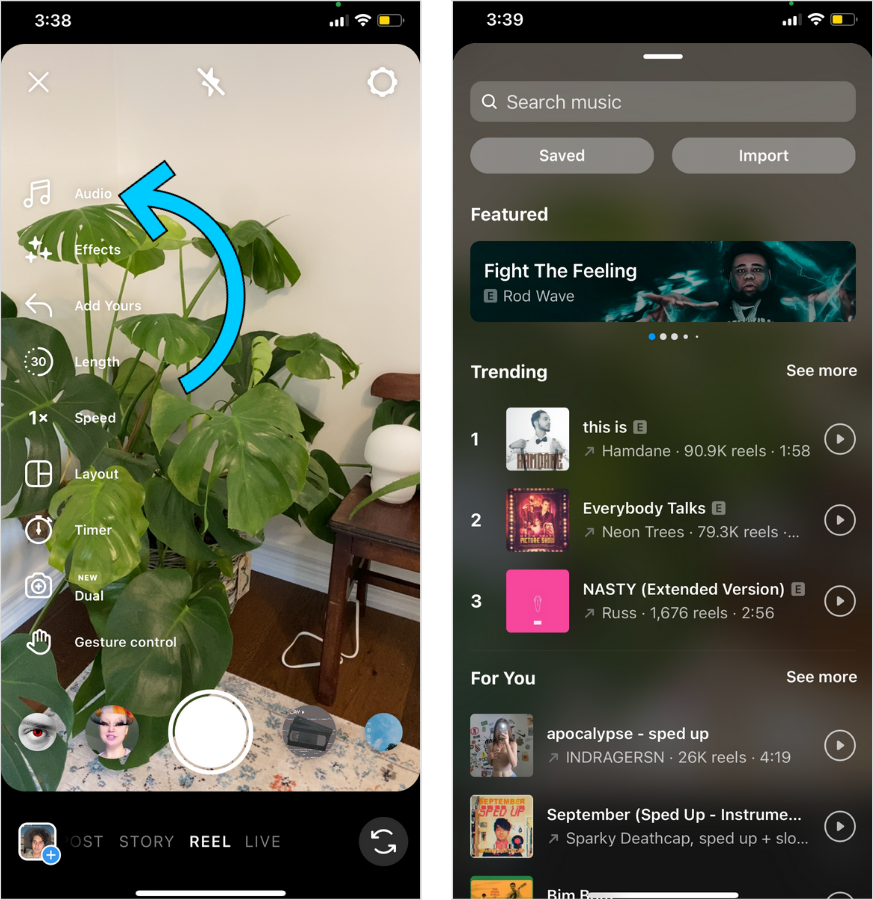
To add music, tap the music icon and search for a track. Preview it to see which part fits your video.
Note: Some business accounts have limited access to popular music due to copyright rules.
Use Text And Stickers
Adding text helps viewers understand your message—especially if they watch with the sound off. Keep text short and easy to read. Place it where it won’t block your face or important visuals.
Stickers can add fun, but don’t overdo it. Use them to highlight, not distract.
Apply Effects And Filters
Try different effects: slow motion, fast forward, or AR filters. These can make your Reel unique. But remember—too many effects can feel chaotic.
Control The Speed
Speed up or slow down clips for impact. For example, a fast-forwarded cooking process or a slow-motion jump both add drama.
Add Transitions
Smooth transitions between clips keep the video flowing. Experiment with quick cuts, swipes, or match-on-action (where the motion continues from one clip to the next).
Check Audio Sync
If you use music, make sure your actions match the beat. This is especially important for dance or lip-sync Reels.
Add Captions
Many viewers watch with the sound off. Captions help everyone understand your video. Most apps have auto-caption tools, but check for mistakes.
Review And Save
Watch your Reel before posting. Fix any spelling errors or awkward cuts. Save a copy to your phone, just in case.
Posting Your Reel: Getting It Seen
You’re almost done—but how you share your Reel affects how many people see it.
Write A Strong Caption
A good caption tells viewers what your Reel is about. Use simple, direct language. Ask a question or add a call to action, like “Save this tip!” or “Tag a friend who needs this!”
Use Hashtags Wisely
Hashtags help your Reel get discovered. Mix popular and niche hashtags. For example: #reels, #howto, plus a specific one like #easydessert or #studyhacks.
Instagram allows up to 30 hashtags, but 3-5 focused hashtags often work better.
Choose A Cover Image
The cover image is the thumbnail people see before clicking. Pick a frame from your Reel or upload a custom image. Make sure it looks good in a square preview.
Tag People And Locations
If your Reel features someone, tag them. Adding a location helps local users find your video. Don’t tag randomly—only relevant people and places.
Share To Your Feed And Stories
You can share your Reel to your main profile and to Stories. Stories disappear after 24 hours, but they boost early views. Sharing to both increases reach.
Post At The Right Time
Post when your audience is most active. For many, this means evenings or weekends. Check your account insights for the best times.
Analyzing Reel Performance: What Works And What Doesn’t
After posting, you want to know: Did my Reel work? Instagram and Facebook give you analytics (called Insights) to check your results.
Key Metrics To Track
- Views: How many people watched your Reel
- Likes: How many tapped the heart
- Comments: Feedback or questions from viewers
- Shares: How many sent your Reel to others
- Saves: People who saved your Reel to watch later
- Reach: How many unique users saw your Reel
Table: Reel Metrics Explained
| Metric | What It Shows | Why It Matters |
|---|---|---|
| Views | Number of plays | Measures popularity and reach |
| Likes | People who enjoyed your content | Shows engagement |
| Comments | User feedback and interaction | Indicates connection with audience |
| Shares | Reel sent to others | Helps your Reel go viral |
| Saves | People bookmarking your Reel | Shows value for viewers |
| Reach | Unique accounts who saw it | Shows total audience size |
Spot Patterns And Trends
Look for Reels that did well. What do they have in common? Is it a certain topic, style, or music? Use this data to plan your next Reel.
Learn From Low Performers
Not every Reel will be a hit. For those with low views or engagement, review:
- Did you use a weak hook?
- Was the video too long or too short?
- Was the audio or editing unclear?
- Did you post at an odd time?
Make small changes and try again.
Advanced Insight: Sometimes a Reel gets few views at first, then picks up days later. Don’t delete it too soon—algorithms can boost older Reels.
Common Mistakes Beginners Make With Reels
Many new creators repeat the same errors. Avoid these and your Reels will improve fast.
Ignoring Trends
Trends—like viral dances, challenges, or sounds—boost reach. But don’t just copy; add your own twist.
Overloading With Effects
Too many filters, texts, or stickers make your Reel messy. Keep it clean and focused.
Poor Audio Quality
If viewers can’t hear you, they’ll scroll away. Use a quiet room and speak clearly. Consider a simple clip-on microphone for better sound.
Forgetting The Hook
The first 3 seconds matter most. If you start slow, people swipe away.
Not Adding Captions
Without captions, you lose viewers who watch without sound (often 70% or more).
Uploading Low-quality Video
Blurry or pixelated videos look unprofessional. Always check your settings and internet connection before uploading.
Ignoring Analytics
If you never check your Reel’s performance, you’ll repeat mistakes. Use Insights to improve.
Advanced Tips For Standout Reels
Once you know the basics, try these pro tips to make your Reels shine.
Collaborate With Others
Team up with another creator. Tag each other and share the Reel—both your audiences see it.
Use “remix” Or “duet” Features
Instagram’s Remix and TikTok’s Duet let you respond to another video. It’s a creative way to join trends or add your opinion.
Experiment With Timing And Rhythm
Sync actions with the music’s beat. Quick cuts or matching movements to lyrics make your Reel more engaging.
Test Different Lengths
Don’t always aim for the maximum allowed time. Some viral Reels are just 7-10 seconds.
Try Third-party Editing Apps
Apps like InShot, CapCut, or Adobe Premiere Rush offer advanced editing tools. You can add animations, layer videos, or use green screen effects.
Table: Popular Reel Editing Apps Compared
| App | Main Features | Best For | Cost |
|---|---|---|---|
| InShot | Cut, merge, filters, text | Beginner-friendly edits | Free (with ads) |
| CapCut | Transitions, effects, auto-captions | Trendy, fast edits | Free |
| Adobe Premiere Rush | Pro editing, audio sync | Advanced creators | Free & paid plans |
Use Analytics To Test And Learn
Try different topics, lengths, and styles. Use analytics to see what works, then do more of that.
Optimize For Discovery
Follow trends, use relevant hashtags, and encourage viewers to share or comment. The more interactions, the more likely your Reel is seen by new people.
Real Examples: What Makes A Reel Go Viral?
Let’s look at what successful Reels often have in common:
- Strong hook: The video grabs attention immediately—maybe with a bold claim or funny face.
- Clear message: Viewers know what’s happening within 3 seconds.
- Good pacing: No long pauses or slow sections.
- Relevant music: The sound matches the mood and is often trending.
- Personal touch: Even when copying a trend, the creator adds their style, joke, or twist.
- Engagement: The caption asks a question or invites viewers to comment or share.
Example: Cooking Reel
A chef shares a 30-second recipe. The video starts with the finished dish (the hook), then quickly shows the key steps with fast cuts and captions. Popular music plays in the background. The caption says, “Who wants a taste? Tag a friend who’d eat this!”
Result: High views and shares because it’s quick, clear, and interactive.
Example: Dance Challenge Reel
A user joins a trending dance. They add their own twist—dancing with their pet. The video is fast, uses the trend’s sound, and the caption asks, “Should my dog get his own Reel? ”
Result: Viral because it’s funny, on-trend, and personal.
Table: Reels Vs. Stories Vs. Tiktok
Understanding where Reels fit helps you choose the right format for your content.
| Feature | Instagram Reels | Instagram Stories | TikTok Videos |
|---|---|---|---|
| Length | 15–90 seconds | Up to 60 seconds (per segment) | Up to 10 minutes |
| Visibility | Public (default) | Disappears in 24 hours | Public |
| Editing Tools | Music, effects, text | Basic, limited music | Advanced, green screen, duets |
| Discovery | Explore & hashtags | Followers only | For You page, hashtags |

Practical Insights Most Beginners Miss
1. Consistency matters more than perfection. One great Reel is nice, but steady posting builds your audience. Try a regular schedule—even once a week.
2. Interact with your viewers. Reply to comments and DMs. Instagram notices when you engage, and may boost your Reels.
3. Repurpose content. One video can become a Reel, a Story, and a TikTok. Change the caption or music for each platform.
4. Test different topics. Sometimes an unexpected idea takes off. Don’t be afraid to experiment.
5. Learn from others. Study top creators in your niche. What do they do differently? Don’t copy, but do adapt smart ideas.
Non-obvious insight: Many viral Reels are simple—shot with a phone, in one take, with a basic message. You don’t need fancy equipment or editing skills. Authenticity often beats polish.
For more examples and the latest trends, visit the official Instagram Reels page.
Frequently Asked Questions
How Long Can An Instagram Reel Be?
Instagram Reels can be 15, 30, 60, or 90 seconds long. You choose the length before recording. Most viral Reels are between 15 and 30 seconds because shorter videos often keep viewers’ attention better.
What’s The Best Time To Post A Reel?
The best time depends on your audience. For many, evenings (6–9 PM) and weekends get more views. Use Instagram Insights to find when your followers are most active. Posting at these times can boost reach.
Do I Need Special Equipment To Make Good Reels?
No. A modern smartphone is enough. Good lighting and steady hands matter more than expensive gear. If you want to improve, a simple tripod and ring light are good investments, but not required for beginners.
How Do I Add Music To My Reel?
When editing your Reel, tap the music note icon. Search for a song or browse trending sounds. Some business accounts have limited access due to copyright, so check what’s available on your profile.
Can I Use The Same Reel On Tiktok?
Yes, but check for watermarks. TikTok may lower reach for videos with the Instagram logo. Use third-party apps or download your Reel before posting to avoid this. Adjust captions and hashtags for each platform.
Making Reels is both a skill and a creative outlet. Start simple, learn as you go, and don’t be afraid to show your personality. With these tips, you’re ready to make your first Reel—and maybe even go viral.

