
Quick diagnosis: CDI module faults often cause no spark, weak spark, or erratic engine running.
I have worked on motorcycles, ATVs, and small engines for years, and this CDI Electronics Troubleshooting Guide brings hands-on tips, clear steps, and pro-level checks. This guide covers what a CDI does, common symptoms, simple tests, advanced diagnostics, and real repairs. Read on to learn how to find and fix CDI issues fast and safely.

What is a CDI and why it matters
Capacitor Discharge Ignition (CDI) is an ignition system module. It stores and dumps energy to the ignition coil. CDI Electronics Troubleshooting Guide helps you find faults that stop spark or cause misfires. A bad CDI can mimic many other problems. Knowing the CDI basics saves time and money.
Common symptoms of CDI failure
Many engine problems point to the CDI. Look for these signs:
- No spark at the plug when cranking the engine.
- Intermittent spark or weak spark under load.
- Engine starts but dies quickly or stalls while running.
- Sudden loss of ignition after heat build-up or vibration.
These signs help narrow down the cause. The CDI Electronics Troubleshooting Guide uses symptom patterns to guide tests.

Tools, parts, and safety checklist
Before you start, gather these items:
- Multimeter with continuity and diode tests.
- Spark tester or a known-good spark plug.
- Basic hand tools and insulated pliers.
- Service manual or wiring diagram for your model.
Work on a cool engine and disconnect the battery when needed. Safety reduces mistakes and ensures accurate diagnostics in this CDI Electronics Troubleshooting Guide.
Step-by-step diagnostic workflow
Follow a clear workflow to save time:
- Visual check first. Look for burned wires, corrosion, or loose connectors.
- Confirm the spark. Use a spark tester while cranking.
- Check power and ground at the CDI. Measure voltage and continuity.
- Test the trigger/pulse input from the pickup coil or stator.
- Test the output to the ignition coil.
- Swap with a known-good CDI if available.
This CDI Electronics Troubleshooting Guide gives a repeatable order to find faults quickly.
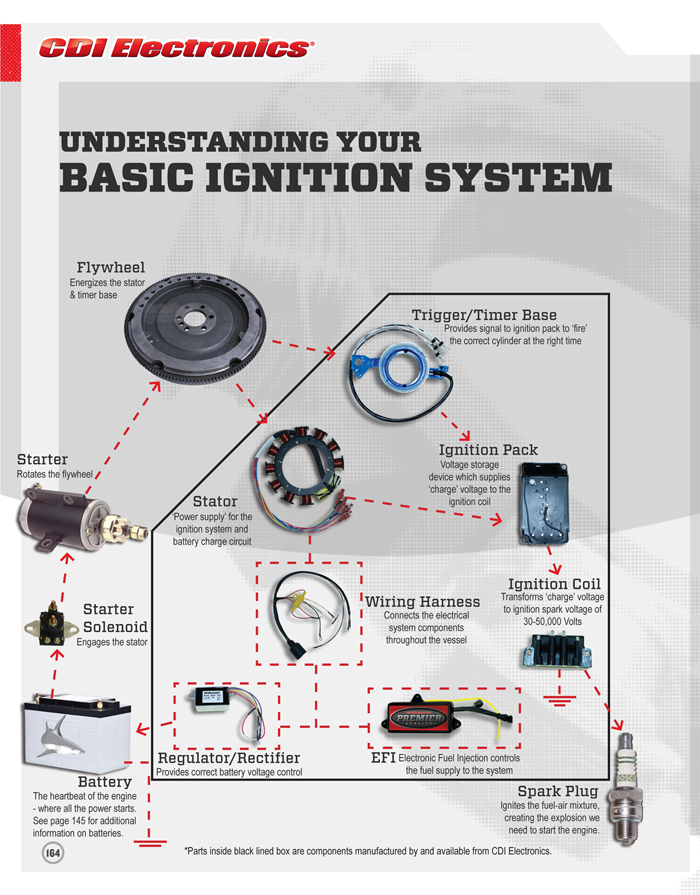
![]()
People also ask (brief answers)
How do I know if the CDI is bad?
If there is no spark but power and pickup signals are good, the CDI is likely faulty. Replace or bench-test the unit to confirm.
Can a bad stator look like a bad CDI?
Yes. A weak or missing trigger from the stator can mimic CDI failure. Always test the pickup and stator first.
Is CDI repair possible or is replacement better?
Some CDI units are serviceable by trained technicians. For most DIYers, replacement is quicker and more reliable.
Testing the CDI inputs and outputs
Test the key points in every CDI system:
- Power feed: Measure constant 12V or battery voltage at the CDI power pin with ignition on.
- Ground: Check for low-resistance ground on the CDI chassis or negative pin.
- Trigger/pulse input: Use an oscilloscope or a multimeter (AC or frequency) to see pulses while cranking.
- Output to coil: Look for switching pulses or spark pulses at the coil primary.
If any test fails, the CDI Electronics Troubleshooting Guide recommends isolating the bad circuit. Replace the faulty part or repair wiring as needed.
 component checks explained”
style=”max-width: 100%; height: auto; border: 2px solid black; border-radius: 10px; display: block; margin: 0 auto;”
loading=”lazy”
/>
Common component checks explained
Focus checks on related parts that often cause CDI faults:
- Stator/pickup coil: Check DC resistance and AC pulses. Replace if open or weak.
- Ignition coil: Check primary and secondary resistances and insulation. Weak coil gives weak spark.
- Kill switch and key switch: Test continuity and any cut-off wiring.
- Wiring harness: Look for pin corrosion and broken strands.
This CDI Electronics Troubleshooting Guide helps you test parts methodically to avoid unnecessary CDI swaps.

Repair, replacement, and when to swap the CDI
Decide repair vs replace using these guidelines:
- Replace the CDI when internal failure is likely and a known-good unit is affordable.
- Repair wiring, connectors, coils, or switches first, as they are common failure points.
- Consider refurbishing a CDI only if you have the right tools and a parts donor.
- Keep OEM numbers and specs to match replacements.
From my work, more than half of “bad CDI” calls were fixed by repairing wiring or the stator first. This CDI Electronics Troubleshooting Guide leans on that practical insight.
Preventive maintenance to avoid CDI trouble
Simple upkeep reduces CDI failures:
- Keep battery charged and terminals clean.
- Secure and protect wiring from heat and chafe.
- Use dielectric grease on connectors to prevent corrosion.
- Replace old coils and plug wires proactively.
These steps extend CDI life and lower the chance of roadside failures, as covered in this CDI Electronics Troubleshooting Guide.
Advanced tips and tight spots to check
When basic tests fail to find the problem, try these:
- Use an oscilloscope to view trigger waveforms and coil switching. A bad waveform often points to a weak pickup or intermittent CDI.
- Wiggle test harnesses while cranking to detect intermittent faults.
- Heat-test components with a heat gun to reproduce failures caused by temperature.
- Consult wiring diagrams and trace signals to avoid wasted swaps.
In my shop, scope traces solved several tricky cases that a multimeter missed. The CDI Electronics Troubleshooting Guide recommends investing in basic test gear for this reason.
Frequently Asked Questions of Cdi Electronics Troubleshooting Guide
What causes a CDI to fail?
CDIs can fail due to voltage spikes, water intrusion, heat, vibration, or manufacturing defects. Poor grounding and corroded connectors also cause failures.
How do I test a CDI with a multimeter?
Check for power and ground first. Then test for trigger pulses on the input. If inputs are good and output shows no switching, the CDI may be faulty.
Can moisture damage a CDI?
Yes. Moisture causes corrosion and shorting inside the CDI. Drying and cleaning connectors can help, but internal corrosion often means replacement.
Is a no-spark condition always the CDI?
No. No spark can come from coil failure, bad pickup, battery issues, or kill switch faults. Use a step-by-step approach to find the true cause.
How long does a CDI usually last?
A well-kept CDI can last many years. Heat, moisture, and electrical faults shorten its life. Preventive care extends service life.
Conclusion
This CDI Electronics Troubleshooting Guide gives a clear path from symptom to solution. Start with simple checks, test inputs, isolate parts, and use a known-good unit if needed. With the right tools and steps, most CDI problems are easy to fix. Try the workflow today, keep notes on what you test, and share your results or questions below to learn more.

