

Building a deck is one of the best ways to add both value and enjoyment to your home. It creates a space for relaxing, entertaining, and connecting with nature—right in your backyard. But if you’ve never taken on a project like this, the process can feel overwhelming.
From planning and permits to the final touches, each step requires careful thought and attention to detail. The good news? With the right guidance and a bit of patience, building a deck is a project that even beginners can tackle successfully.

36% off Today’s Exclusive Deals
Limited-time Exclusive Deals. Check current discount on Amazon.
Check Price on Amazon As an Amazon Associate I earn from qualifying purchases.This guide will take you through the full process of building a deck, from the first idea to the last screw. Along the way, you’ll find practical advice, real-world examples, and key insights that many first-timers overlook. By the end, you’ll not only know what to do—you’ll know *why* each step matters.
Planning Your Deck
The foundation of a great deck starts with a solid plan. Rushing into the build without proper planning can lead to mistakes, wasted money, and a deck that doesn’t fit your needs.
Define Your Purpose
Before you pick up a saw, ask yourself what you want from your deck. Is it for family gatherings, quiet mornings, or large parties? The answer will guide your design, size, and even the materials you choose.
- Entertainment: If you host often, you’ll need enough space for seating, maybe even an outdoor kitchen.
- Relaxation: A smaller, private deck with a cozy chair or hot tub might be perfect.
- Dining: Make sure there’s room for a table and chairs, plus easy access to the kitchen.
Choose The Location
Think about where the deck will get the most use and the best views. Consider:
- Sun exposure: South-facing decks get more sun; shade might be needed.
- Privacy: Trees, fences, or the house itself can block unwanted views.
- Access: Direct entry from the house is ideal.
Also, check the slope and drainage of your yard. A spot that collects water could lead to rot and structural problems.
Check Local Codes And Permits
Building codes exist to keep you safe, but they can be complex. Most towns require a permit for decks over a certain height (usually 30 inches above ground). Some require inspections at different stages. Skipping permits can lead to fines or having to rebuild parts of your deck.
Contact your local building department early. They’ll tell you:
- Required setbacks (distance from property lines)
- Height limits
- Railing and stair regulations
- Footing size and depth
Sketch Your Design
Draw a simple plan showing:
- Dimensions
- Stair locations
- Railing sections
- Posts and beam locations
You don’t need to be an artist—just clear enough to communicate your idea. Many home improvement stores offer free deck design tools online.
Set A Budget
Deck costs can vary widely. According to the National Association of Home Builders, the average deck costs around $25–$35 per square foot for pressure-treated wood, and up to $60+ per square foot for composite materials.
Factor in:
- Materials (wood, composite, fasteners)
- Tools (rent or buy)
- Permits
- Labor (if hiring help)
- Extras (lighting, furniture)
A small 12×16 ft deck (192 sq ft) could cost between $4,800 and $7,680 in materials alone. Add 20-30% for labor if you’re not building yourself.
Choosing Materials
The material you choose affects your deck’s appearance, lifespan, and maintenance needs. Here’s a comparison of the most common options:
| Material | Average Cost (per sq ft) | Maintenance | Expected Lifespan | Pros | Cons |
|---|---|---|---|---|---|
| Pressure-Treated Wood | $2–$5 | Annual staining/sealing | 10–15 years | Affordable, widely available | Can warp/split, needs upkeep |
| Cedar/Redwood | $6–$10 | Staining every 2–3 years | 15–20 years | Natural look, resists insects | More expensive, soft wood |
| Composite | $8–$15 | Wash occasionally | 25+ years | Low maintenance, many colors | Higher cost, can get hot |
| PVC | $10–$18 | Wash occasionally | 30+ years | Resists moisture, no splinters | Most expensive, looks less natural |
Pressure-treated wood is the most common for budget builds. If you want less maintenance and longer life, composite decking is a strong choice. Just be aware that composite and PVC can be slippery when wet, and sometimes feel hotter underfoot in direct sun.
Pro tip: Don’t forget to budget for fasteners (screws, hidden clips). Stainless steel or coated fasteners are essential to prevent rust, especially with pressure-treated lumber.
Tools And Equipment You’ll Need
Most deck projects require a mix of basic and specialized tools. Renting tools you’ll use only once can save money.
Essential tools:
- Circular saw or miter saw
- Drill/driver and bits
- Measuring tape
- Level
- Hammer
- Speed square
- Chalk line
- Shovel/post hole digger
Optional but helpful:
- Power auger (for deep post holes)
- Impact driver (for driving long screws)
- Reciprocating saw (for cutting notches)
- Screw gun (for fast deck board installation)
Safety gear is a must: safety glasses, work gloves, and hearing protection. If you’re working above ground, consider a fall protection harness.
Laying Out The Deck
Once you have your plan and materials, it’s time to start marking out your deck’s footprint. This step is crucial for a sturdy, square deck.
- Mark the perimeter: Use stakes and string to outline the deck’s edges.
- Check for square: Measure diagonally corner to corner; both measurements should match.
- Mark post locations: Based on your plan, mark where each footing and post will go. Posts are usually spaced 6–8 feet apart.
- Double-check setbacks: Make sure your layout meets local rules for distances from property lines and structures.
Common mistake: Skipping the diagonal measurement. Even a small error can lead to angled boards and uneven railings later.
Setting The Footings And Posts
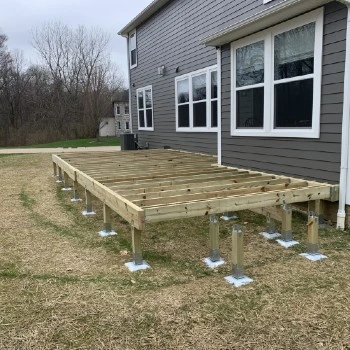
Footings are the concrete bases that hold your deck’s posts. They need to be below the frost line (usually 12–48 inches deep, depending on your area) to prevent heaving in winter.
Digging Footings
- Use a post hole digger or power auger for round holes.
- Make holes at least 12 inches wide; deeper in cold climates.
- For a small deck, you may need 4–6 footings. Larger decks require more.
Pouring Concrete
- Mix concrete according to package instructions.
- Pour into holes, up to ground level.
- Insert a post anchor or J-bolt into the wet concrete to hold the post base.
- Allow concrete to cure for at least 24–48 hours.
Setting Posts
- Use pressure-treated 4×4 or 6×6 posts for support.
- Place posts in anchors; check for plumb (vertical alignment).
- Secure with bolts or screws.
Pro tip: Slightly overbuild your footing size. Stronger bases mean less settling and fewer problems down the line.
Framing The Deck
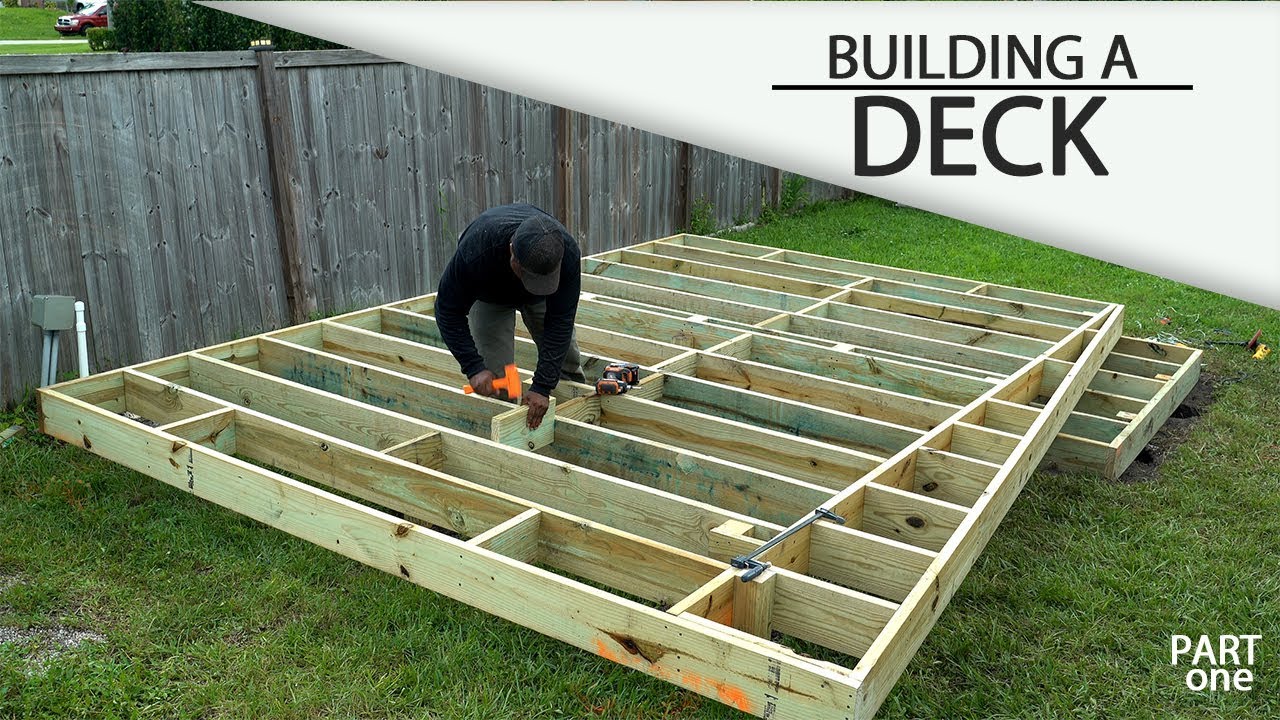
The frame is the deck’s skeleton, supporting all the weight above. This step can make or break the strength of your deck.
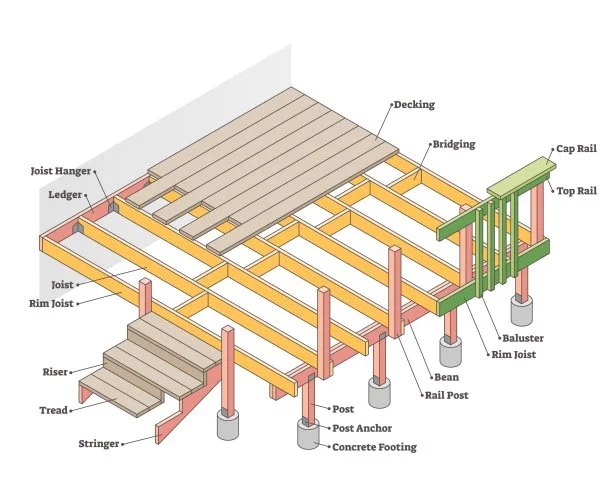
Installing The Ledger Board
The ledger board attaches the deck to your house. It must be securely fastened and flashed to prevent rot.
- Remove siding where the ledger will go.
- Use lag bolts or ledger screws to secure it directly to the house’s rim joist.
- Install metal flashing above the ledger to direct water away.
Common mistake: Attaching the ledger to brick or stone veneer. Always anchor to solid framing.
Building The Beam And Joists
- Beams rest on the posts and support the joists.
- Attach beams to posts with metal post-to-beam connectors.
- Joists (usually 2×8 or 2×10 lumber) run perpendicular to the beams, spaced 16 inches apart.
- Secure joists with joist hangers for added strength.
Here’s a quick look at typical framing spacing:
| Lumber Size | Maximum Span (ft) | Joist Spacing |
|---|---|---|
| 2×6 | 9 | 16" OC |
| 2×8 | 12 | 16" OC |
| 2×10 | 15 | 16" OC |
Always follow your local codes, as they may require shorter spans for safety.
Blocking And Bracing
Install blocking between joists every 4–6 feet to reduce twisting. Diagonal bracing can prevent the deck from swaying, especially for high or freestanding decks.
Installing Decking Boards
With the frame complete, it’s time to lay the deck boards—the part everyone will see and walk on.
Laying The Boards
- Start against the house and work outward.
- Leave a gap (usually 1/8–1/4 inch) between boards for drainage and expansion.
- For wood, use deck screws; for composite, use hidden fasteners for a clean look.
- Stagger joints for a natural appearance and stronger surface.
Pro tip: Wet wood boards will shrink as they dry; composite boards won’t. Adjust your gap accordingly.
Trimming And Finishing
- Cut board ends flush with the deck’s edge.
- Install fascia boards to cover exposed framing.
- Sand any rough edges or surfaces.
Building Stairs And Railings
If your deck is more than 2 feet above the ground, stairs and railings are required for safety.
Stairs
- Measure the height from the deck to the ground.
- Divide by 7–7.5 inches to get the number of steps (each step is called a “rise”).
- Use stringers (cut from 2×12 lumber) to support the steps.
- Attach treads (step boards) and risers (vertical boards) if desired.
Railings
- Posts must be strong and securely attached (not just nailed).
- Rails should be 36–42 inches high, depending on local code.
- Balusters (vertical spindles) are spaced less than 4 inches apart for child safety.
Deck railings can be built from wood, metal, or composite to match your deck style.
Finishing Touches
The details make your deck more comfortable and long-lasting.
Sealing And Staining
- Pressure-treated wood should be sealed or stained after it dries (usually 2–3 months after installation).
- Use a deck cleaner before finishing.
- Apply sealer or stain with a brush, roller, or sprayer.
Lighting
Low-voltage deck lights improve safety and create a cozy atmosphere. Options include:
- Post cap lights
- Step lights
- String lights
Furniture And Accessories
Choose weather-resistant furniture and consider:
- Planters
- Umbrellas or pergolas for shade
- Built-in benches or storage
Maintenance
Even low-maintenance decks need care. Sweep regularly, wash once a year, and check for loose boards or fasteners. Wood decks require periodic re-sealing; composites need less but should still be inspected.
Common Mistakes To Avoid
Building a deck is straightforward, but these errors can cause big problems:
- Skipping permits: Can lead to fines or forced removal.
- Improper footings: Leads to sinking or shifting.
- Poor flashing: Causes water damage where deck meets house.
- Not allowing for expansion: Boards can buckle or crack.
- Using the wrong fasteners: Leads to rust and structural failure.
Many beginners also forget to check for underground utilities before digging. Call your local service to mark gas, electric, and water lines.
Example: Cost And Time Breakdown
Let’s look at a typical 12×16 ft (192 sq ft) pressure-treated wood deck built by a homeowner.
| Item | Cost Estimate | Time Estimate |
|---|---|---|
| Materials | $4,800 | n/a |
| Permits | $100 | n/a |
| Tools (rental) | $150 | n/a |
| Labor (DIY) | $0 | 60–80 hours |
| Total | $5,050 | 60–80 hours |
Note: Hiring a contractor can double the price, but saves time and ensures code compliance.
Two Insights Beginners Often Miss
- Deck height affects everything. Even a few extra inches can change the need for railings, stair design, and permit requirements. Measure carefully and plan your finished deck height from the start.
- Ventilation matters. Skipping gaps between boards or boxing in the underside too tightly can trap moisture, causing rot. Make sure your deck can “breathe”—especially with wood.
Where To Get Help
Many home improvement stores offer free classes or expert advice. Online resources like the Family Handyman provide detailed guides with photos and videos.
Final Thoughts
Building a deck is more than just a construction project—it’s about creating a space that fits your life. With good planning, the right materials, and careful attention to each step, you can build a deck that lasts for decades. Remember, take your time, double-check your measurements, and don’t be afraid to ask for help when you need it.
The reward is not just a new part of your home, but the satisfaction of building it yourself.
Frequently Asked Questions
How Long Does It Take To Build A Deck?
A simple deck can be built in one to two weekends by a beginner, if you have all your materials ready. Larger or more complex designs may take longer. Weather, inspection schedules, and drying time for concrete can also affect your timeline.
What’s The Best Wood For Deck Building?
Pressure-treated pine is most common due to price. For a more natural look and better resistance to insects, cedar or redwood are good choices. In humid areas, composite or PVC may last longer with less maintenance.
Do I Need A Permit To Build A Deck?
In most areas, yes—especially if the deck is over 30 inches above the ground or attached to your house. Always check with your local building department before starting. Inspections are often required at multiple stages.
How Do I Maintain My Deck?
Clean your deck at least once a year. Wood decks should be resealed or stained every 1–3 years, depending on weather and use. Composite decks need less maintenance but should still be washed and checked for loose fasteners.
Can I Build A Deck Myself, Or Should I Hire A Pro?
Many homeowners build their own decks, especially with simple designs. If your deck is large, elevated, or you’re unsure about permits and structural details, hiring a professional contractor is safer. For complex builds, the extra cost often pays off in safety and time saved.

