Starting a Facebook Page is one of the simplest ways to grow your presence online, connect with new audiences, and promote your ideas, brand, or business. But while the process seems easy, many people miss key steps that make a big difference in results.
If you want to get noticed on Facebook, it’s not just about filling out forms—it’s about making smart choices, adding the right details, and understanding how the platform works. This guide breaks down how to create a Facebook Page from scratch, with tips to help your page stand out from the start.

36% off Today’s Exclusive Deals
Limited-time Exclusive Deals. Check current discount on Amazon.
Check Price on Amazon As an Amazon Associate I earn from qualifying purchases.Why Create A Facebook Page?
Before you set up your page, it’s important to know what a Facebook Page can do. Unlike a personal profile, a Facebook Page is designed for businesses, organizations, public figures, artists, and anyone who wants to share content with a wider audience. Here are a few reasons why you might need one:
- Reach More People: Pages are public, so anyone can find and follow them.
- Professional Tools: You get insights, advertising options, and special features.
- Separate Your Identity: Keep your business or project separate from your personal profile.
- Build Trust: A well-made page looks more official than a personal account.
Many people try to use their personal profile for business, but Facebook doesn’t allow this. In fact, using a personal profile for commercial reasons can get your account restricted or even banned. That’s a mistake you definitely want to avoid.
Preparation: What You Need Before You Start
Setting up a Facebook Page only takes a few minutes if you’re ready. To avoid problems, gather these things first:
- A personal Facebook account: You need this to create and manage a Page.
- Page name: Think carefully—this is how people will search for and find you.
- Profile photo: Usually your logo or a face; must be square (at least 170×170 pixels).
- Cover photo: A large banner image (at least 820×312 pixels).
- Description/About info: A short, clear summary (255 characters or less for the intro).
- Contact details: Email, phone, website, address (if relevant).
- Category: What type of business or organization are you?
- Call-to-action: Decide the main action you want visitors to take (like “Call Now” or “Shop Now”).
Don’t rush these decisions. For example, changing your page name later is possible, but it’s not always easy—especially if you already have followers. The same goes for your page URL (username); choose something simple and memorable.
Step-by-step: How To Create Your Facebook Page
Let’s go through each step with clear instructions and tips along the way.
1. Log In To Your Personal Facebook Account
You can’t create a Page without a personal profile. If you don’t have one, sign up at facebook. com. Don’t worry—your personal info won’t be public on the Page.
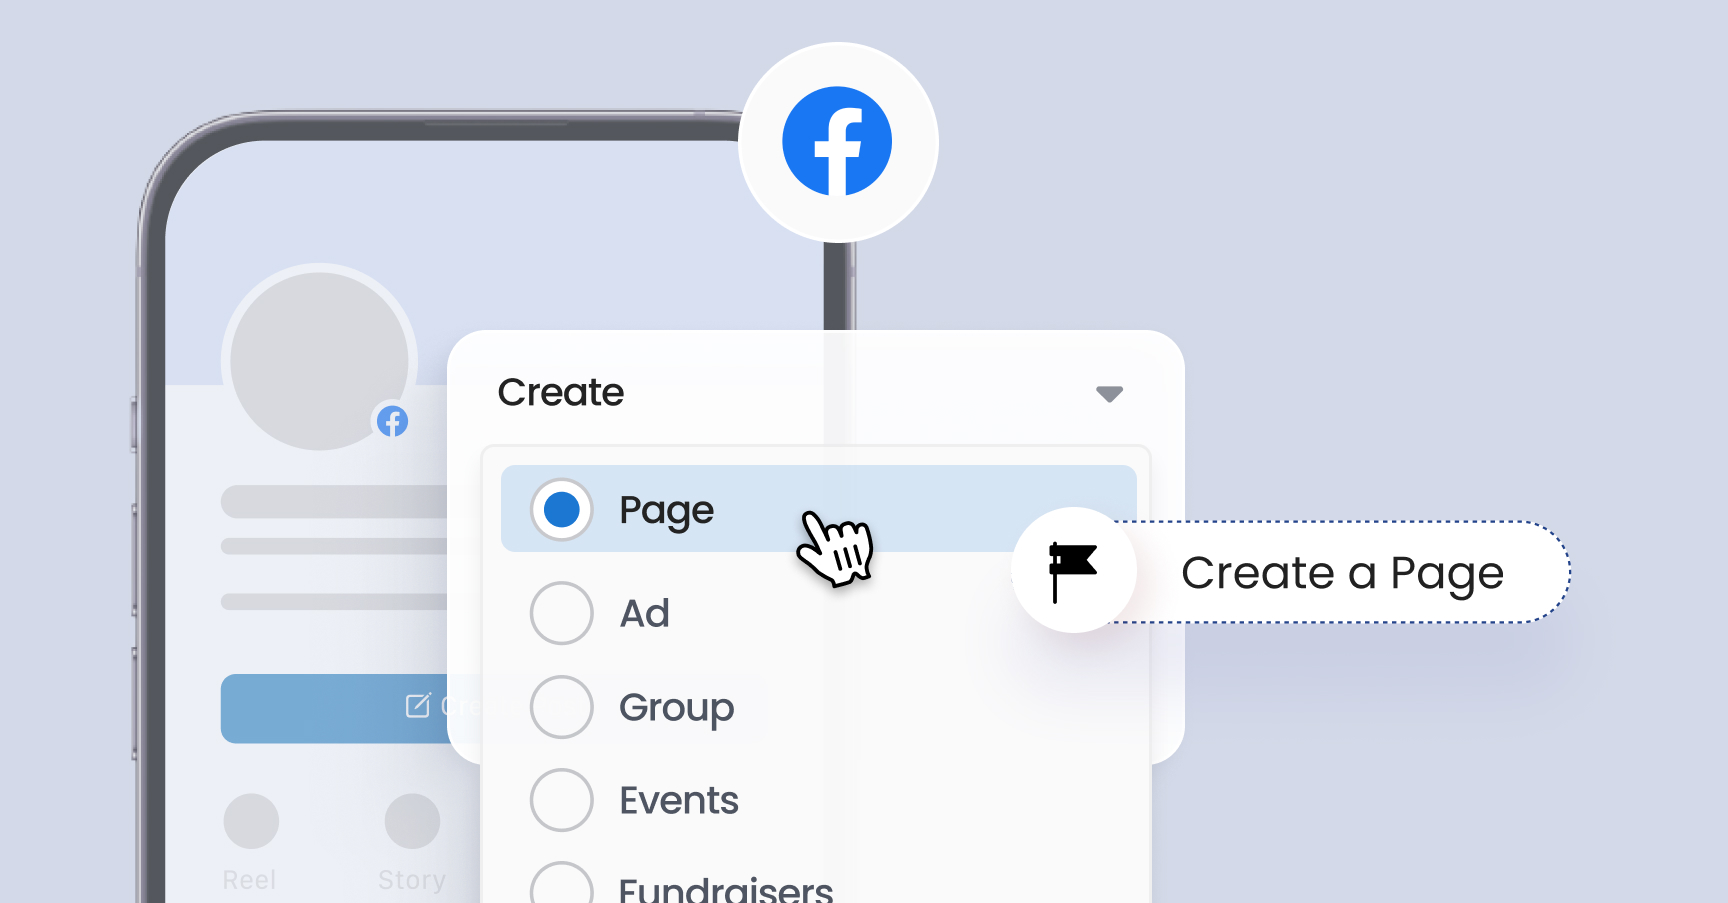
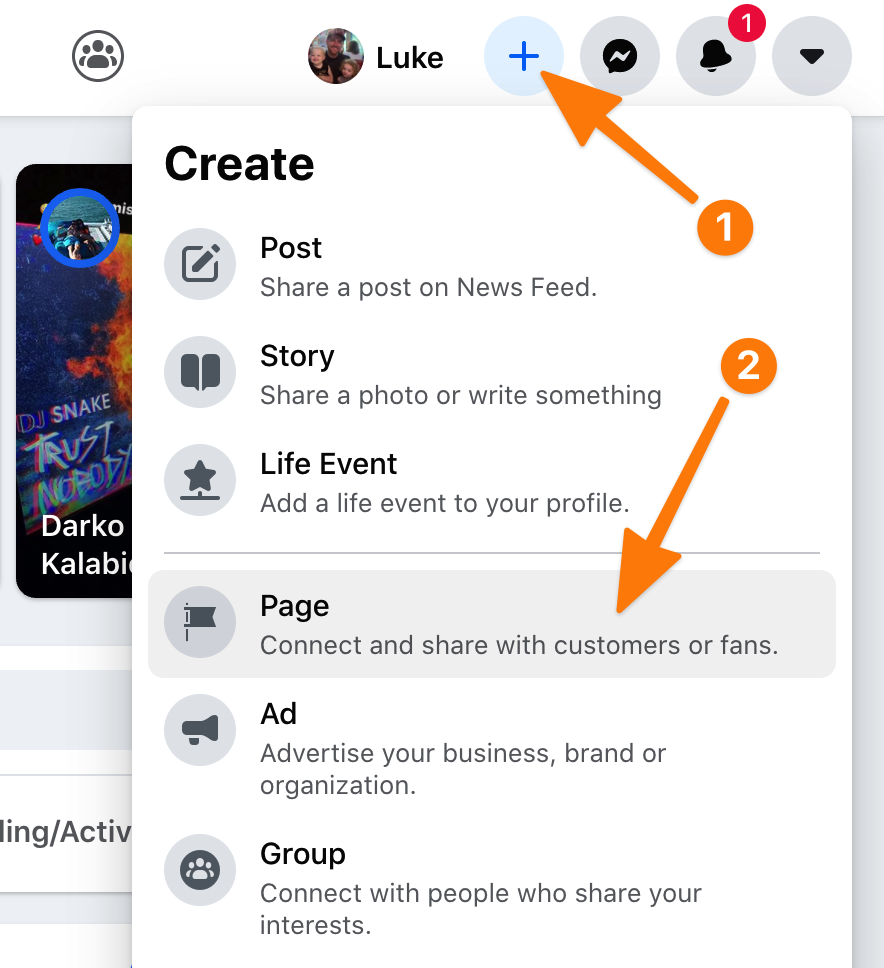
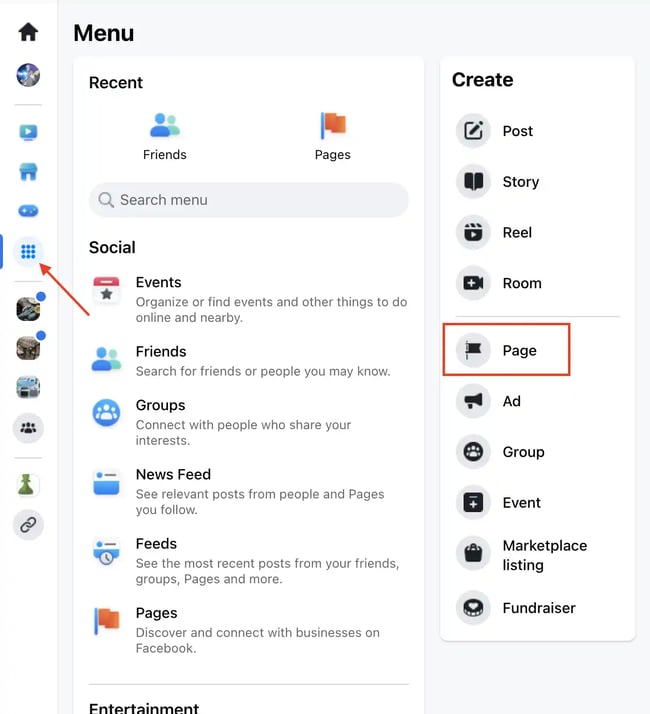
2. Find The Page Creation Tool
On your Facebook homepage:
- On desktop: Click Pages in the left menu, then Create New Page.
- On mobile: Tap the menu (three lines), then Pages, and Create.
This opens the page creation form.
3. Enter Your Page Name And Category
- Page name: This should match your brand or business exactly. Avoid using all caps or strange symbols.
- Category: Type in keywords (like “restaurant,” “consultant,” “musician”) and select the best fit. You can add up to three categories.
4. Add A Description
Write a short, clear description of what your page is about. Make it easy to understand, even for people who don’t know your business yet.
5. Upload Profile And Cover Photos
Your images are the first thing people see. Use high-quality, square images for your profile photo. For the cover, use a photo or graphic that shows what you do or your style.
Image size tips:
- Profile photo: 170 x 170 pixels (desktop), 128 x 128 (smartphones)
- Cover photo: 820 x 312 pixels (desktop), 640 x 360 (mobile)
A common mistake is using a logo or image that looks fine on a website, but is too small or blurry on Facebook. Test your images on different devices to make sure they look sharp.
6. Add Contact And Business Details
Fill in your address, phone number, website, and hours if you have them. Even if your business is online, people trust pages that list real contact info.
7. Customize Your Page Username
Your username creates your Facebook web address (like facebook. com/yourbrand). Pick something short and easy to spell. Avoid numbers or dashes unless necessary.
You can set this in the “Create @username” section under your page name. Sometimes, you may not be able to claim a username immediately if it’s already taken or your page is too new.
8. Set Your Call-to-action Button
Facebook lets you add a button under your cover photo. Popular options include:
- Contact Us
- Send Message
- Call Now
- Shop Now
- Sign Up
Choose the action that matches your main goal. For example, if you want more leads, use “Contact Us” or “Send Message. ” For online stores, “Shop Now” works best.
9. Complete The About Section
Go to your page’s “About” tab and fill out every field you can. This helps people (and search engines) understand what you offer.
Include:
- Business hours
- Price range
- Detailed description
- Company mission
- Products or services
The more details you add, the more professional your page looks.
10. Publish Your Page
Once you’re happy with all the details, click Publish. Your page is now live and visible to everyone. But the work doesn’t stop here—now you need to optimize, invite people, and start posting content.
Optimizing Your Facebook Page For Success
A basic page is a good start, but to get real results, you need to make it as strong as possible. Here’s how to set your page up for growth.
Add A Short Username And Custom Url
A custom username (like @BestBakery) helps people find your page easily. It also gives you a clean link to share. If your desired username is taken, try adding a location or keyword (like @BestBakeryNYC).
Use The Right Page Template
Facebook offers templates for different types of pages (Business, Venues, Services, Nonprofit, etc. ). Each template has different tabs and buttons. Choose a template that matches your goals—find this option in Page Settings > Templates and Tabs.
Organize Your Tabs
Tabs are the menu items on your page (Home, About, Photos, Reviews, etc. ). You can turn tabs on or off and rearrange them. For example, if you don’t have events, hide the Events tab.
Set Up Messaging And Auto-responses
Many people will message your page instead of calling or emailing. Set up a welcome message or instant reply to greet people. You can also add FAQs and automated responses for common questions.
Assign Page Roles
If you have a team, you can give others access to help manage the page. Facebook lets you assign roles like Admin, Editor, Moderator, Advertiser, or Analyst. Be careful who you give full admin rights—admins can remove others or even delete the page.
Link To Other Accounts
Connect your Facebook Page to your Instagram or WhatsApp Business account to share posts and ads across platforms easily. You can do this in your Page Settings.
Add A Pinned Post
A pinned post stays at the top of your page. Use this for promotions, announcements, or to introduce yourself to new visitors.
Double-check Privacy And Visibility
Some people accidentally set their page or posts to “Only Me” or limit them. Make sure your page is public so anyone can find it.
Posting Content: What Works Best On Facebook Pages
The real value of a Facebook Page comes from what you post. Regular, high-quality content keeps your audience engaged and helps your page grow.
Types Of Content That Perform Well
- Images and Videos: Posts with visuals get much more attention than text-only posts.
- Stories: Short, behind-the-scenes updates or quick tips.
- Live Videos: Real-time interaction; great for Q&A, launches, or events.
- Links to Useful Content: Articles, guides, or resources your audience cares about.
- Polls and Questions: Get feedback and spark discussion.
A key insight: Facebook’s algorithm prefers content that starts conversations. Posts that get comments and shares are shown to more people.
Posting Frequency And Timing
There’s no perfect number, but most successful pages post at least 3–5 times per week. Too many posts in one day can annoy followers.
Best times to post depend on your audience, but in general, evenings and weekends get higher engagement. Use Facebook Insights (free tool for pages) to see when your followers are online.
Writing Tips For Facebook Posts
- Keep it short and clear.
- Use simple language.
- Add a call to action (ask a question, invite comments, etc. ).
- Use emojis and line breaks to make posts easy to read.
Don’t just promote—mix in helpful, fun, or inspiring posts to build trust.
Scheduling And Planning
Facebook lets you schedule posts in advance. This helps you stay consistent, even when you’re busy.
Growing Your Audience: Getting Likes And Followers
Once your page is live, you need people to find and follow it. Here’s how to get your first fans—and keep growing.
Invite Friends And Contacts
You can invite your Facebook friends to like your page. Don’t just invite everyone—focus on people who are interested. Add a personal note if possible.
Share Your Page Outside Facebook
Put your page link on your website, business cards, email signature, and other social media profiles. The more places people see it, the faster you’ll grow.
Use Facebook Ads (when Ready)
Facebook ads can help you reach new people quickly. Start with a small budget and target people by location, interests, or age.
A common beginner mistake: spending money on ads before your page is complete or before posting any content. Make sure your page looks trustworthy first.
Join And Participate In Groups
Join Facebook Groups related to your niche and share helpful posts (not spam). This builds your reputation and brings people back to your page.
Collaborate And Tag Others
Work with other pages or influencers. Tag them in posts or run a joint promotion. This exposes your page to their followers.
Run Contests Or Giveaways
Simple contests (“Like our page and comment to win”) can bring in new followers, but follow Facebook’s rules. Don’t require people to share your post on their own timeline—that’s against Facebook policy.
Page Insights: Tracking Your Growth
Facebook Pages come with free analytics called Insights. These show you:
- How many people like and follow your page
- Which posts get the most engagement (likes, comments, shares)
- When your audience is online
- Demographic info (age, gender, location)
- How people found your page
Review these stats regularly to see what’s working. For example, if videos get more comments than photos, post more videos.
Here’s a quick comparison of two types of posts:
| Type of Post | Average Reach | Average Engagement |
|---|---|---|
| Video | 2,000 people | 5.5% |
| Image | 1,500 people | 3.7% |
As you can see, video posts typically get more reach and engagement.
Common Mistakes To Avoid
Many new page owners make errors that hurt their growth. Watch out for these:
- Incomplete profiles: Missing photos or info make your page look unprofessional.
- Irregular posting: Posting once a month won’t build a following.
- Ignoring comments/messages: Respond to people quickly, even if it’s just “Thanks!”
- Over-promotion: Don’t make every post an ad. Mix in value.
- Buying likes: Fake followers don’t engage and can harm your page.
Another non-obvious mistake: using copyrighted images or music. Always use content you own or have permission to use.
Privacy And Security Tips
Protecting your page (and your personal profile) is important. Here’s how:
- Use a strong, unique password on your Facebook account.
- Set up two-factor authentication for extra security.
- Limit admin access—only give full control to people you trust.
- Regularly review who has access to your page in the Page Roles section.
If you ever lose access, Facebook has a recovery process, but it can take time.
Example: Creating A Page For A Local Bakery
To make these steps more real, let’s look at how someone might create a page for a bakery.
- Page name: Sweet Cravings Bakery
- Category: Bakery, Dessert Shop, Coffee Shop
- Profile photo: Logo or photo of best-selling cake
- Cover photo: Colorful shot of bakery display
- Description: “Fresh-baked treats daily. Visit us in downtown Springfield or order online!”
- Username: @SweetCravingsBakery
- Call-to-action: “Order Food”
- About section: Address, phone, menu link, open hours
With this setup, the page looks professional and is easy to find. They post daily photos of new treats, share baking tips, and answer messages within an hour. In three months, they reach 2,000 followers—all local customers.
Advanced Features And Customizations
Once your page is running smoothly, you can explore more advanced options to boost your reach and results.
Facebook Shops And Services
If you sell products, you can add a Shop tab to list and sell items directly on Facebook. For service businesses, add a Services tab to list what you offer and take bookings.
Events
If you hold events, classes, or special promotions, use the Events tab. People can RSVP, share with friends, and get reminders.
Reviews And Recommendations
Enable reviews to build trust. Respond to all reviews—thank people for positive ones, and handle negative feedback politely.
Integrate With Other Tools
You can connect your page with tools like Mailchimp (for newsletters), appointment booking systems, or online ordering platforms.
Here’s a table comparing three types of Facebook Page features:
| Feature | Who Should Use It? | Benefits |
|---|---|---|
| Shop | Retailers, eCommerce | Sell products directly, track orders |
| Services | Consultants, Salons | List offerings, enable bookings |
| Events | Venues, Educators | Promote events, manage RSVPs |
Facebook Business Suite
For businesses managing multiple pages or profiles, the free Meta Business Suite tool lets you manage posts, ads, and messages all in one place. This saves time and helps you stay organized.
How Facebook Pages Compare To Groups And Profiles
It’s easy to confuse Pages, Groups, and Profiles. Here’s a quick comparison to help you decide what’s best for your needs:
| Feature | Page | Group | Profile |
|---|---|---|---|
| Purpose | Public presence for business or brand | Community discussion space | Personal use |
| Visibility | Public | Public, private, or secret | Friends only (by default) |
| Analytics | Yes (Insights) | Limited | No |
| Advertising | Yes | No | No |
For most businesses and public projects, a Facebook Page is the right choice.
Staying Updated: Facebook Page Changes And Trends
Facebook updates its features often. What works today may change next year. To keep your page effective:
- Check Facebook’s official help center and blog for updates.
- Join marketing groups or follow social media experts.
- Test new features as they roll out.
For official tips, see the Facebook Business Help Center.
Frequently Asked Questions
How Much Does It Cost To Create A Facebook Page?
Creating a Facebook Page is completely free. You only pay if you choose to run ads or promote your posts. There are no hidden fees for basic features.
Can I Create A Page Without A Personal Facebook Account?
No, you must have a personal Facebook profile to create and manage a Page. Your personal information is not shown publicly on the Page, but it’s needed for security and admin purposes.
How Do I Delete Or Unpublish My Facebook Page?
Go to your Page settings, then select “General.” Here you can find options to unpublish (hide the page) or delete it permanently. Unpublishing is useful if you want to make changes without losing everything.
Can I Change My Page Name Or Username Later?
You can request a name or username change in your Page settings, but Facebook must approve changes. If your page has many followers or if the new name is very different, approval may take longer or be denied.
How Do I Make My Page More Visible?
Post regular, high-quality content, invite friends, use a custom username, complete your profile, and interact with followers. Running targeted ads and joining relevant groups also help boost visibility.
Creating a Facebook Page is more than a technical step—it’s your digital handshake with the world. By following these steps and tips, you set yourself up for real connections and steady growth. Stay active, keep learning, and your page can become a powerful tool for your business or brand.