

Editing videos can feel overwhelming, especially if you’re just starting. But with the right approach, anyone can learn to create polished, engaging content. Whether you want to edit travel vlogs, short films, marketing videos, or social media clips, understanding the core steps of video editing makes the process faster and more enjoyable.
This guide breaks down everything you need to know about how to edit videos, from choosing the right software to exporting your final masterpiece. You’ll also discover tips that beginners often overlook, practical examples, and a clear explanation of each stage.

36% off Today’s Exclusive Deals
Limited-time Exclusive Deals. Check current discount on Amazon.
Check Price on Amazon As an Amazon Associate I earn from qualifying purchases.If you want to turn raw footage into something memorable, read on.
What Is Video Editing?
Video editing is the process of arranging, modifying, and enhancing video clips to tell a story or communicate information. It involves tasks like trimming unwanted parts, adding music, adjusting colors, and including effects. The goal is to make your content clear, engaging, and professional-looking.
Many people think video editing is just cutting and joining clips, but it’s much more. Editors also manage audio, add transitions, and sometimes create special effects.
Choosing The Right Video Editing Software
The software you choose will affect how quickly you learn and the quality of your videos. Here’s a comparison of popular video editors:
| Software | Best For | Price | Platform |
|---|---|---|---|
| Adobe Premiere Pro | Professionals & Advanced Users | $20.99/month | Windows, macOS |
| Final Cut Pro | Mac Users, Pros | $299.99 (one-time) | macOS |
| DaVinci Resolve | Color Grading & Free Option | Free / $295 (Studio) | Windows, macOS, Linux |
| iMovie | Beginners, Mac Users | Free | macOS, iOS |
| HitFilm Express | Beginners, YouTubers | Free / Paid Upgrades | Windows, macOS |
When choosing software, consider:
- Your skill level: Beginners may prefer simpler tools like iMovie or HitFilm Express.
- Budget: Free options like DaVinci Resolve are powerful, but paid tools offer advanced features.
- Platform compatibility: Make sure the software runs on your device.
- Project needs: Complex effects require more advanced software.
Non-obvious Insight
Some free editors like DaVinci Resolve offer features that match paid software. However, the learning curve can be steep. Beginners often think they need pro software, but starting with simpler tools can help you build confidence and skills.
Preparing Your Footage
Before editing, organize your files. This step saves time and avoids mistakes later.
- Transfer all video clips from your camera, phone, or memory card to your computer.
- Create folders for different types of files: Videos, audio, images, and graphics.
- Rename files with descriptive names like “Interview_Jan2024” or “BeachShot1.”
- Back up your footage to an external drive or cloud storage.
Staying organized prevents lost files and lets you focus on editing.
Understanding The Video Editing Workflow
Every editor follows a basic workflow, though the order can change based on the project.
1. Importing
Bring your files (video, audio, images) into your editing program. Most editors let you drag and drop files or use an import menu.
2. Creating A Sequence Or Timeline
A timeline is where you arrange your clips. Think of it as a digital workspace where you build your video, second by second.
3. Rough Cut
Start by placing your clips on the timeline in the order you want. Trim unnecessary parts. At this stage, don’t worry about perfect timing or effects—focus on the story.
4. Fine Cut
Go back and refine your edits. Tighten transitions, cut awkward pauses, and adjust the flow. Add B-roll (extra footage), images, and graphics as needed.
5. Adding Audio
Import music, sound effects, and voiceovers. Place them where they fit best. Adjust volume levels so dialogue is clear, and background music isn’t too loud.
6. Color Correction And Grading
Fix brightness, contrast, and colors to make your video look natural. Color grading gives your video a unique style or mood.
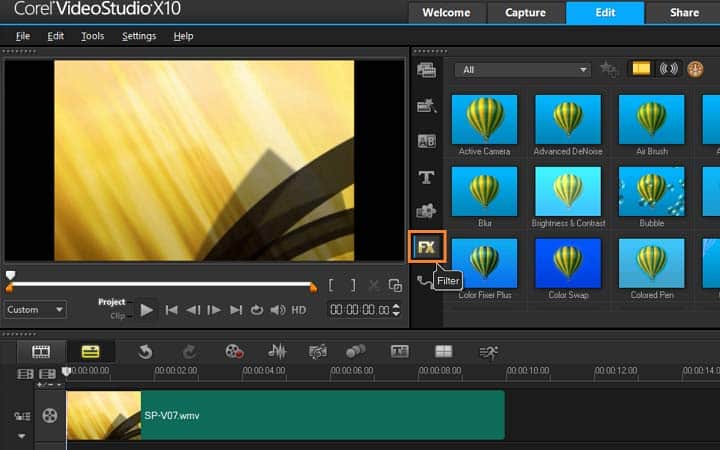
7. Adding Transitions And Effects
Include transitions (like fades or wipes) between clips. Add text, titles, and simple effects.
8. Exporting
Once you’re happy with the edit, export your project into a shareable video file.
Importing And Organizing Media
Importing is more than dragging files; it’s about building a solid foundation.
- Use bins or folders inside your editing software to sort files.
- Label tracks (video, audio, effects) for easy reference.
- Delete duplicate or unusable clips early.
Many beginners skip file organization, leading to confusion and wasted time. Professional editors spend time organizing to prevent mistakes later.
Cutting And Arranging Clips
Trimming is a key editing skill. Here’s how to do it well:
- Set in and out points to choose the exact part of each clip you want.
- Use the razor tool or similar to split clips.
- Avoid jump cuts unless they fit your style (quick, sudden changes can look unprofessional).
- Look for natural pauses in dialogue or action to cut smoothly.
Non-obvious tip: Sometimes, leaving a few frames before and after the main action gives you flexibility for transitions or later edits.
Working With Audio
Audio makes a big difference in how people feel about your video.
- Clear voice is more important than perfect visuals.
- Use headphones to check audio quality.
- Adjust levels so that voices, music, and effects blend well.
- Use fade in/out on music and effects to avoid sudden starts or stops.
Common Audio Mistakes
- Forgetting to remove background noise.
- Music that is too loud, making speech hard to hear.
- Not syncing audio and video correctly, causing “lip flap.”
To fix background noise, many editors have a noise reduction filter. For music, lower the volume during voice parts.
Adding Transitions And Effects
Transitions help your video flow smoothly. Here are common types:
- Cut: Instant change from one shot to another.
- Dissolve/Fade: Gradual change, often used at the start or end.
- Wipe: One shot replaces another by moving across the screen.
Use effects sparingly. Too many effects can distract viewers. Common effects include:
- Slow motion
- Zoom
- Picture-in-picture
Non-obvious tip: Use transitions only when they serve the story. Overusing them can make your video look amateurish.
Color Correction And Grading
Color correction makes your video look natural; grading gives it style.
Steps For Color Correction
- Adjust white balance so whites look truly white.
- Set exposure for proper brightness.
- Balance contrast for clear differences between light and dark areas.
- Fix saturation so colors aren’t too dull or too bright.
Grading For Style
Apply a color “look” to match your mood (warm for happy, cool for sad). Many editors offer built-in color presets called LUTs.
| Correction Tool | Purpose | Found In |
|---|---|---|
| White Balance | Fix color temperature | All major editors |
| Color Wheels | Fine-tune shadows, midtones, highlights | Premiere Pro, DaVinci Resolve |
| LUTs | Apply creative looks | Most advanced editors |
Adding Titles, Text, And Graphics
Titles and text add context or highlight important information. Use them for:
- Opening titles: Introduce the video.
- Lower thirds: Show names or places.
- End credits: List contributors.
Tips for effective text:
- Use large, clear fonts.
- Keep text on screen long enough to read.
- Use high contrast (light on dark or vice versa).
Graphics can include logos, icons, or charts. Import them as image files (PNG, JPEG) and place them on a higher video track.
Using B-roll And Cutaways
B-roll is extra footage that supports your main story. For example, if your video is about cooking, B-roll could show close-ups of ingredients or the finished dish.
Benefits of B-roll:
- Covers mistakes or awkward edits.
- Makes the video more interesting.
- Gives extra context.
Cutaways are similar, but they briefly show something else, like a reaction shot during an interview.
Many beginners forget to film or use B-roll. Always shoot more footage than you think you need.
Exporting Your Final Video
Exporting turns your project into a shareable file. Here’s what to consider:
Key Export Settings
- Resolution: Commonly 1920×1080 (Full HD) or 3840×2160 (4K).
- Frame rate: Match your original footage (often 24, 30, or 60 fps).
- Format: MP4 is widely supported.
- Bitrate: Higher bitrate = better quality, but larger file size.
Most editors offer export presets for YouTube, Vimeo, or Instagram.
Example Export Settings For Youtube
| Setting | Recommended Value |
|---|---|
| Resolution | 1920×1080 |
| Frame Rate | 24 or 30 fps |
| Format | MP4 (H.264) |
| Bitrate | 8 Mbps (HD) |
| Audio | AAC, 320 kbps |
Advanced Editing Tips For Beginners
Learn Keyboard Shortcuts
Using keyboard shortcuts speeds up your editing. For example, “C” in Premiere Pro activates the razor tool, while “V” switches back to selection. Find a shortcut guide for your software and practice a few each day.
Use Proxy Files For Large Projects
High-resolution footage can slow down editing. Proxy files are lower-quality copies you edit with, then swap for full-quality files at the end. This keeps editing smooth, even on slower computers.
Regularly Save And Backup
Editing software can crash. Save your work every few minutes and back up your project files on an external drive or cloud storage.
Don’t Overuse Effects
Many beginners add too many effects. Use effects to enhance your story, not distract from it. Simple, clean edits often look more professional.
Watch Tutorials And Analyze Other Videos
Study videos you admire. Notice how they use cuts, music, and pacing. Many free tutorials on YouTube explain editing basics for each software.
Common Video Editing Mistakes (and How To Avoid Them)
- Ignoring the story: Editing should serve your message, not just look flashy.
- Unbalanced audio: Test your video on different devices to catch audio problems.
- Jump cuts: Use B-roll or transitions to cover harsh edits.
- Low-resolution exports: Always export at the highest quality your footage allows.
- Not reviewing the final video: Watch your video all the way through before sharing.
Practical Example: Editing A Simple Youtube Vlog
Suppose you filmed a day in your life. Here’s how you might edit it:
- Import all footage into your software.
- Organize clips into folders: Morning, afternoon, evening.
- Create a timeline, drag clips in order, and do a rough cut.
- Trim out mistakes, long pauses, and boring parts.
- Add background music at low volume.
- Insert B-roll of the city, your meals, or friends.
- Include titles for each part of the day.
- Adjust colors for consistency.
- Export in 1080p MP4 format.
- Watch the final video to check for mistakes.
How To Edit Videos Faster
- Plan your video before filming (makes editing easier).
- Use templates or presets for titles and color.
- Edit in short sessions to stay focused.
- Use proxy files for large projects.
Video Editing For Social Media
Each platform has unique needs:
- Instagram: Square (1:1) or vertical (9:16) videos work best.
- YouTube: 16:9 widescreen is standard.
- TikTok: Vertical (9:16) and short length.
Edit for platform requirements to avoid black bars or quality loss.
Legal And Copyright Considerations
When editing, always use music and images you have rights to. Many beginners use copyrighted music without permission, risking takedowns or demonetization. Use royalty-free music libraries or create your own.
For more on copyright and fair use, check out this resource from the U.S. Copyright Office.
When To Hire A Professional Editor
If your project is complex or for business, a professional editor can save time and improve quality. Look for editors with:
- A strong portfolio.
- Experience in your type of video.
- Good communication skills.
Staying Inspired And Improving
Video editing is a creative skill. Watch films, YouTube channels, and ads to see new styles. Try challenging yourself with small projects. The more you edit, the better you’ll get.
Frequently Asked Questions
How Long Does It Take To Edit A Video?
It depends on the length and complexity. A simple 5-minute video might take 2–4 hours for a beginner. Large projects can take days or weeks.
What Is The Best Free Video Editing Software?
DaVinci Resolve and HitFilm Express are excellent free options. IMovie is great for Mac users. Each has unique features, so test a few to see what suits you.
Can I Edit Videos On My Phone?
Yes. Apps like iMovie, KineMaster, and Adobe Premiere Rush let you edit directly on your phone. Mobile editing works well for short, simple videos.
How Do I Make My Videos Look Professional?
Focus on clear audio, good lighting, smooth cuts, and consistent color. Avoid too many effects. Watch professional videos and learn from their pacing and style.
What Format Should I Export My Video In?
MP4 (H. 264) is the most widely used format for sharing online. It offers a good balance of quality and file size. For archiving, you may want higher-quality formats like MOV or ProRes.
Editing videos is a skill anyone can learn with practice. Start simple, keep your workflow organized, and focus on telling a clear story. With time, you’ll turn raw footage into videos you’re proud to share.

