

A dripping faucet is more than just an annoyance. Over time, even a small leak can waste hundreds of gallons of water and increase your utility bills. In the United States, the Environmental Protection Agency (EPA) estimates that household leaks waste nearly 1 trillion gallons of water each year. The good news: you don’t need to be a professional plumber to tackle a leaking faucet. With a few basic tools and a little patience, most people can fix the problem themselves. This guide will walk you through every step, highlight common mistakes, and help you avoid frustration. Whether you have a compression, cartridge, ball, or ceramic disk faucet, you’ll find practical advice here.
Understanding Why Faucets Leak
A faucet leak almost always means a worn or damaged internal part. The most common causes are:

36% off Today’s Exclusive Deals
Limited-time Exclusive Deals. Check current discount on Amazon.
Check Price on Amazon As an Amazon Associate I earn from qualifying purchases.- Worn washers: These rubber or silicone rings seal the flow of water. Over time, they harden or crack.
- Damaged O-rings: O-rings help seal joints. They can fail in cartridge and ball faucets.
- Corroded valve seats: Water minerals and sediment can corrode the seat, especially in older models.
- Loose or worn parts: Screws, nuts, and handles loosen or wear out with use.
Ignoring a leak can lead to mold growth, water damage, and higher bills. Fixing it quickly saves money and prevents bigger problems.
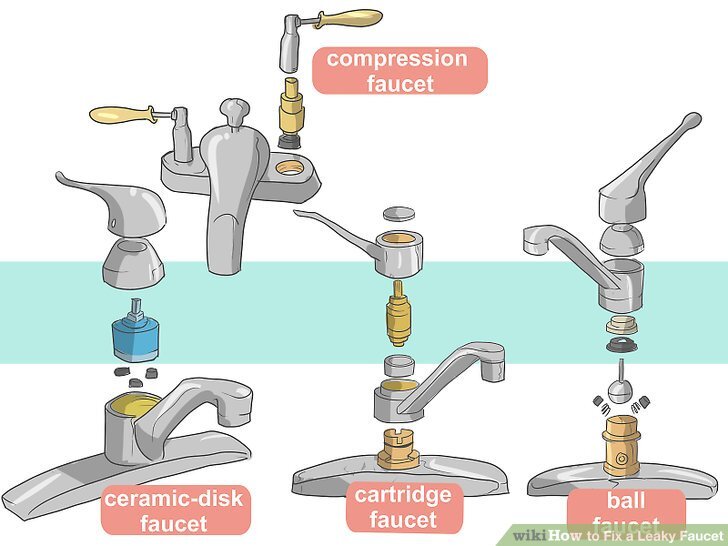
Types Of Faucets: Know What You Have
Before you can fix a faucet, you need to know what kind it is. The repair steps are different for each type.
| Faucet Type | Main Features | Common in | Leak Source |
|---|---|---|---|
| Compression | Two handles (hot/cold), turns to open | Older homes, utility sinks | Washer, seat |
| Cartridge | One or two handles, smooth motion | Modern bathrooms/kitchens | Cartridge, O-rings |
| Ball | Single handle, moves in all directions | Kitchen sinks | Ball assembly, springs, seals |
| Ceramic Disk | One lever, very smooth, durable | High-end fixtures | Disk, seals |
To identify your faucet, look at the handle number and how it moves. If you’re unsure, check the manufacturer’s website or user manual.
Tools And Materials You’ll Need
Having the right tools makes the job easier and prevents damage. Here’s what you’ll need for most faucet repairs:
- Adjustable wrench: For loosening nuts and bolts
- Phillips and flathead screwdrivers: For removing handle screws
- Allen wrench (hex key): For single-handle faucets
- Replacement parts: Washers, O-rings, cartridges, or kits (bring old parts to the store for a match)
- Plumber’s grease: For lubricating O-rings and threads
- Needle-nose pliers: For removing small parts
- Rag or towel: To cover the drain and avoid losing small pieces
- White vinegar: For cleaning mineral buildup
If you’re missing a tool, some hardware stores offer tool rentals. Always have everything ready before you start.
Preparation: What To Do Before You Start
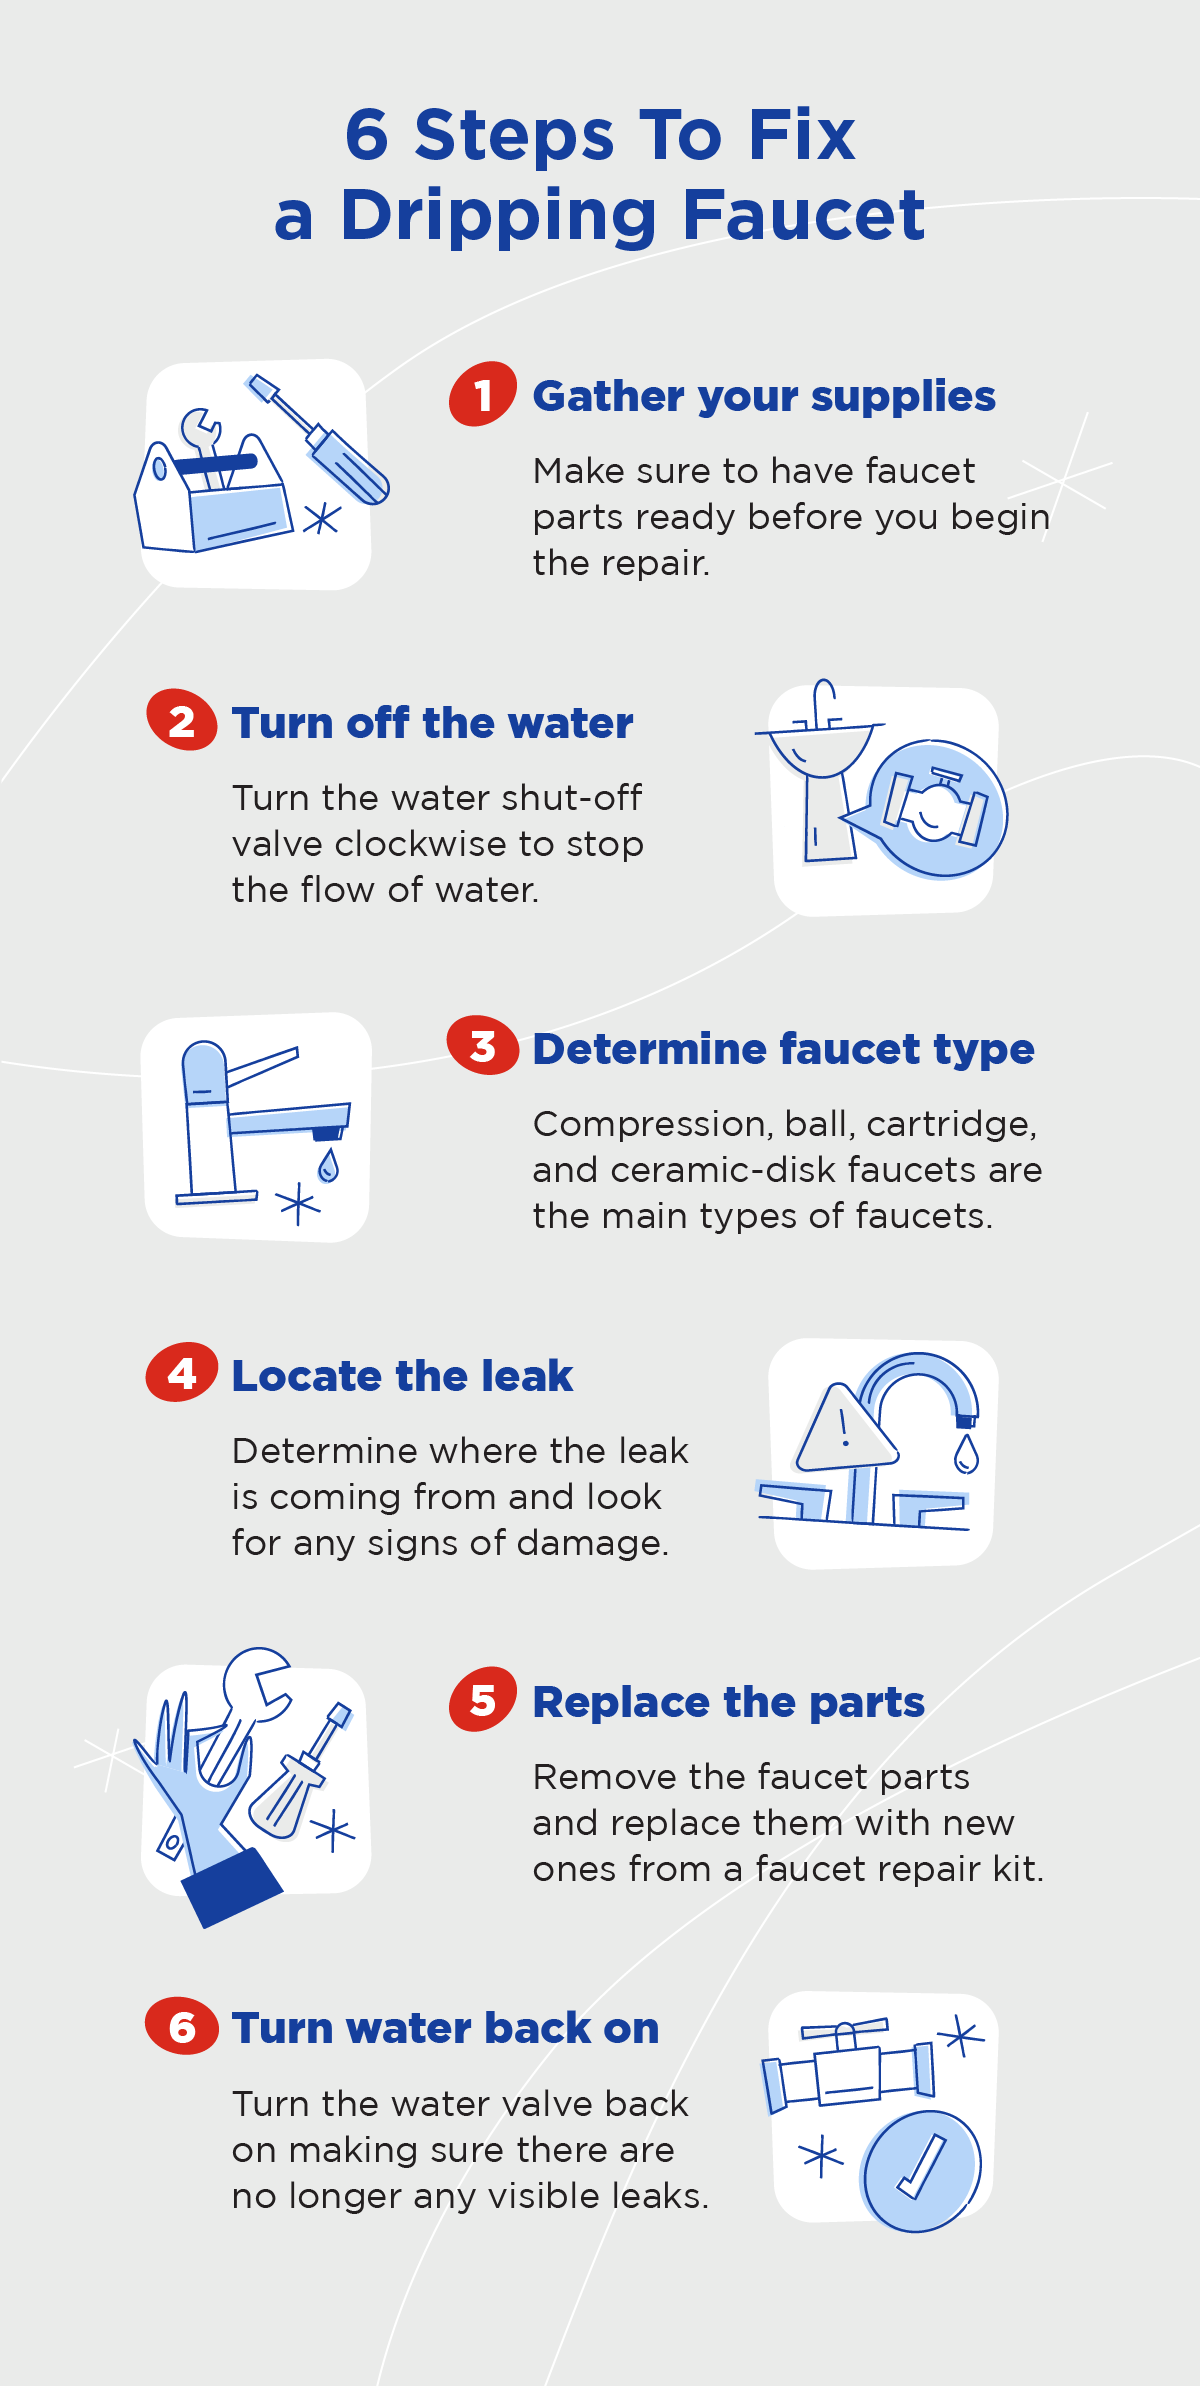
- Turn Off the Water Supply: Look under the sink for two shut-off valves (hot and cold). Turn them clockwise until tight. If you can’t find them, shut off the main water supply to the house.
- Plug the Drain: Use a sink stopper or a rag. This keeps screws and small parts from falling down the drain.
- Clear the Area: Remove items from around the sink for easy access.
- Gather Tools and Parts: Lay them out within easy reach.
- Take Photos: As you disassemble the faucet, take pictures with your phone. This helps you remember where each part goes when reassembling.
Many beginners skip the drain plug or forget to photograph steps—this often leads to lost parts or confusion later.

Step-by-step: Fixing A Compression Faucet Leak
Compression faucets are common in older homes. They usually leak due to a worn washer or seat.
Removing The Handle
- Pry off the decorative cap on the faucet handle with a flathead screwdriver.
- Unscrew the handle screw (usually under the cap) with the right screwdriver.
- Lift off the handle gently.
Removing The Stem And Washer
- Use an adjustable wrench to loosen the packing nut (below the handle).
- Pull out the faucet stem (this may need a gentle wiggle).
- At the bottom of the stem, you’ll see a rubber washer held by a small screw.
Replacing The Washer
- Unscrew and remove the old washer.
- Take the washer to a hardware store to get an exact match (size and thickness matter).
- Install the new washer and screw it in place.
- Inspect the seat inside the valve body. If it’s rough or corroded, you may need a seat wrench to replace it.
Reassembly
- Grease the stem threads with plumber’s grease.
- Insert the stem back in the valve.
- Tighten the packing nut and reattach the handle.
- Turn on the water and test.
Pro tip: Don’t overtighten the packing nut, or the handle will be stiff and may damage the washer.
Repairing A Cartridge Faucet
Cartridge faucets are popular for their smooth motion and durability. Leaks usually mean the cartridge or O-rings need replacing.
Removing The Handle
- Find the set screw (usually at the base or back of the handle).
- Remove it with an Allen wrench or screwdriver.
- Pull off the handle.
Removing The Cartridge
- Unscrew or unclip the retaining nut or clip (varies by brand).
- Use pliers to pull the cartridge straight out. (If stuck, wiggle gently.)
- Note the orientation for reassembly (take a photo).
Installing The New Cartridge
- Take the old cartridge to the store to get an identical replacement.
- Lubricate O-rings with plumber’s grease.
- Insert the new cartridge, making sure it’s aligned as before.
- Replace the retaining nut or clip, then reattach the handle.
Hidden insight: Many leaks come from damaged O-rings rather than the cartridge itself. If the cartridge looks fine, try changing just the O-rings first.
Fixing A Ball Faucet
Ball faucets are common in kitchens and have several small parts that can wear out.
Disassembly
- Remove the handle as described above.
- Use pliers to remove the cap and collar.
- Lift out the ball assembly.
Replacing Seals And Springs
- Inside the faucet body, you’ll find rubber seats and springs.
- Use needle-nose pliers to pull these out.
- Replace with new seats and springs from a repair kit.
- Reinstall the ball assembly, cap, and handle.
Common mistake: Mixing up the order of springs, seats, and washers. Keep parts organized as you remove them.
Repairing A Ceramic Disk Faucet
Ceramic disk faucets are tough, but leaks can happen if the seals are worn or if debris gets between the disks.
Disassembly And Inspection
- Remove the handle and decorative cap.
- Unscrew the disk cylinder.
- Lift out the cylinder and inspect the seals.
Cleaning And Replacement
- Rinse the seals and disk with vinegar to remove mineral buildup.
- If seals are cracked or stiff, replace them.
- Reassemble and test.
Pro tip: Never use force on ceramic disks—they’re strong but can crack if mishandled.
When To Replace Vs. Repair
Sometimes, fixing a leak is not enough. If your faucet is old, corroded, or repairs don’t last, consider a replacement. Here’s a quick comparison to help you decide.
| Situation | Repair | Replace |
|---|---|---|
| Single, slow drip | ✔️ | |
| Frequent leaks after repair | ✔️ | |
| Corroded or pitted body | ✔️ | |
| Hard-to-find replacement parts | ✔️ | |
| Handle hard to turn | ✔️ | |
| Heavy mineral buildup | ✔️ (if minor) | ✔️ (if severe) |
If you decide to replace, measure the hole spacing and bring photos to the store for help choosing a new model.
Tips For Success And Common Mistakes
Extra tips most beginners miss:
- Match parts exactly: Even small differences in washer or cartridge size can cause leaks.
- Lubricate O-rings and threads: This prevents wear and makes turning the handle easier.
- Inspect both hot and cold sides: Leaks often start on one side but soon affect the other.
- Don’t overtighten: Too much force can crack plastic or strip threads.
- Flush the faucet: After reassembly, run water for a minute to clear debris.
Mistakes to avoid:
- Skipping the water shut-off step (causes flooding).
- Losing small screws and washers down the drain.
- Mixing up the order of parts during reassembly.
- Using the wrong size replacement parts.
- Ignoring corroded or pitted valve seats.
Troubleshooting: What If The Leak Persists?
If your faucet still leaks after repair, check these areas:
- Washer or O-ring not seated correctly: Reopen and check placement.
- Valve seat is damaged: Replace or resurface with a seat wrench.
- Cartridge or disk is not the right model: Double-check the part number.
- Leaks at the base: The O-ring under the spout may need replacing.
Sometimes, internal corrosion or cracks mean the faucet must be replaced. If your repair fails twice, it’s time to upgrade.
Water Conservation And Cost Savings
Fixing a leaky faucet is good for your wallet and the environment. Here’s how much water and money you can save:
| Drip Rate | Water Wasted/Year | Estimated Cost/Year |
|---|---|---|
| 1 drip/second | 3,000+ gallons | $35-$50 |
| 3 drips/second | 9,000+ gallons | $100-$130 |
| Steady trickle | Up to 20,000 gallons | $220+ |
You can learn more about water savings at the EPA WaterSense website.
When To Call A Professional
Some leaks are too complex or risky for DIY. Call a licensed plumber if:
- The shut-off valves don’t work or break.
- Pipes are corroded, leaking, or difficult to access.
- You see water damage under the sink or in the wall.
- The faucet is part of a complex or custom system.
A professional can diagnose hidden problems and ensure repairs are safe and long-lasting.
Frequently Asked Questions
How Do I Know Which Part Is Causing The Leak?
Look at where the water drips. If it drips from the spout, it’s likely a washer, cartridge, or seal. If the leak is at the base or under the handle, the O-ring or packing may be worn. Take photos and compare with online guides or your faucet manual.
Can I Use Generic Replacement Parts?
It’s best to use manufacturer-approved parts. Generic washers or cartridges may fit poorly and cause more leaks. Always bring the old part to the store for comparison.
Is It Safe To Use Plumber’s Tape On Faucet Threads?
Plumber’s tape (Teflon tape) is usually for pipe threads, not faucet stems or cartridges. Use plumber’s grease for lubricating faucet parts. Only use tape if the manufacturer recommends it.
My Faucet Still Leaks After Changing The Washer. What Now?
Check if the valve seat is rough or corroded. Even a new washer won’t seal well on a damaged seat. Use a seat wrench to replace or smooth it. Also, verify the washer and screw are the right size and installed correctly.
How Often Should I Check My Faucets For Leaks?
Inspect faucets and under-sink pipes every few months. Early leaks are easier (and cheaper) to fix. Listen for drips and look for water stains or mold around the sink.
Fixing a leaking faucet is one of the simplest ways to save money, conserve water, and maintain your home. With the right tools and careful steps, most leaks can be fixed in less than an hour. Remember: patience and attention to detail are your best friends. If you ever feel stuck, don’t hesitate to ask for help or call a professional. Your plumbing—and your wallet—will thank you.

