
Installing a ceiling fan can change the way a room feels. It cools the air, saves energy, and often adds a stylish touch to your home. Many people think this job is only for professionals. But with the right tools and careful steps, you can install a ceiling fan yourself—even if you’re not a trained electrician.

Today's Exclusive Deals
Limited-time Exclusive Deals. Check current discount on Amazon.
Check Price on Amazon As an Amazon Associate I earn from qualifying purchases.This guide will walk you through each step, highlight the most common mistakes, and share insights that beginners often miss. Let’s make your room more comfortable and efficient with a new ceiling fan.
Why Install A Ceiling Fan?
A ceiling fan does more than just move air. It creates a gentle breeze that makes rooms feel cooler in summer and can help push warm air down in winter. This means you can set your thermostat higher in summer and lower in winter, reducing energy bills. According to the U.S. Department of Energy, using a ceiling fan lets you raise your air conditioning setting by about 4°F with no loss in comfort. That can mean real savings. Ceiling fans also help with air circulation, so rooms don’t feel stuffy.
Tools And Materials Needed
Before starting, gather all the necessary tools and materials. Missing just one can slow down your progress or lead to mistakes.
Today's Exclusive Deals
Limited-time Exclusive Deals. Check current discount on Amazon.
Check Price on Amazon As an Amazon Associate I earn from qualifying purchases.Essential Tools:
- Screwdrivers (flat-head and Phillips)
- Wire stripper and cutter
- Pliers
- Voltage tester
- Drill with bits (usually 1/8” and 3/8”)
- Adjustable wrench
- Tape measure
- Ladder (6-8 feet)
- Safety glasses
Materials:
- Ceiling fan kit (with mounting bracket, blades, canopy, motor, and hardware)
- UL-rated electrical box (for ceiling fans, not just light fixtures)
- Wire connectors (wire nuts)
- Electrical tape
- Circuit tester
Optional but Helpful:
Today's Exclusive Deals
Limited-time Exclusive Deals. Check current discount on Amazon.
Check Price on Amazon As an Amazon Associate I earn from qualifying purchases.- Stud finder
- Fan brace (if no ceiling joist is available)
- Downrod (for high or sloped ceilings)
Pro tip: Always use a UL-rated box designed for ceiling fans. Regular light fixture boxes can break or fail over time due to the fan’s weight and movement.

Safety Precautions
Electricity is dangerous. Even if you’re handy, never skip safety checks:
- Turn off power at the circuit breaker, not just the wall switch. Test wires with a voltage tester.
- Use a sturdy ladder on a flat surface. Never stretch or lean too far.
- Wear safety glasses to protect your eyes from dust and falling debris.
- If you find old or damaged wiring, stop. Call a licensed electrician. Never try to fix frayed wires yourself.
Many injuries happen during simple jobs because people skip these basics. Don’t rush—safety first, always.
Choosing The Right Ceiling Fan
Not all ceiling fans are the same. Picking the right one makes installation easier and ensures your fan works well.
Room Size And Blade Span
Match the fan blade span to your room size for best airflow.
| Room Size (sq ft) | Recommended Fan Size |
|---|---|
| Up to 75 sq ft | 29″–36″ blades |
| 76–144 sq ft | 36″–42″ blades |
| 145–225 sq ft | 44″ blades |
| 226–400 sq ft | 50″–54″ blades |
Insight: Many first-timers pick fans that are too small. If you’re unsure, choose the next size up. A fan that’s a little too big is better than one that’s too small.
Mounting Type
- Flush mount: For ceilings lower than 8 feet.
- Standard mount: For 8–9 foot ceilings, with a short downrod.
- Extended downrod: For ceilings higher than 9 feet.
Ceiling slope: If your ceiling is sloped, buy an angled mount kit and check the maximum angle allowed by your fan model.
Features And Controls
Modern fans may have remote controls, reversible motors, or integrated lights. Decide what’s important before you buy.
Energy Star rating: Choose a fan with this label if possible. It will use less electricity.
Removing The Old Fixture
If you already have a ceiling light or old fan, you’ll need to remove it before installing the new one.
- Turn off the power at the breaker.
- Remove the light bulbs and fixture cover.
- Unscrew the fixture from the electrical box. Hold the fixture as you remove the last screws so it doesn’t fall.
- Test all wires with a voltage tester.
- Disconnect the wires by unscrewing the wire nuts. Note which wires connect where (take a photo if needed).
- Remove the old electrical box if it’s not rated for ceiling fans.
Common mistake: Not checking if the existing box is fan-rated. Regular boxes can come loose and are unsafe.
Installing A Fan-rated Electrical Box
A fan needs a special box that’s attached firmly to the ceiling framing.
How To Know If Your Box Is Fan-rated
Look for a label inside the box or check if it’s metal with heavy screws into a joist. If it’s plastic or only nailed to drywall, replace it.
Steps To Install
- Access the attic above the ceiling if possible. If not, use a fan brace from below.
- Remove the old box and insert the new fan-rated box.
- Attach it directly to a ceiling joist with screws or use a brace that expands and locks between joists.
- Pull the house wires into the box.
Pro tip: Use a fan brace if your joist isn’t centered where you want the fan. It adjusts to fit different spaces.

Assembling The Ceiling Fan
Unpack your fan and lay out all parts. Read the manual for your model—steps can vary.
- Assemble the motor: Attach the downrod (if needed) to the motor housing. Thread wires through the rod.
- Secure the mounting bracket to the electrical box with the provided screws.
- Install the fan’s canopy (the cover at the ceiling) but leave it loose if you need to connect wires later.
Insight: Many fans have small screws and washers. Work on a blanket to avoid losing parts.
Wiring The Ceiling Fan
Wiring is the most important and sometimes confusing part. Here’s what you need to know.
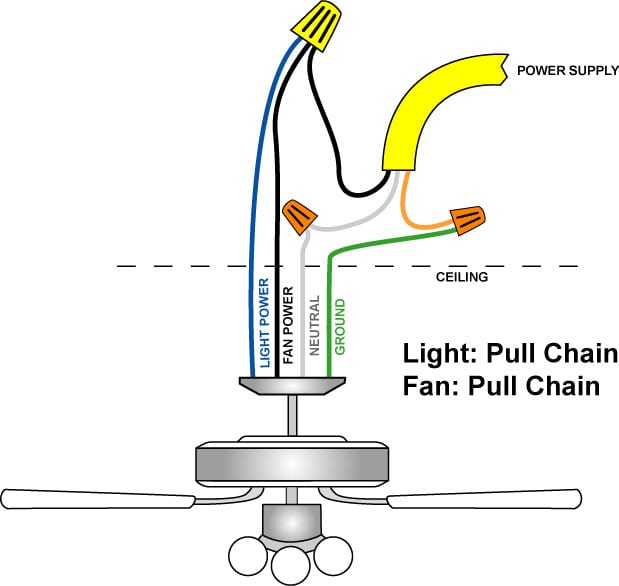
Standard Wire Colors
- Black: Fan motor (sometimes red for light kit)
- Blue: Light kit (if separate)
- White: Neutral
- Green or bare: Ground
Step-by-step Wiring
- Connect the ground wire (green or bare) from the box to the fan’s green wire and the mounting bracket.
- Connect white to white (neutral wires).
- Connect black to black (fan power). If your fan has a blue wire for lights, connect it to the black or red from the ceiling, depending on your switch setup.
- Secure all connections with wire nuts and wrap with electrical tape.
- Gently tuck the wires into the box.
If your fan and light are on separate switches, connect the blue and black fan wires to different wires from the ceiling.
Common mistake: Mixing up the wires. Double-check colors and use the manual for your specific fan.
Mounting The Fan Motor
Lift the assembled fan motor to the mounting bracket. This can be heavy—get someone to help.
- Hang the fan on the bracket’s hook or slot to free your hands for wiring.
- After wiring, lift the fan into the bracket and secure it with the provided screws.
- Tighten all screws fully. Loose screws can cause wobbling later.
Pro tip: Don’t attach the blades yet. It’s easier to lift and wire the motor alone.
Attaching The Fan Blades
Now it’s time to attach the blades.
- Attach each blade to its metal bracket using the provided screws.
- Then attach each bracket to the motor housing, tightening screws firmly.
- Space the blades evenly. Uneven blades create wobble and noise.
Insight: Check blade arms for small numbers or labels. These show which arm fits with which blade for perfect balance.
Installing The Light Kit (if Included)
Most ceiling fans come with a light kit, but not all. If yours does, follow these steps:
- Connect the light kit wires to the fan’s wires (usually blue or black to black, white to white).
- Secure the kit to the fan with screws.
- Install light bulbs (check wattage limits).
- Attach the glass shade or cover.
Pro tip: Use LED bulbs for lower heat and longer life.
Testing And Balancing The Fan
Turn power back on at the breaker and test your fan.
- Fan turns on: Check all speeds and directions.
- Light works: Flip the light switch or use the remote.
- No unusual noise: A quiet hum is normal, but clicking means something is loose.
Balancing The Fan
If the fan wobbles, use the included balance kit. Attach weights to the top of the blades, moving them until the wobble stops.
Common mistake: Tighten all blade screws before balancing. Loose screws are the main cause of wobble.
Troubleshooting Common Problems
Even with careful work, you might run into issues.
Fan Won’t Turn On
- Check the circuit breaker and wall switch.
- Double-check all wire connections.
- Test the remote batteries.
Wobbly Fan
- Tighten all screws and blade brackets.
- Check that the fan box is solid.
- Use the balancing kit.
Lights Don’t Work
- Check bulb wattage and installation.
- Recheck wiring to the light kit.
Noisy Operation
- Make sure nothing is touching the blades.
- Check for loose screws or parts.
- Use rubber washers if needed.
Comparing Diy Vs. Professional Installation
Wondering if you should hire a pro instead? Here’s a quick comparison.
| Factor | DIY Installation | Professional Installation |
|---|---|---|
| Cost | Low (just parts) | Higher (labor + parts) |
| Time | 2–4 hours | 1–2 hours |
| Skill needed | Basic electrical & tools | None required |
| Warranty | May void if installed incorrectly | Usually covered |
| Safety | Good if you follow steps | Very safe |
Insight: If you have never worked with electricity, paying for a pro is smart. But if you’re comfortable with basic wiring and tools, this is a safe and satisfying DIY project.
Tips For A Safe And Lasting Installation
- Always use a fan-rated box. Never skip this, even if you’re tempted.
- Don’t use longer downrods than needed—long rods can swing and wobble.
- Clean blades regularly. Dust on blades makes fans unbalanced over time.
- If your fan has a remote, keep a spare battery handy.
- Label circuit breakers in your panel for faster, safer work in the future.
Non-obvious tip: After a few weeks, re-tighten all screws. Vibration can loosen them, causing noise or wobble.
When To Call A Professional
Some jobs are best left to experts:
- If your ceiling is concrete or has no attic access
- If you find aluminum or old wiring
- If you’re adding new switches or need new wiring
- If you feel unsure at any step
Electricians can finish in less time and guarantee safe operation. Sometimes peace of mind is worth the extra cost.
Ceiling Fan Maintenance
A ceiling fan is low-maintenance, but regular care keeps it running well.
Cleaning
Turn off the fan and use a damp cloth to wipe each blade. A pillowcase slipped over the blade catches dust without spreading it.
Checking For Loose Parts
Every few months, check blade screws and mounting hardware. Tighten as needed.
Lubricating (if Needed)
Most modern fans have sealed bearings and never need oil. If your fan is old and squeaks, check the manual—some need a drop of oil.
Seasonal Changes
Reverse the fan direction with the switch on the motor:
- Summer: Blades spin counterclockwise for a breeze.
- Winter: Blades spin clockwise to push warm air down.
This simple trick saves energy year-round.
The Environmental And Financial Benefits
Installing a ceiling fan can reduce your carbon footprint. According to the EPA, using ceiling fans can cut air conditioning costs by up to 30%. Over a year, that’s real money saved and less stress on the environment. If you use Energy Star fans and LED bulbs, the effect is even bigger.
Frequently Asked Questions
How Do I Know If My Ceiling Box Is Strong Enough For A Ceiling Fan?
Look for a label inside the box. It should say “fan-rated” or “UL-listed for ceiling fans”. If it’s plastic, thin metal, or nailed just to drywall, it’s not strong enough. Always use a box screwed directly to a ceiling joist or a fan-rated brace.
Can I Install A Ceiling Fan Where A Light Fixture Was?
Yes, but you must replace the old light fixture box with a fan-rated electrical box. Light boxes are not built to hold the weight or handle the movement of a ceiling fan.
What If My Ceiling Is Sloped?
Most fans can be installed on sloped ceilings with an angled mount kit and a longer downrod. Check the maximum angle allowed by your fan’s manual. Some fans work up to 30°, but others may need special kits.
Is It Safe To Install A Ceiling Fan Without Turning Off The Breaker?
No. Always turn off the circuit breaker, not just the wall switch. Some wires may still be live even if the switch is off. Use a voltage tester before touching any wires.
Where Can I Find More Guidance For Ceiling Fan Installation?
For more details, diagrams, and safety tips, see the official guide from the Family Handyman.
Installing a ceiling fan is a smart way to make your home more comfortable and efficient. With careful steps and attention to detail, you can handle this project yourself. Follow each stage, respect safety, and you’ll enjoy cool breezes and energy savings for years to come.
If you ever feel unsure, remember that calling a professional is always a good option.


