
Installing solar panels is one of the smartest moves for homeowners and businesses today. Not only does it lower energy bills, but it also helps the environment by reducing carbon emissions. Still, many people hesitate because the process seems complex.
In reality, installing solar panels is achievable, even for beginners, if you follow clear steps. This guide breaks down everything you need to know—from planning and choosing panels to mounting them and connecting to the grid. Whether you plan to do it yourself or hire professionals, you’ll understand the process and make confident decisions.
Understanding Solar Panel Basics
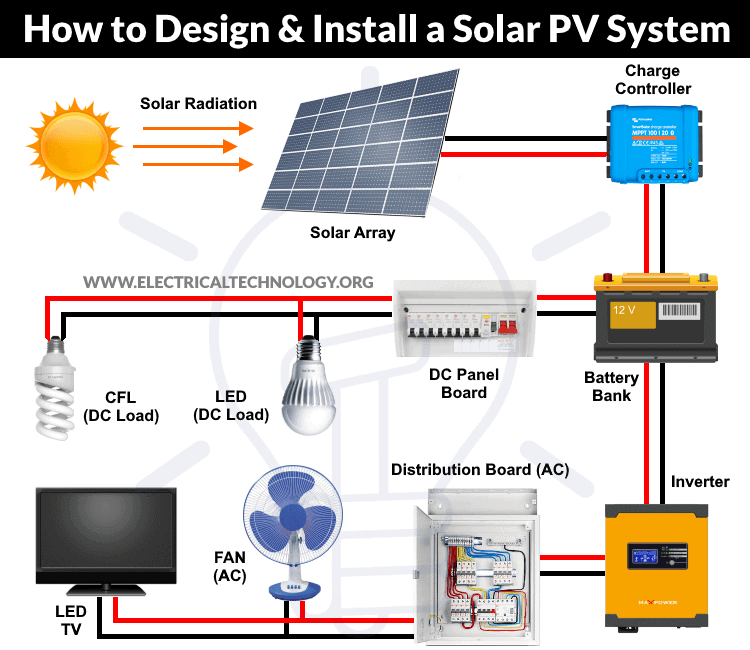
Before you start, it’s important to know how solar panels work. These panels use sunlight to create electricity, which can power your home or business. The main parts of a solar system are:
- Solar panels: Turn sunlight into direct current (DC) electricity.
- Inverter: Changes DC electricity into alternating current (AC), which most appliances use.
- Mounting system: Holds the panels on your roof or ground.
- Battery (optional): Stores extra energy for use at night or during outages.
- Monitoring system: Tracks how much energy you produce and use.
A typical home system has between 10–30 panels, depending on energy needs. The average panel produces about 250–400 watts. If your home uses 900 kWh per month, you’ll need a system that generates about 30 kWh per day.
Planning Your Solar Panel Installation
Proper planning is key. Rushing can lead to mistakes, higher costs, or poor results. Here’s what you should do first:
Checking Your Roof And Site
Not every roof is suitable for solar panels. Consider these factors:
- Roof age and condition: If your roof is old, replace or repair it before installing panels.
- Orientation: South-facing roofs (in the US) get the most sun.
- Tilt angle: A tilt of 30–45 degrees is ideal for most locations.
- Shade: Avoid trees, chimneys, or nearby buildings that block sunlight.
Ground-mounted systems are a good option if your roof isn’t suitable.
Calculating Your Energy Needs
To know how many panels you need, check your electricity bill for average monthly usage. Divide your monthly usage (kWh) by the number of days in the month to find daily usage. Then, consider local sunlight hours—most US cities get 4–6 peak sun hours daily.
For example, if you use 900 kWh/month:
- Daily usage: 900 / 30 = 30 kWh
- If your area gets 5 hours of sun: 30 / 5 = 6 kW system needed
Add 10–20% extra to cover cloudy days and losses.
Checking Local Rules And Permits
Most cities and counties require permits for solar installations. Check with your local building department. You may also need permission from your utility company. Some areas have incentives or rebates for solar, so ask about those, too.
Budgeting Costs
Solar panel costs have dropped over the years. As of 2024, the average price is $2. 50–$3. 50 per watt, including installation. A typical 6 kW system costs $15,000–$21,000 before incentives. Many states offer tax credits or rebates, which can reduce your costs by 20–30%.
Financing options like loans or leases are also available.
Here’s a quick comparison of costs for different system sizes:
| System Size (kW) | Estimated Cost (USD) | Avg. Annual Output (kWh) | Homes Powered |
|---|---|---|---|
| 3 | $7,500–$10,500 | 4,200 | Small apartment |
| 6 | $15,000–$21,000 | 8,400 | Average home |
| 10 | $25,000–$35,000 | 14,000 | Large house |
Choosing The Right Solar Panels And Equipment
Selecting the best panels and system components is crucial for performance and long-term savings.
Types Of Solar Panels
There are three main types:
- Monocrystalline: Most efficient (15–22%), high cost, sleek black appearance.
- Polycrystalline: Lower efficiency (13–17%), cheaper, blue tint.
- Thin-film: Least efficient (10–13%), flexible, good for unusual surfaces.
Monocrystalline panels are popular for homes because they need less space and last longer.
Comparing Panel Brands
Quality matters. Look for warranty, efficiency, and reviews. Top brands include SunPower, LG, and Canadian Solar. Most offer 20–25 year warranties.
Here’s a direct comparison:
| Brand | Efficiency (%) | Warranty (years) | Price Range |
|---|---|---|---|
| SunPower | 21–22 | 25 | High |
| LG | 20–21 | 25 | High |
| Canadian Solar | 17–19 | 20 | Medium |
| Renogy | 15–18 | 20 | Low |
Inverters And Batteries
Inverters come in three types:
- String inverter: Cheapest, connects all panels in one line.
- Micro-inverter: More expensive, but each panel has its own, improves performance in shade.
- Power optimizer: Middle option, boosts output from each panel.
For batteries, lithium-ion is the most common. Tesla Powerwall and LG Chem are popular brands. Batteries add $8,000–$12,000 to your system, but let you use solar power at night or during outages.
Mounting Systems
Roof mounts are standard, but ground mounts are used if your roof is unsuitable. Make sure the mounting system is strong and weather-resistant. Aluminum and stainless steel mounts last longer.
Step-by-step Solar Panel Installation
Now that you’ve chosen your equipment and planned the project, it’s time to install.
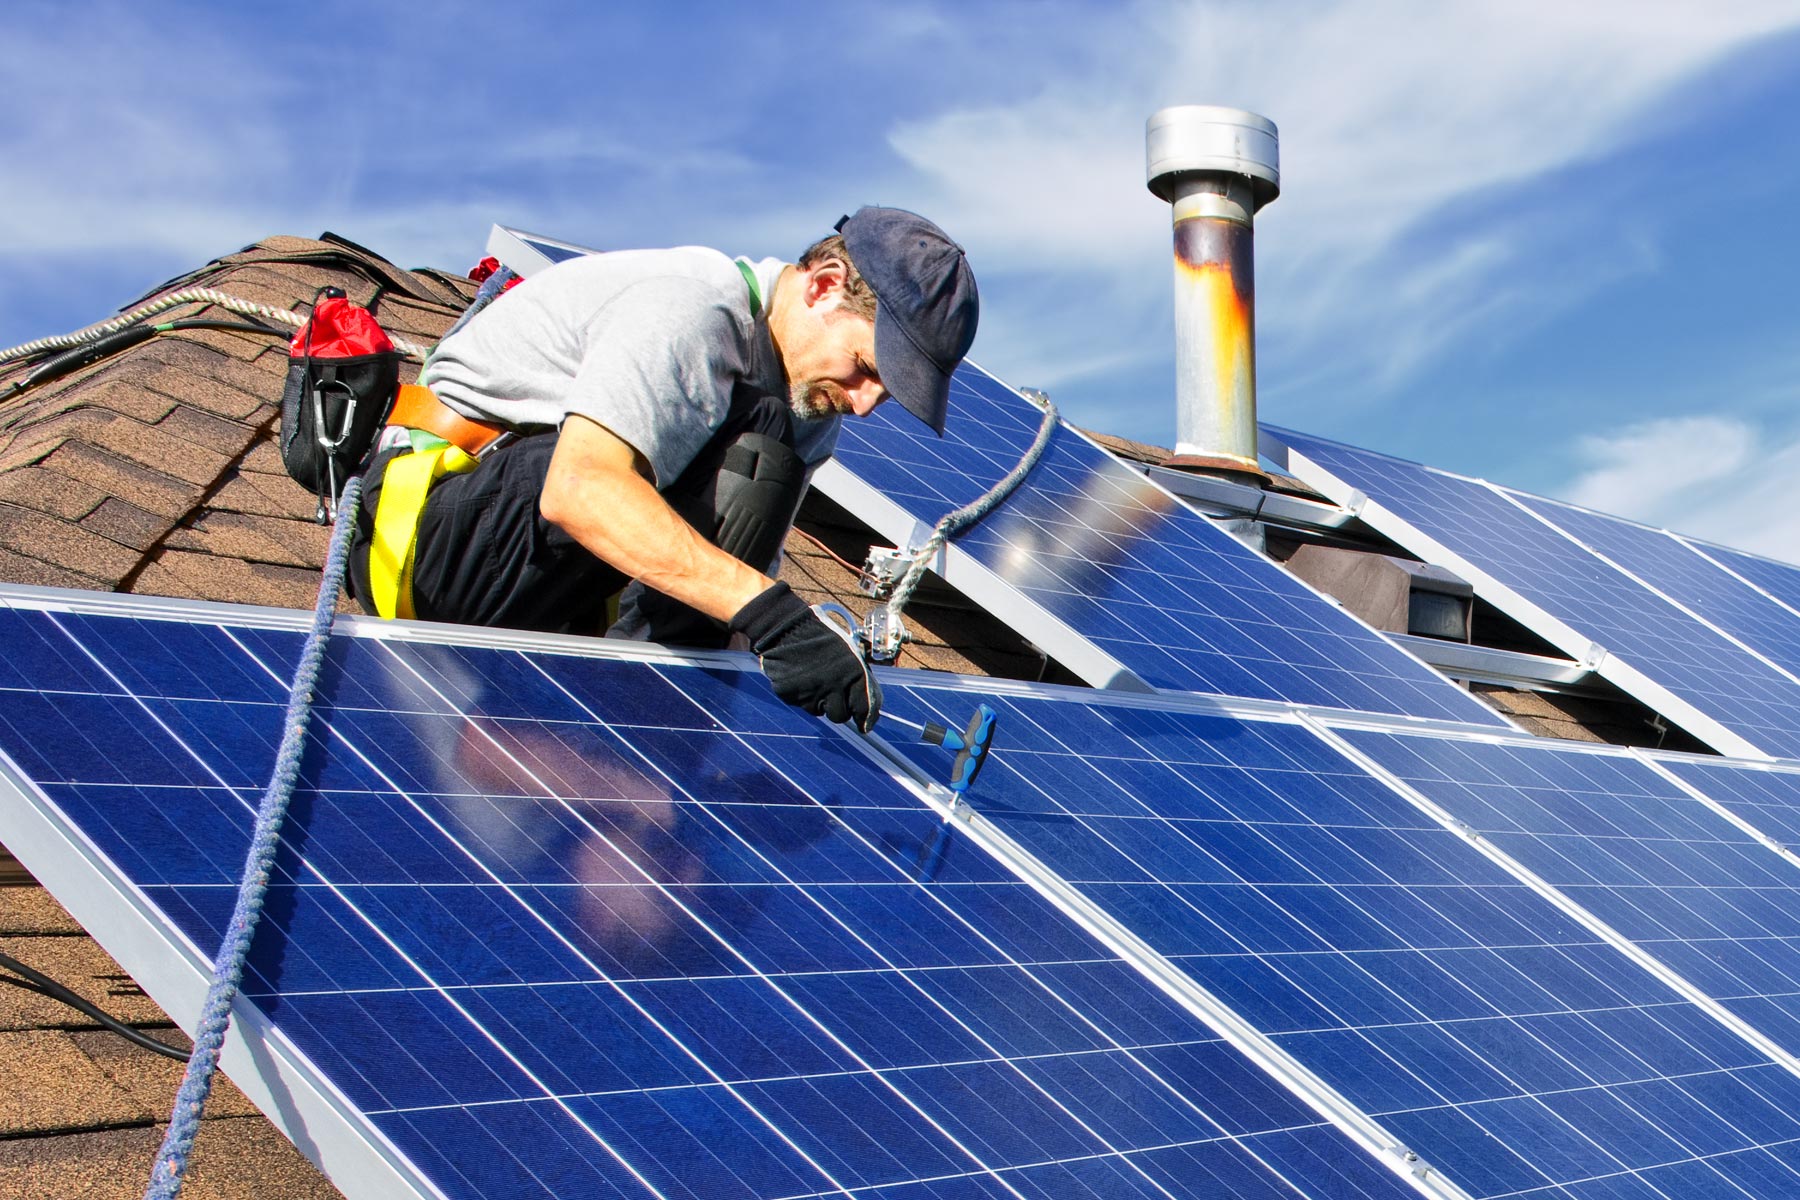
Step 1: Preparing The Site
Clear your roof or ground area. Remove debris and check for damage. Mark where each panel will go. Make sure there is space to work safely.
Step 2: Installing The Mounts
Mounts must be fixed securely. For roof installations:
- Locate roof rafters using a stud finder.
- Drill pilot holes for mount brackets.
- Attach brackets with lag bolts.
- Seal holes with waterproof sealant to prevent leaks.
For ground mounts, dig holes for posts, pour concrete, and attach the frame.
Step 3: Attaching The Panels
Place panels on the mounting frame. Fasten them with clamps or bolts. Panels should be tilted for best sun exposure, usually facing south.
Step 4: Wiring The Panels
Solar panels produce DC electricity. Connect the panel wires to the inverter. Use weatherproof cables and conduits. Most systems use a series or parallel wiring pattern:
- Series: Adds voltage, keeps current same.
- Parallel: Adds current, keeps voltage same.
Connect ground wires for safety.
Step 5: Installing The Inverter
Mount the inverter near your main electrical panel or outside wall. Connect panel wires to the inverter input. Connect the inverter output to your home’s breaker box.
Step 6: Connecting To The Grid Or Battery
If you have a battery, connect it to the inverter following manufacturer instructions. For grid-tied systems, connect to your utility meter. You may need an inspection before switching on.
Step 7: Testing And Commissioning
Turn on the system and check for errors. Use the monitoring system to see how much power you’re generating. If everything works, your system is ready.
Here’s a summary of the installation steps:
| Step | Action | Key Considerations |
|---|---|---|
| 1 | Site preparation | Clear area, check roof strength |
| 2 | Mount installation | Find rafters, seal holes |
| 3 | Panel attachment | Correct tilt, tight clamps |
| 4 | Wiring panels | Weatherproof cables, safety |
| 5 | Inverter installation | Location, proper connections |
| 6 | Grid/battery connection | Follow rules, inspection |
| 7 | Testing system | Monitor output, check errors |
-Power-Generator-Step-11-Version-2.jpg)
Safety Tips And Common Mistakes
Installing solar panels involves working with electricity and heights. Safety is vital.
- Always turn off power before wiring.
- Use safety harnesses when working on roofs.
- Wear gloves and eye protection.
- Double-check connections to avoid shorts or fires.
Common mistakes include:
- Wrong panel placement: Panels in shade or facing the wrong direction lose efficiency.
- Poor wiring: Loose or exposed wires can cause failures.
- Skipping permits: Unapproved systems may be shut down.
- Not sealing roof holes: Leads to leaks and damage.
- Buying cheap panels: Low-quality panels break down faster.
Non-obvious insight: Many beginners forget to check the roof’s weight limit. Solar panels are heavy—if your roof isn’t strong, it may sag or collapse. Always confirm with a structural engineer if unsure.
Hiring A Professional Vs. Diy
You can install solar panels yourself, but hiring a professional often gives better results.
Diy Installation
Pros:
- Saves money (labor costs are 20–30% of total).
- Learn valuable skills.
Cons:
- Takes more time.
- Risk of mistakes or injuries.
- Warranty may be voided.
Professional Installation
Pros:
- Fast, safe, and reliable.
- Better access to permits and incentives.
- Often includes warranty.
Cons:
- Higher upfront cost.
If you’re unsure, get quotes from several installers and compare. Ask about experience, licenses, and reviews.
Solar Panel Maintenance
Solar panels need little upkeep, but regular checks help them last longer.
- Clean panels every 3–6 months to remove dust and debris.
- Check for loose wires, broken mounts, or cracks.
- Monitor output—if it drops, check for shading or dirt.
- Have a professional inspect every 2–3 years.
Most panels last 20–25 years, but inverters usually need replacement after 10–15 years.
Maximizing Your Solar Investment
To get the most from your solar panels:
- Use energy during daylight hours when panels are generating power.
- Install LED lights and energy-efficient appliances.
- Consider adding a battery for backup power.
- Track your system with a monitoring app.
Surprisingly, many homeowners don’t adjust their habits after installing solar. Shifting activities like laundry or dishwashing to daytime can save even more money.
Real-world Example: Saving Money With Solar
Let’s look at a typical scenario. A US homeowner installs a 6 kW system for $18,000. With a 26% federal tax credit, the net cost drops to $13,320. The system produces about 8,400 kWh/year, saving $1,200/year on electricity. Over 20 years, that’s $24,000 in savings—almost double the investment.
If electricity rates rise, savings increase even more.
Environmental Benefits
Solar panels reduce reliance on fossil fuels. The average home system cuts carbon emissions by about 4 tons per year. That’s like planting 100 trees annually. If every US home used solar, emissions would drop by millions of tons.
Useful Resources
For more details and updates, check:
u.s. Department Of Energy
This site has guides, calculators, and policy information.
Frequently Asked Questions
What Permits Do I Need To Install Solar Panels?
Most cities require a building permit and an electrical permit. You may also need approval from your local utility. Always check with your city or county before starting.
How Long Does Installation Take?
Professional installation usually takes 1–3 days for a home system. DIY projects may take longer, depending on your skills and weather.
Can I Install Solar Panels If My Roof Is Flat?
Yes, but you’ll need a tilted mounting system to angle the panels toward the sun. Flat roofs are common in commercial buildings and work well for solar.
How Much Do Solar Panels Increase Home Value?
Studies show that homes with solar panels sell for 4–5% more than similar homes without. Buyers value lower energy costs and green features.
Do Solar Panels Work During Power Outages?
Grid-tied systems usually shut down during outages for safety. If you have a battery backup, you can keep using solar power when the grid is down.
Installing solar panels is a big step, but it’s rewarding both financially and environmentally. With careful planning and the right equipment, you can enjoy clean energy for decades. If you’re ready to start, follow these steps or consult a professional for help.
Solar power is not just a trend—it’s a smart investment in your future.

