
Most control board faults show as odd temps, lights, or no response—test with meters.
I have worked on many refrigerators and repaired dozens of control boards. This guide on Kitchenaid Refrigerator Control Board Troubleshooting pulls together clear steps, tests, and tips I use in the field. You will learn how the board works, how to spot problems, how to test parts safely, and when to repair or replace. Read on to save time and avoid common mistakes.
Understanding the Kitchenaid Refrigerator Control Board
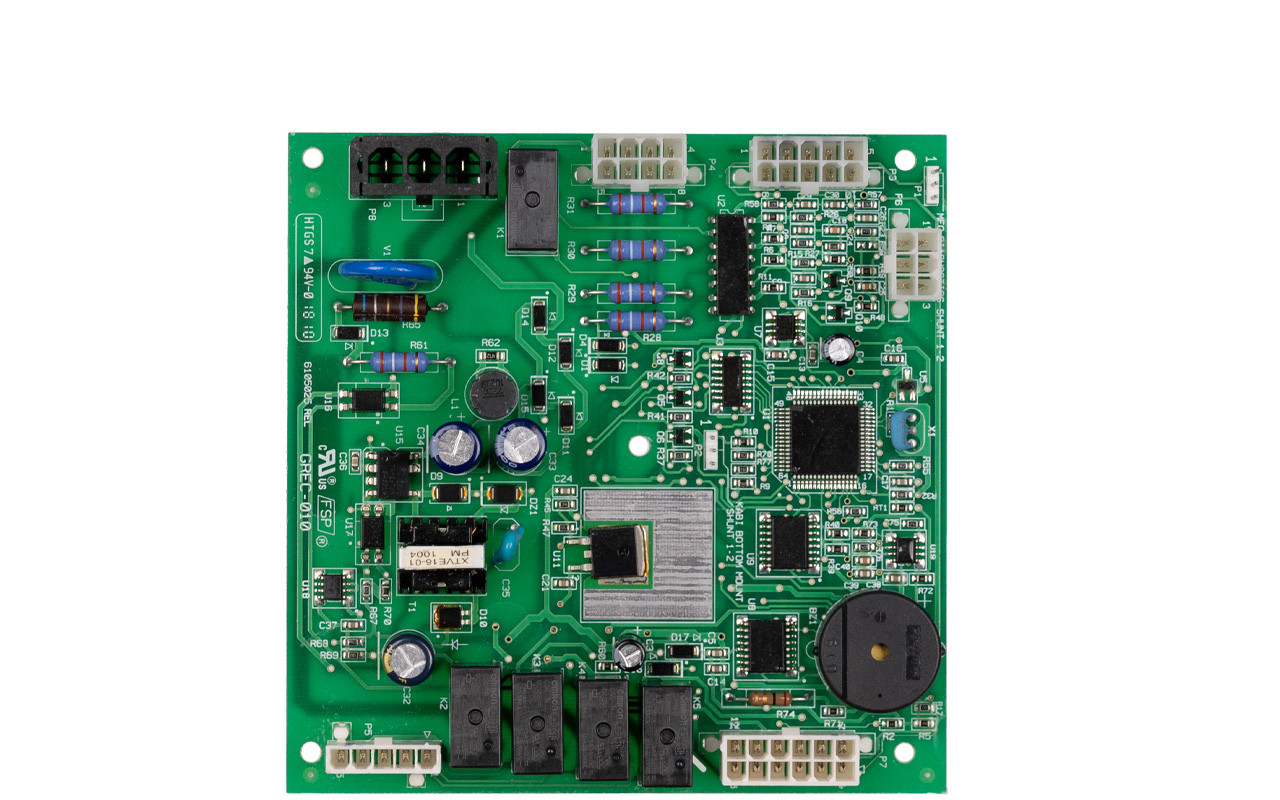
The control board is the brain of a Kitchenaid fridge. It reads sensors. It tells fans, compressor, and defrost heater what to do. If it fails, the fridge may not cool, may show errors, or may behave strangely.

Common Symptoms of a Failing Kitchenaid Refrigerator Control Board
If you see one or more of these signs, consider control board issues:
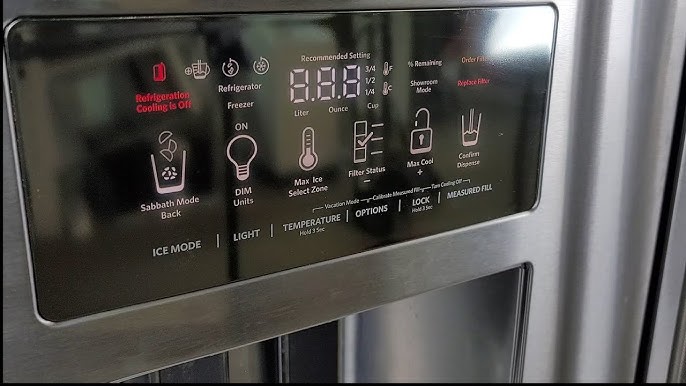
- Display panel is blank or shows random codes.
- Refrigerator or freezer runs too warm or too cold.
- Lights, ice maker, or dispenser stop working.
- Fans or compressor cycle oddly or not at all.
- Constant clicking or relays that chatter.
Symptoms can come from other parts too. Use tests to narrow the cause. Kitchenaid Refrigerator Control Board Troubleshooting starts by logging these symptoms.

Step-by-Step Troubleshooting Guide for Kitchenaid Refrigerator Control Board Troubleshooting
Follow steps in order. Keep safety first.
- Safety first. Unplug the fridge before opening panels. Turn off water for models with ice makers.
- Note symptoms and model number. Write down display errors and model/serial from the sticker. This helps find correct parts.
- Inspect visually. Look for burn marks, bulging capacitors, loose connectors, or water damage on the board and harness.
- Reset power. Unplug for 5 minutes and plug back in. Some control quirks clear with a reset.
- Check fuses and thermal cutoffs. Use a multimeter to test for continuity on board fuses and safety devices.
- Test sensors. Measure NTC thermistor resistance at room temp. Compare to specs in service data.
- Test outputs. With power on and careful hands-off checks, test voltage to the compressor, evaporator fan, and defrost heater when the board calls for them.
- Watch for error codes. Note blinking LEDs or panel codes. These point to specific failures.
- Swap with a known good board if available. This isolates the problem quickly.
- Replace connectors or harnesses if corroded. Bad wiring can mimic a bad board.
These steps frame safe and methodical Kitchenaid Refrigerator Control Board Troubleshooting. Keep notes during tests.

Diagnostic Tests and Error Codes
Basic tests reduce guesswork.
- Multimeter checks: Test for 120V or 240V where the board outputs power. Check continuity on fuses and thermostats.
- Thermistor measure: At 77°F expect certain Ohms. If far off, sensor may be faulty.
- Relay listen: A working relay clicks when the board sends a signal. No click may mean no drive from the board.
- LED blink codes: Count blinks and match to service sheet for your model.
People also ask:
How do I read control board error codes?
Count LED blinks or read panel codes and compare to the model’s service sheet. Codes map to sensors or subsystems.
Can a bad thermistor look like a bad control board?
Yes. A failed thermistor sends wrong readings. Always test sensors before replacing the board.
Will unplugging the fridge fix control board errors?
A power reset can clear temporary faults. Persistent errors need tests and diagnosis.
These tests help you decide the next step in Kitchenaid Refrigerator Control Board Troubleshooting.
When to Replace vs Repair the Control Board
Decide with these considerations:
- Visible damage or burnt components often means replace the board.
- If only a connector or fuse is bad, repair that first.
- Cost: OEM boards can be costly. Compare repair vs replacement cost.
- Warranty: Check your warranty before buying parts.
If the board is intermittently failing, a replacement often saves future service calls. Kitchenaid Refrigerator Control Board Troubleshooting includes weighing cost and risk.

Parts, Tools, and How to Order
Common parts and tools you will need:
- Replacement control board matched to model number.
- Multimeter for voltage and continuity tests.
- Nut drivers, screwdrivers, and pliers.
- Contact cleaner and dielectric grease for connectors.
Always order boards using the model and serial number. Using the wrong board can cause more harm. Keep original parts until repairs are confirmed. Kitchenaid Refrigerator Control Board Troubleshooting requires correct parts and basic tools.

Safety Tips and Best Practices
Keep these simple safety rules in mind:
- Unplug before disassembly. Avoid shorts and shocks.
- Use insulated tools and do not touch live circuits.
- Label connectors when you disconnect them.
- Take photos before disassembly to aid reassembly.
If you are unsure, call a pro. Safety is part of good Kitchenaid Refrigerator Control Board Troubleshooting.

Personal Experience and Practical Tips
From years on service calls, I learned a few truths. Always test sensors first. A bad harness causes many false board replacements. I once replaced a board, only to find a pinched wire caused the issue. Learn to trace wiring and listen for relays. These habits cut repair time and cost. Kitchenaid Refrigerator Control Board Troubleshooting improves with practice and careful notes.
Frequently Asked Questions of Kitchenaid Refrigerator Control Board Troubleshooting
What is the most common sign of a bad control board?
The most common sign is erratic temperature control or a blank display. Other symptoms include intermittent operation of the compressor or fans.
Can I test the control board myself?
Yes. Basic tests like visual inspection, continuity checks, and voltage tests can be done with a multimeter. Always unplug before working and follow safety steps.
How much does a Kitchenaid control board replacement cost?
Costs vary by model but expect parts to range widely. Labor adds on if you hire a technician. Check warranty first to reduce cost.
How long does a control board last?
A control board can last many years but may fail earlier due to power surges, moisture, or heat. Regular cleaning and careful handling help extend life.
Will resetting the fridge fix control board problems?
Resetting may clear temporary faults and is worth trying first. Persistent faults will need diagnostic testing to find the real cause.
Conclusion
You now have a clear path for Kitchenaid Refrigerator Control Board Troubleshooting. Start with safety, note symptoms, test sensors and outputs, and only replace the board when tests point to it. Use the steps and tips here to save time and avoid common mistakes. Try the simple tests first, keep a repair log, and reach out to a technician if you find burnt parts or you feel unsure. If this helped, subscribe for more appliance repair guides or leave a comment with your model and symptoms so others can learn.

