
Carrier AC unit troubleshooting often starts with simple checks: power, filters, and thermostat.
I have spent years diagnosing and fixing HVAC systems. This guide on Carrier AC unit troubleshooting draws on hands-on experience and industry best practices. You will learn clear steps to find problems, test parts, and fix many common faults. The goal is to help you act with confidence and avoid costly mistakes.
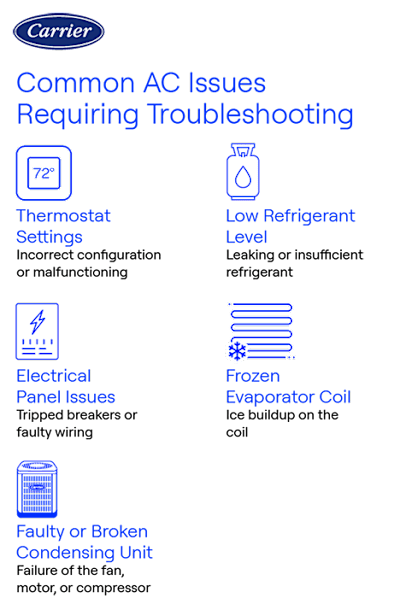
Common symptoms and what they mean
Faulty cooling, strange noises, or frequent cycling are typical signs. Carrier AC unit troubleshooting begins by matching the symptom to likely causes. Low airflow often points to a dirty filter or blocked duct. Short cycling can mean a bad thermostat, low refrigerant, or an oversized unit.
Warm air from vents usually means compressor or refrigerant issues. Frozen coils suggest poor airflow or low refrigerant. Loud clanking can indicate loose parts or failed motor bearings. Identifying the symptom narrows down tests and saves time.

Quick safety checklist before troubleshooting
Always prioritize safety before you start Carrier AC unit troubleshooting. Turn off power at the thermostat and the breaker. Wear protective gloves and eye protection when handling sharp or dirty parts. Avoid touching capacitor terminals; they store charge and can shock you.
Use a non-contact voltage tester to confirm power is off. Keep a fire extinguisher nearby if you will solder or work with flammable materials. If you smell gas or refrigerant strongly, stop and call a professional.

Step-by-step Carrier AC unit troubleshooting guide
Follow this clear process to troubleshoot most Carrier systems. Work from simple checks to complex tests. Keep notes and take photos so you can track progress.
-
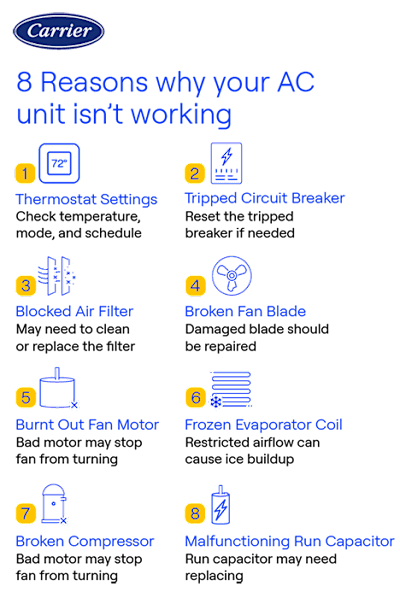
Check power and thermostat
- Confirm the thermostat is on, set to cool, and the temperature is below room temp.
- Check the breaker and the outdoor unit switch.
- Replace thermostat batteries if needed.
-
Inspect and replace filters
- Dirty filters reduce airflow and cause many problems.
- Replace or clean filters every 1–3 months depending on use.
- After replacing the filter, run the system to see if performance improves.
-
Examine the outdoor unit
- Clear leaves, dirt, and debris from around the condenser.
- Inspect the fins and coil for damage or heavy dirt.
- Ensure the fan runs when the system is on.
-
Check the indoor coil and blower
- Look for frost or ice on the evaporator coil.
- Clean the coil gently if dirty and ensure the drain is clear.
- Verify the blower motor is running and delivering strong airflow.
-
Test capacitors and contactors
- A weak capacitor can cause the compressor or fan motor to struggle.
- Use a multimeter with capacitance testing to check health.
- Replace faulty capacitors and pitted contactors.
-
Measure refrigerant pressures
- Low refrigerant often causes poor cooling and frozen coils.
- Only certified technicians should add refrigerant.
- Leaks must be located and repaired before recharge.
-
Listen for unusual noises
- Grinding or clanking often means mechanical failure.
- Hissing can indicate refrigerant leaks.
- Buzzing may be an electrical issue or loose panel.
-
Reset and monitor
- After repairs, reset the system by turning power off and on.
- Monitor run cycles and temperatures for several hours.
This stepwise approach keeps Carrier AC unit troubleshooting safe and systematic. If a test requires specialist tools or certification, stop and call a pro.

Interpreting error codes and control board lights
Many Carrier systems show LED codes or thermostat error messages. These codes speed diagnosis if you know what they mean. Check both the indoor control board and the outdoor unit for flashing lights.
Common indicators and what they suggest:
- Two or three flashes: communication error between indoor and outdoor units.
- Rapid blinking: high-pressure or low-pressure fault.
- Solid light with lockout: safety trip, often compressor overload.
- Thermostat codes: call for service or sensor failure.
Always consult the unit’s service manual for exact meanings. If a safety lockout repeats after a reset, do not ignore it. Recurrent codes often point to deeper issues like refrigerant leaks or compressor failure.
Tools and parts to have on hand
Having the right tools speeds Carrier AC unit troubleshooting and reduces risk. Keep a basic kit ready for DIY checks.
- Screwdrivers and nut drivers for access panels and terminals.
- Multimeter for voltage, continuity, and capacitance checks.
- Non-contact voltage tester for safety.
- Fin comb for straightening condenser fins.
- Shop vacuum and soft brush for coil cleaning.
- Replacement filters, capacitors, contactors, and thermostat batteries.
- Safety gear: gloves, goggles, and a mask for dust.
For refrigerant work, hold proper certifications. Attempting refrigerant service without training is illegal and dangerous.

Routine maintenance to prevent problems
Routine care prevents many common faults and extends unit life. Make Carrier AC unit troubleshooting less frequent by following simple maintenance steps.
- Change or clean filters every 1–3 months.
- Keep the outdoor unit clear of debris and vegetation.
- Clean evaporator and condenser coils yearly.
- Check and clear condensate drains to avoid water damage.
- Schedule annual professional tune-ups before cooling season.
- Calibrate thermostats and check electrical connections.
A small amount of care saves time and money. I’ve seen neglected units fail years earlier than well-maintained ones.
When to call a professional and cost considerations
Know your limits when doing Carrier AC unit troubleshooting. Stop and call a licensed HVAC tech for electrical issues, refrigerant work, or when the compressor is suspected. Professionals have the training and tools for safe, code-compliant repairs.
Typical cost examples:
- Filter or thermostat replacement: low cost and often DIY.
- Capacitor or contactor replacement: moderate cost; parts are affordable.
- Refrigerant recharge and leak repair: higher cost due to labor and materials.
- Compressor replacement: high cost; may justify considering system replacement.
Get multiple quotes for major repairs. A reputable technician will provide a clear diagnosis and written estimate.
Personal experience: lessons learned and practical tips
I have worked on many Carrier AC systems over the years. One lesson is to never ignore small signs. A faint rattle became a bent fan blade that later destroyed the motor. Quick action saved the compressor.
Another tip is to document service. Keep receipts, dates, and parts used. It helps both DIY troubleshooting and professional service. Finally, treat alarms and repeated lockouts as urgent. They signal safety systems doing their job.
Frequently Asked Questions of Carrier Ac Unit Troubleshooting
How do I reset my Carrier AC unit?
Turn off the thermostat and the breaker for the outdoor unit. Wait five minutes, then restore power and set the thermostat to cool. If the unit fails to restart, inspect error codes or call a technician.
Why is my Carrier AC blowing warm air?
Warm air can come from low refrigerant, a faulty compressor, or poor airflow due to clogged filters. Check filters and vents first; if the problem continues, professional diagnosis is needed.
What causes a Carrier AC to freeze up?
Freezing often happens with low airflow, dirty coils, or low refrigerant. Replace filters and ensure the blower runs. If coils remain frozen, call a licensed HVAC tech.
How often should I clean my Carrier AC coils?
Clean coils at least once a year, ideally before the cooling season. If you have pets or heavy pollen, clean them twice a year to maintain efficiency.
Is it safe to test capacitors myself?
Capacitor testing is possible with the right tools and safety steps, but capacitors store high voltage and can shock you. If you are unsure, hire a professional.
Can I add refrigerant myself to a Carrier unit?
No. Adding refrigerant typically requires certification and special tools. Improper handling can harm the unit and the environment. Use a licensed technician.
Conclusion
Carrier AC unit troubleshooting follows a clear path: observe, test, and repair. Start with simple checks like filters and power, then move to electrical and refrigerant tests as needed. Regular maintenance prevents many issues and saves money over time.
Take action today by inspecting filters and outdoor clearance. If a repair looks complex, reach out to a licensed HVAC technician. Share your experience or questions in the comments and subscribe for more practical HVAC guides.

