Moving a pool table can seem like a daunting task. It’s not just any piece of furniture; it’s heavy, cumbersome, and requires careful handling.
Whether you’re relocating or simply rearranging your game room, you might be wondering how to transport your pool table safely and efficiently. The good news is, with the right approach and a bit of planning, you can do it without damaging your prized possession or breaking a sweat.
Imagine the satisfaction of seeing your pool table in its new spot, ready for the next game. This guide will walk you through the steps, ensuring you have the confidence and know-how to tackle this task successfully. Curious to discover the secrets to a smooth move? Keep reading, and you’ll find out!
Preparation Steps
Careful planning is essential for moving a pool table. Start by gathering necessary tools and materials. Disassemble the table with caution, labeling each part. Ensure safe transport by wrapping components securely.
When moving a pool table, preparation is key. Proper steps ensure a smooth process and protect the table. Each step requires attention to detail. Let’s explore the essential preparation steps.
Gather Necessary Tools
Start with the right tools. Essential items include a drill, screwdrivers, and wrenches. Moving blankets and bubble wrap protect surfaces. Secure a dolly or moving cart for transport. Label each tool for easy access during the move.
Assess The Pool Table Size
Measure the table’s dimensions. Include length, width, and height. This helps in planning the move. Check doorways and hallways for clearance. Knowing the table’s size avoids surprises. It also aids in choosing the right vehicle.
Create A Transportation Plan
Plan the route carefully. Decide the best path from room to truck. Identify any obstacles, like stairs or narrow spaces. Coordinate with helpers to ensure smooth teamwork. A clear plan minimizes risk and confusion.

Disassembly Process
Transporting a pool table requires careful disassembly. Remove the felt, rails, and legs. Pack each component securely to prevent damage.
Transporting a pool table is no small feat, but breaking it down into manageable pieces can make the task much easier. The disassembly process is crucial for safe and efficient transportation. If you’ve ever tried to move a fully assembled pool table, you know it’s a beast. Disassembling it allows you to pack it securely and avoid damage. Let’s dive into the step-by-step process of taking apart your pool table, ensuring each part is handled with care.
Remove The Pockets
Start with the pockets. These are often secured with screws or staples. Use a screwdriver to gently remove the screws from the pocket brackets. If staples are used, a staple remover can help. Be cautious—it’s easy to damage the material if you’re too forceful. Have you ever thought about how much wear and tear these pockets endure over time? Removing them lets you inspect their condition and decide if replacements are needed.
Detach The Rails
Next, you’ll want to detach the rails. Rails are usually held in place with bolts underneath the table. Use a wrench to loosen and remove these bolts. Keep track of all hardware in a labeled bag or container. Ever lost a bolt in a pile of moving supplies? It’s a frustrating experience you can avoid by being organized. Once the rails are off, you can assess their condition and even give them a good cleaning.
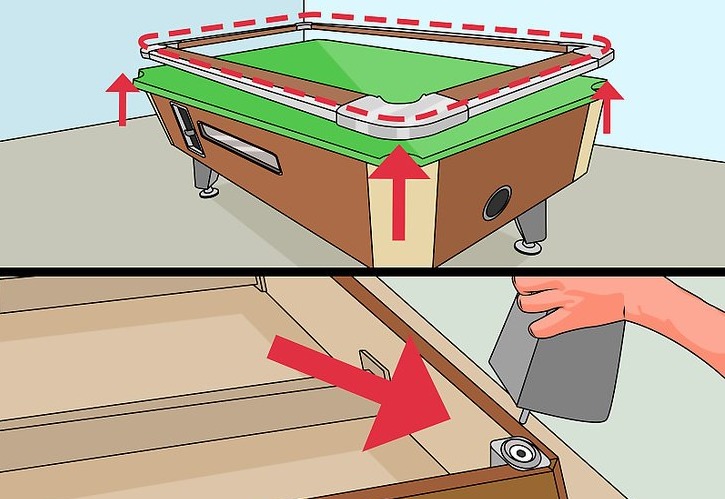
Lift The Felt
Now it’s time to lift the felt. Start at one corner and gently peel it back. If the felt is glued, you might need a tool to help loosen it. Be mindful not to tear it; a smooth removal means you can reuse it. What condition is your felt in? This is a perfect opportunity to check for wear and consider whether a replacement is necessary. Carefully fold the felt and store it in a protective cover.
Take Apart The Slate
Finally, tackle the slate, the heaviest part of the pool table. Slate pieces are often bolted to the frame. Use a drill to remove these bolts, and carefully lift each piece with a partner. Slate is fragile despite its weight—one wrong move can cause a crack. Did you know slate is the key to your table’s level surface? Handle it with care, and keep it flat during transport to maintain its integrity. Disassembling a pool table requires patience and attention to detail. Each step not only helps in moving the table but also offers a chance to inspect and maintain its components. Are you ready to transform this daunting task into an achievable mission? Follow these guidelines, and your pool table will arrive at its new home in perfect shape.
Packing Materials
Transporting a pool table requires careful use of packing materials. Secure the table parts with bubble wrap and blankets. Protect each section to avoid scratches and damage during the move.
Transporting a pool table is no small feat, and packing materials play a crucial role in ensuring every part of your cherished game piece arrives safely. Imagine the dismay of setting up your pool table only to find a chipped slate or torn pockets. Proper packing can prevent such mishaps, and it all starts with choosing the right materials.
Secure The Slate
The slate is the heart of your pool table. It’s heavy and fragile, demanding careful attention. Use thick, padded moving blankets to cover the slate completely. This protects against scratches and cracks during transit. Consider adding foam padding or bubble wrap for extra cushioning. This might seem excessive, but the slate is irreplaceable, and its protection is paramount. Have you ever tried to repair a damaged slate? It’s a costly and time-consuming affair.
Wrap The Rails
Rails are not just aesthetic—they affect gameplay. Wrap each rail with bubble wrap or foam sheets. This prevents damage and maintains their pristine condition. Tightly secure the wrapping with packing tape to avoid slipping. Rails can easily get dinged or scratched, impacting your pool shots. Would you want to play on a table with uneven rails? Ensuring they’re protected is key to preserving the table’s integrity.
Protect The Pockets
Those leather pockets are often overlooked but are vital for catching your winning shots. Wrap them individually with bubble wrap. Secure them with tape, ensuring no part is exposed. You might think pockets can withstand rough handling, but even minor tears can affect playability. Have you ever watched a ball slip through a damaged pocket? It’s frustrating and impacts the game experience. Keeping them safe ensures your table remains functional and enjoyable. Packing your pool table correctly is not just about using the right materials—it’s about understanding the value of each part and taking steps to protect them. What steps will you take to ensure your pool table remains in top condition during transport?
Loading Techniques
Transporting a pool table requires careful planning and technique. Detach legs and slate pieces for easier handling. Use padding to prevent scratches and damages during the move. Secure the table in the moving truck to ensure safety throughout the journey.
Transporting a pool table is no small feat. The loading techniques you use can make or break your moving experience—literally. It’s not just about muscle power; it’s about strategy and precision. Proper loading can prevent damage and ensure your beloved table arrives safely at its new home. Have you ever wondered what the best ways are to get that heavy piece of furniture from one place to another without a hitch? Let’s dive into some essential techniques that can make the process smoother and more efficient.
Use A Dolly
A dolly can be your best friend when moving a pool table. This handy tool allows you to roll the table easily instead of lifting it, saving your back and energy. You simply slide the dolly under the table legs, ensuring it is centered to maintain balance. Consider using a furniture dolly with straps for added security. This can prevent the table from slipping off during movement. The wheels on a dolly make maneuvering around tight corners and narrow hallways a breeze.
Secure In The Vehicle
Once you have the table on the dolly, the next step is securing it in the moving vehicle. This is crucial to prevent any shifting during transit, which could cause damage. How do you ensure it stays put? Use ratchet straps to tightly secure the pool table to the vehicle’s anchor points. Check that the table is snug against the walls of the vehicle to minimize any movement. Double-check all straps before hitting the road for peace of mind.
Balance The Weight
Weight distribution is key when transporting a pool table. A poorly balanced table can lead to accidents and damage. Have you ever tried carrying a heavy bag that’s off-balance? The same principle applies here. Position the pool table over the vehicle’s center of gravity, typically near the middle. This helps maintain vehicle stability. Ensure that the weight is evenly distributed across all points where the table rests. Adjust as necessary until you achieve balance. Engaging in these loading techniques can significantly ease the transportation process. Have you considered how a simple tool like a dolly can change your moving experience? By securing your table properly and balancing the weight, you can move with confidence and ease.
Transporting Safely
Transporting a pool table requires careful planning and teamwork. Disassemble the table into smaller parts for easier handling. Use protective padding to prevent damage during the move.
Transporting a pool table safely is crucial to ensure it arrives at its new location in perfect condition. A pool table is not just another piece of furniture; it’s an investment in fun, family time, and maybe even a little friendly competition. Without the proper steps, you risk damaging both the table and your vehicle. Let’s explore some practical ways to make sure your pool table is transported safely.
Choose The Right Vehicle
Selecting the right vehicle is the first step to a successful move. A large van or a truck with a flatbed is ideal. These vehicles provide ample space and stability for your pool table, reducing the risk of damage. If you don’t own such a vehicle, consider renting one. It’s a small investment for the safety of your pool table. Ensure the vehicle has sufficient loading capacity and tie-down points to secure the table.
Drive Carefully
Driving carefully is crucial once your pool table is loaded. The weight and dimensions of a pool table can affect your vehicle’s handling. Adjust your driving style accordingly. Keep speeds moderate to maintain control. You don’t want sudden jerks or swift movements that could shift the table. Make sure to plan your route, avoiding areas with heavy traffic or rough roads.
Avoid Sudden Stops
Sudden stops can be disastrous during transport. They can cause the pool table to slide, potentially damaging it or your vehicle. Always maintain a safe distance from the vehicle in front of you. Anticipate traffic lights and stop signs. Slow down well in advance to ensure smooth braking. Would you rather arrive a few minutes late or risk damaging your beloved pool table? Transporting your pool table safely requires careful planning and execution. With the right vehicle, cautious driving, and an eye on the road, your table will arrive ready for its next game. Are you ready to take these steps and ensure your pool table’s safe journey?
Reassembly Tips
Moving a pool table requires careful planning. Disassemble parts like legs and slate for safe transport. Label components clearly to ensure easy reassembly.
Reassembling your pool table after transport might seem daunting, but with some practical tips, you can make it a smooth process. You need to handle each component with care, especially when it comes to the slate, felt, rails, and pockets. Whether you’re doing this for the first time or it’s your tenth move, these reassembly tips will guide you through the steps effectively.
Position The Slate
The slate is the heaviest part of your pool table and must be positioned accurately for a level playing surface. Make sure the slate is placed on a sturdy and even base. Use a level tool to ensure it’s perfectly flat. A small tilt can affect your game, so double-checking is crucial. If you notice any unevenness, now is the time to adjust it.
Reattach The Rails
Once the slate is secure, it’s time to reattach the rails. Align each rail with the pre-drilled holes on the table. Use the original screws and tighten them adequately. A loose rail can disrupt a perfect shot, so make sure they’re secure.
Stretch The Felt
Stretching the felt correctly is essential for a smooth playing surface. Start by laying the felt over the slate and gently stretching it to remove any wrinkles. Secure it with a staple gun along the edges, making sure it’s tight and even. A taut felt ensures the balls roll smoothly, enhancing your gameplay.
Secure The Pockets
Finally, secure the pockets to complete the reassembly. Align each pocket with its designated spot underneath the table. Use screws or bolts to fasten them in place. Check that the pockets are snug and not loose, ensuring every ball is caught effortlessly. Transporting and reassembling a pool table can be a rewarding experience when done with precision. Have you ever thought about how much the small details in reassembly can impact your game? By following these tips, you’ll be ready to enjoy your pool table as if it never left your home.
Common Mistakes
Transporting a pool table requires care and attention. Many make mistakes that can lead to damage. Understanding common errors is crucial. Let’s explore the pitfalls that can arise during this process.
Ignoring Weight Limits
Pool tables are heavy. They often weigh hundreds of pounds. Ignoring weight limits can lead to accidents. Always check the capacity of your moving equipment. Ensure it can handle the table’s weight safely.
Improper Wrapping
Proper wrapping prevents scratches and dents. Use padding and wraps to protect the table’s surface. Many skip this step. This can result in damage during transport. Take time to wrap each piece carefully.
Rushing The Process
Rushing can cause mistakes. Take your time to disassemble and pack each part. Ensure all pieces are secured and labeled. Haste leads to forgotten parts and potential damage. Plan each step and move at a steady pace.

Frequently Asked Questions
How Do You Safely Move A Pool Table?
To safely move a pool table, first disassemble it. Remove the legs, pockets, rails, and felt. Use appropriate tools and label each part. Transport the slate carefully, as it’s heavy and fragile. Reassemble at the new location, ensuring it’s level and secure.
Can You Move A Pool Table Without Disassembling?
It’s not recommended to move a pool table without disassembling. The weight and size can cause damage. Disassembly reduces risk to both the table and movers. It ensures safe transportation and easier reassembly. Always follow professional guidelines or hire experts for best results.
What Tools Are Needed To Disassemble A Pool Table?
To disassemble a pool table, you’ll need a socket wrench, screwdriver, staple remover, and possibly a drill. These tools help in removing bolts, staples, and screws. Proper tools ensure efficient disassembly and prevent damage. Ensure you have the necessary equipment before starting the process.
How Long Does It Take To Move A Pool Table?
Moving a pool table can take several hours, depending on the table’s size and complexity. Professionals may complete the task faster. DIY moves typically take longer due to careful disassembly and reassembly. Always allocate enough time and plan carefully to ensure a smooth move.
Conclusion
Transporting a pool table requires careful planning and effort. Break it down into manageable parts. Ensure you have the right tools. Moving with a team helps. Secure all parts to avoid damage. Use blankets to protect surfaces. Load and unload with caution.
Remember, safety comes first. Renting a truck might be necessary. Reassemble with patience and precision. Enjoy your pool table in its new spot. With these steps, the process becomes easier. You’ll soon be playing again. Safe and sound.