
You can access detailed error codes and run tests with the Whirlpool Duet Dryer Diagnostic Mode.
I’ve worked on laundry appliances for years, and I use the Whirlpool Duet Dryer Diagnostic Mode every time I troubleshoot a Duet dryer. This built‑in test suite helps you find faults fast. Read on to learn how to enter the diagnostic mode, read codes, run tests, interpret results, and take safe, effective next steps. You’ll get clear steps, real tips from hands‑on experience, and the confidence to decide when to fix it yourself or call a pro.
How the Whirlpool Duet Dryer Diagnostic Mode Works
The Whirlpool Duet Dryer Diagnostic Mode is a service menu inside the dryer’s control system. It runs self‑tests on sensors, motors, heaters, door switches, and the user interface. The dryer reports results as fault codes or LED/buzzer patterns.
This diagnostic mode lets you isolate the cause of common problems. It helps you avoid replacing parts at random. It is not a full substitute for a tech, but it saves time and reduces guesswork.

How to Enter Whirlpool Duet Dryer Diagnostic Mode
Follow these steps to enter the Whirlpool Duet Dryer Diagnostic Mode. Read each step first. Work with the door closed and the dryer powered on.
- Make sure the dryer is plugged in and the door is closed.
- Turn the dryer control knob to the "Timed Dry" position.
- Press and hold the "Wrinkle Shield" and "EcoBoost" (or "Signal") buttons at the same time for 3 seconds.
- The dryer should display a code or light pattern to show it entered the diagnostic mode.
- Use the control knob or buttons to step through tests. Each step runs a separate function test.
If your model uses different button names, the same idea applies: press two service buttons together for 2–5 seconds. Check the tech sheet behind the dryer or the service manual for model‑specific steps.

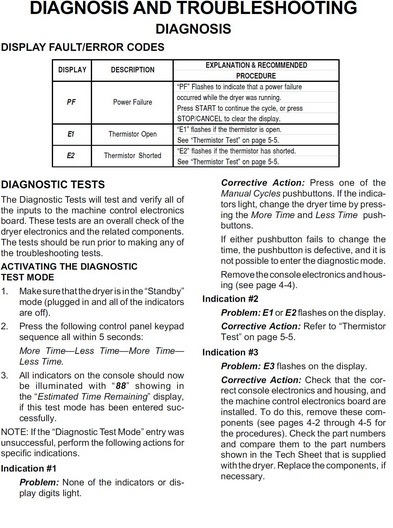
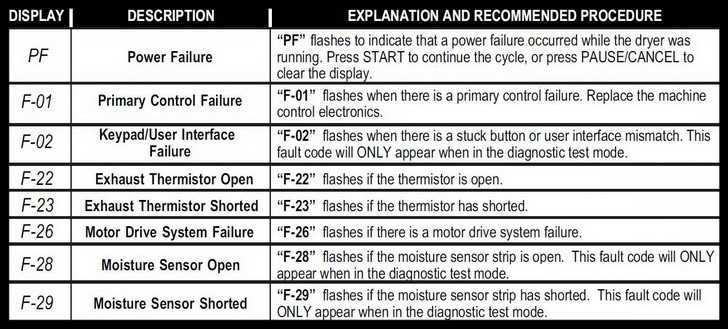
Reading and Interpreting Diagnostic Codes
The diagnostic mode provides codes and test outputs. Codes often fall into two groups: control and component faults. Control faults point to the main board or communication errors. Component faults point to sensors, heaters, motors, or switches.
Common indicators and what they mean
- Error codes or letter/number pairs. These are shorthand for specific faults.
- Lights or flashes. The pattern often maps to a code list in the manual.
- Test results. A motor test will spin the drum. A heater test will attempt to heat.
How to interpret results
- Compare the code to the tech sheet. The dryer’s service sheet lists what each code means.
- Check related parts. If the code points to airflow, inspect the vent and lint screen. If it points to heat, check thermal fuses and heating elements.
- Use process of elimination. Run individual tests in diagnostic mode to see which component fails.

Common Error Conditions and Troubleshooting Using Diagnostic Mode
These are the issues I see most often when using the Whirlpool Duet Dryer Diagnostic Mode. I include quick checks and fixes you can try.
No heat or long dry times
- What to check: vent blockage, lint screen, vent hose, vent hood outside.
- Diagnostic tip: Run the heater test in diagnostic mode. If the heater won’t run, check the thermal fuse and heating element.
No power or no display
- What to check: outlet power, plug, circuit breaker, door switch.
- Diagnostic tip: Use the diagnostics to check the user interface and door switch input. If the board won’t respond, the control board could be at fault.
Drum not turning
- What to check: belt, motor, idler pulley, motor capacitor.
- Diagnostic tip: Run the motor test. If the motor doesn’t spin but gets power, the motor may need replacement.
Moisture sensor errors
- What to check: sensor bars inside the drum, residue or fabric softener build‑up.
- Diagnostic tip: Clean sensor strips and rerun the moisture sensor test in diagnostic mode.
Door or control lock errors
- What to check: door latch, strike, and lock mechanism.
- Diagnostic tip: Diagnostic mode will test the door switch and lock. Replace parts only when a test fails.
From my experience, clogged vents and dirty sensor strips cause the most repeat trips. Fix these first before swapping expensive parts.
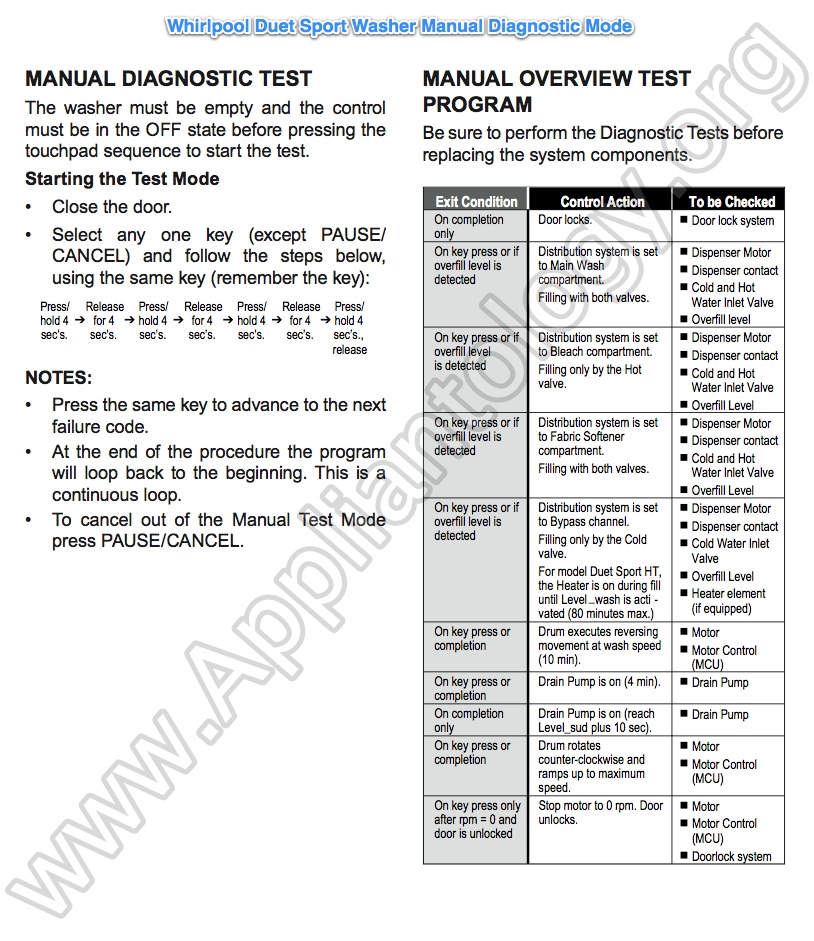
Running Specific Tests in Diagnostic Mode
Use these tests to isolate components. Tests run differently by model, but the idea is the same. Keep steps short and safe.
Motor/drum test
- Start the motor test in diagnostic mode.
- Listen and watch for smooth rotation.
- If stalled, inspect belt and motor.
Heater test
- Start the heater test.
- Monitor for a heating element glow or warm airflow.
- If no heat, check thermal fuses and element continuity.
Sensor and switch tests
- Run door switch and moisture sensor checks.
- Open or close the door to see a change in status.
- Clean or replace parts if tests fail.
Noise and vibration tests
- Run an unloaded cycle while observing.
- Note any unusual sounds or wobble.
- Tighten or replace mounts, drum rollers, or bearings as needed.

Clearing Codes and Exiting the Whirlpool Duet Dryer Diagnostic Mode
After you identify and fix a problem, clear codes before normal use. Clearing helps confirm the repair.
Steps to clear codes
- Exit diagnostic mode using the control knob or the cancel/off button.
- Unplug the dryer for 30 seconds to power‑cycle the control board.
- Plug the dryer back in and run a short dry cycle.
- If the same code returns, the issue persists. Revisit diagnostics.
Note that some codes will auto‑clear only after a successful test or after the fault stops occurring. Always retest after repairs to confirm the fix.
Safety, Tools, and Best Practices
Safety first. Always cut power before opening the dryer cabinet. Use the right tools and take photos before you disconnect parts. Small steps save time.
Safety tips
- Unplug the dryer or flip the breaker before servicing.
- Wear gloves and eye protection.
- Keep the dryer on a stable surface when you test moving parts.
Useful tools
- Multimeter for continuity and voltage checks.
- Nut drivers and screwdrivers for cabinet access.
- Vacuum and vent brush to clean ducts.
Best practices from my work
- Start with the easy fixes. Clean vents and sensors first.
- Log error codes and steps you took. This helps if you call a technician.
- Replace only the failed part. Use diagnostics to confirm before ordering.

When to Call a Technician
Use diagnostic mode for diagnosis, not for every repair. Call a pro when tests point to complex electronic faults or when you lack tools.
When to call
- The control board shows intermittent or complex faults.
- The motor or major components fail in mid‑repair.
- You see safety‑critical failures like repeated thermal fuse trips.
A qualified tech will have service manuals, parts, and advanced tools. That saves you time and prevents repeated trips.

Frequently Asked Questions of Whirlpool Duet Dryer Diagnostic Mode
How long does it take to run diagnostic mode?
Most diagnostic sessions take 10–30 minutes depending on how many tests you run. Quick checks like motor or heater tests take only a few minutes.
Will diagnostic mode tell me exactly which part to replace?
Diagnostic mode narrows the fault to a component or circuit. It guides your repair, but you may still need a multimeter or visual check to confirm the exact part.
Can I fix errors found in diagnostic mode myself?
Yes, many fixes are DIY friendly. Clean vents, replace thermal fuses, and swap belts if you are comfortable with basic tools. For control board or motor replacement, consider a pro.
Does entering diagnostic mode erase stored faults?
Entering diagnostic mode does not erase faults by itself. You can clear codes by power‑cycling the dryer or using the clear function after a successful repair.
Is using diagnostic mode safe for the dryer?
Yes, diagnostic mode is designed for service use. Follow safety steps: unplug before opening the cabinet, and do not touch live circuits during powered tests.
Conclusion
The Whirlpool Duet Dryer Diagnostic Mode is a powerful tool. It helps you find faults faster. Use it to test motors, heaters, sensors, and controls. Start with easy fixes like cleaning vents and sensors. Confirm each fix by rerunning tests and clearing codes. If the fault points to a control board or a complex electrical problem, call a qualified technician.
Take action today: run the diagnostic checks, document the codes you see, and tackle the simplest fixes first. If you found this guide useful, subscribe for more appliance tips or leave a comment with your dryer code and I’ll help you troubleshoot.

