
Most CDI ignition problems stem from bad coils, pickups, or failed CDI units.
I have worked on small engines and motorcycles for years. This Cdi Ignition Troubleshooting Guide pulls together hands-on tips, clear steps, and real fixes. Read on to learn how to test parts, spot symptoms, and get your engine firing again fast.

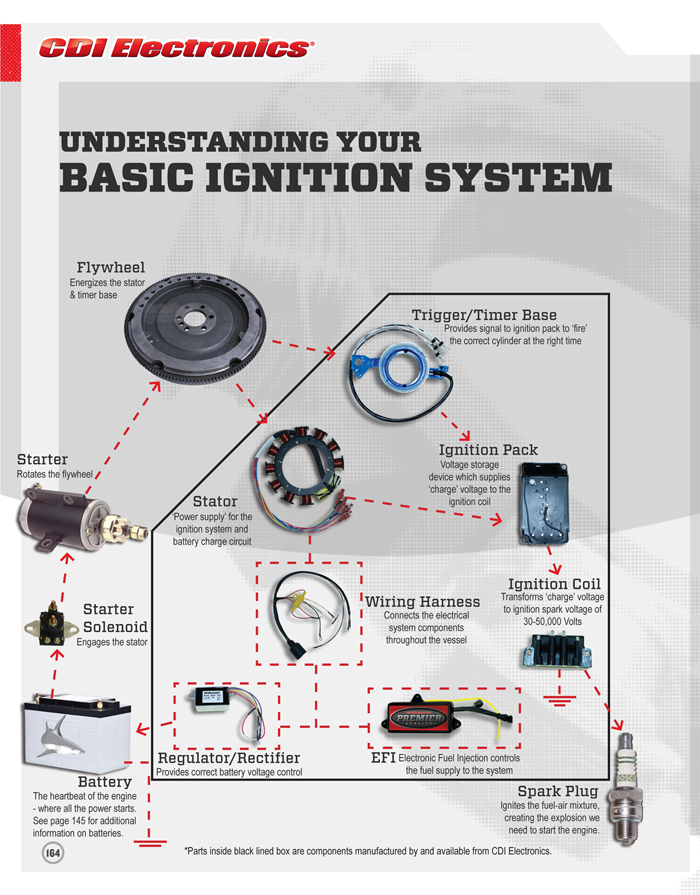
How CDI Ignition Works
Cdi Ignition Troubleshooting Guide starts with knowing how the system works. A CDI uses a charged capacitor to deliver a quick high-voltage pulse to the ignition coil. The pickup (trigger) tells the CDI when to release that pulse.
The stator or battery charges the capacitor in the CDI. Timing parts must be in good shape for the spark to hit at the right moment. Knowing this flow makes fault finding faster and more accurate.

Common Symptoms of CDI Failure
When you use this Cdi Ignition Troubleshooting Guide, watch for these signs. They help you narrow the fault quickly.
- No spark at the plug: Engine turns but no spark shows on a spark tester.
- Intermittent spark: Engine runs then dies or misfires under load.
- Weak spark: Spark is small and pale. Engine is hard to start.
- No power at low RPM: Engine runs poorly at idle but better at high RPM.
- Sudden failure after rain: Water intrusion can short CDI or coils.
Tools and Safety
A good Cdi Ignition Troubleshooting Guide needs the right tools. Keep safety first and disconnect the battery if you work on wiring.
- Multimeter with AC and DC ranges for resistance and voltage checks.
- Spark tester or a spare spark plug for visual tests.
- Wiring diagram or service manual for your vehicle.
- Small tools: screwdrivers, pliers, insulated gloves.
- Optional: oscilloscope for pickup waveform checks.
Step-by-Step Cdi Ignition Troubleshooting Guide
Follow these steps in order. They move from easy checks to deeper tests.
-
Visual inspection
- Look for loose wires, corroded connectors, melted insulation, or water damage. Fix obvious issues first.
-
Check the spark
- Remove the plug, attach a tester, and crank. Note spark color and consistency. No spark means further tests.
-
Test the coil primary and secondary
- Use the multimeter. Compare readings to specs. Very high or open readings point to a bad coil.
-
Test the pickup/trigger
- Measure resistance and AC voltage while cranking. Pickup failure often causes no spark or erratic timing.
-
Inspect the stator and charging circuit
- A weak or dead stator can stop the CDI from charging. Test AC output at the stator leads.
-
Swap known-good parts
- If you can, replace the CDI with a known good unit. A quick swap tells you if the CDI itself is bad.
-
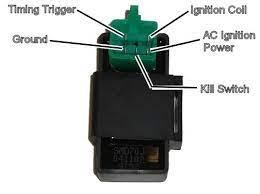
Check ground and switches
- Kill switches, safety interlocks, and poor ground can cut ignition power. Test continuity and switch action.
-
Advanced testing with an oscilloscope
- Look at pickup waveforms and coil primary pulses. Distorted or missing waveforms reveal timing or CDI issues.
People also ask:
What if the spark appears weak? Replace or test the coil and check the wiring for high resistance.
Can a CDI fail intermittently? Yes. Heat and moisture can cause intermittent CDI faults.

Testing CDI Components
This Cdi Ignition Troubleshooting Guide covers each part test simply. Below are practical checks you can do with a multimeter.
Testing the pickup coil
- Measure resistance against spec. While cranking, measure AC voltage. No or very low AC means a bad pickup.
Testing the ignition coil
- Check primary and secondary resistance. A short or open coil will read out of spec. Compare to service values.
Testing the stator
- Test AC output for each winding. Stator failure often shows low AC voltage or open windings.
Testing the CDI unit
- Many CDI units are sealed and not repairable. Swap with a known good unit or use a test bench CDI to confirm failure.

Replacement, Repair, and Buying Tips
Use this Cdi Ignition Troubleshooting Guide to make smart buying choices. Parts can vary even if they look the same.
- Match part numbers and connector types. Many CDI units differ in timing maps or rev limits.
- Consider OEM first for reliability. Quality aftermarket units can work if they match specs.
- Avoid cheap, unbranded units for performance engines. They can cause timing errors.
- Keep a spare CDI if you rely on the vehicle for work or travel.
Prevention and Maintenance
A good Cdi Ignition Troubleshooting Guide also teaches how to avoid problems. Small steps lengthen component life.
- Keep connections clean and dry to prevent corrosion.
- Use dielectric grease on connectors exposed to weather.
- Inspect wiring annually for chafing and heat damage.
- Store vehicles in dry places to avoid moisture-related CDI faults.
Frequently Asked Questions of Cdi Ignition Troubleshooting Guide
What is the first thing I should check with no spark?
Check wiring, ground, and the kill switch. Then try a spark tester to confirm no spark before deeper tests.
Can a battery-powered CDI fail differently than a magneto-powered CDI?
Yes. Battery-powered CDI relies on battery voltage while magneto systems rely on stator output, so symptoms may differ.
How do I know if the pickup coil is bad?
Measure its resistance and AC output while cranking. No reading or wildly off-spec values mean it is likely bad.
Is it safe to swap CDI units between models?
Only if the part numbers and pinouts match. Mismatched CDI units can change timing or damage the engine.
Do moisture and heat affect CDI units?
Yes. Moisture causes shorts, and heat can fail internal electronics. Dry, cool storage helps longevity.
How long will testing take for a hobbyist?
Basic checks can take 30 to 60 minutes. Deeper troubleshooting or parts swapping might take several hours.
Can aftermarket CDI improve performance?
Some aftermarket CDIs offer different timing curves or rev limits. Choose carefully and test for reliability.
Conclusion
This Cdi Ignition Troubleshooting Guide gives clear steps to find and fix ignition faults. Start with simple checks, use the right tools, and work methodically. If you follow these tips, you will find problems faster and avoid wasted parts.
Take action now: check your basics, run the simple tests, and note what you find. Share your results, ask for help, or subscribe for more guides.

