
Brake System Troubleshooting quickly pinpoints issues to keep brakes safe and reliable.
I have spent years diagnosing and repairing brake systems, so I know how small symptoms lead to big problems. This guide on Brake System Troubleshooting shows clear steps, simple tests, and real tips you can trust. Read on to learn how to find the cause, fix it safely, and prevent the same fault from coming back.
How brake systems work
A basic brake system turns pedal force into stopping power. The master cylinder pushes fluid through lines to calipers or wheel cylinders. Pads or shoes press on rotors or drums. Modern cars add ABS and electronic aids that change how brakes respond.
Understanding this flow helps with Brake System Troubleshooting. If one link fails, the whole system can feel weak or noisy. Keep this simple map in mind as you check parts.
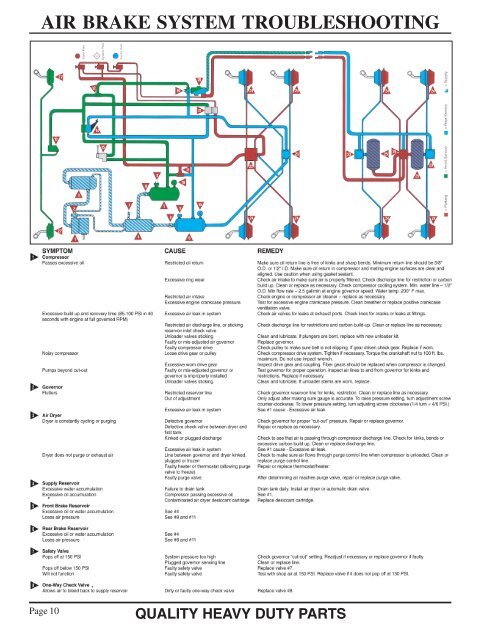
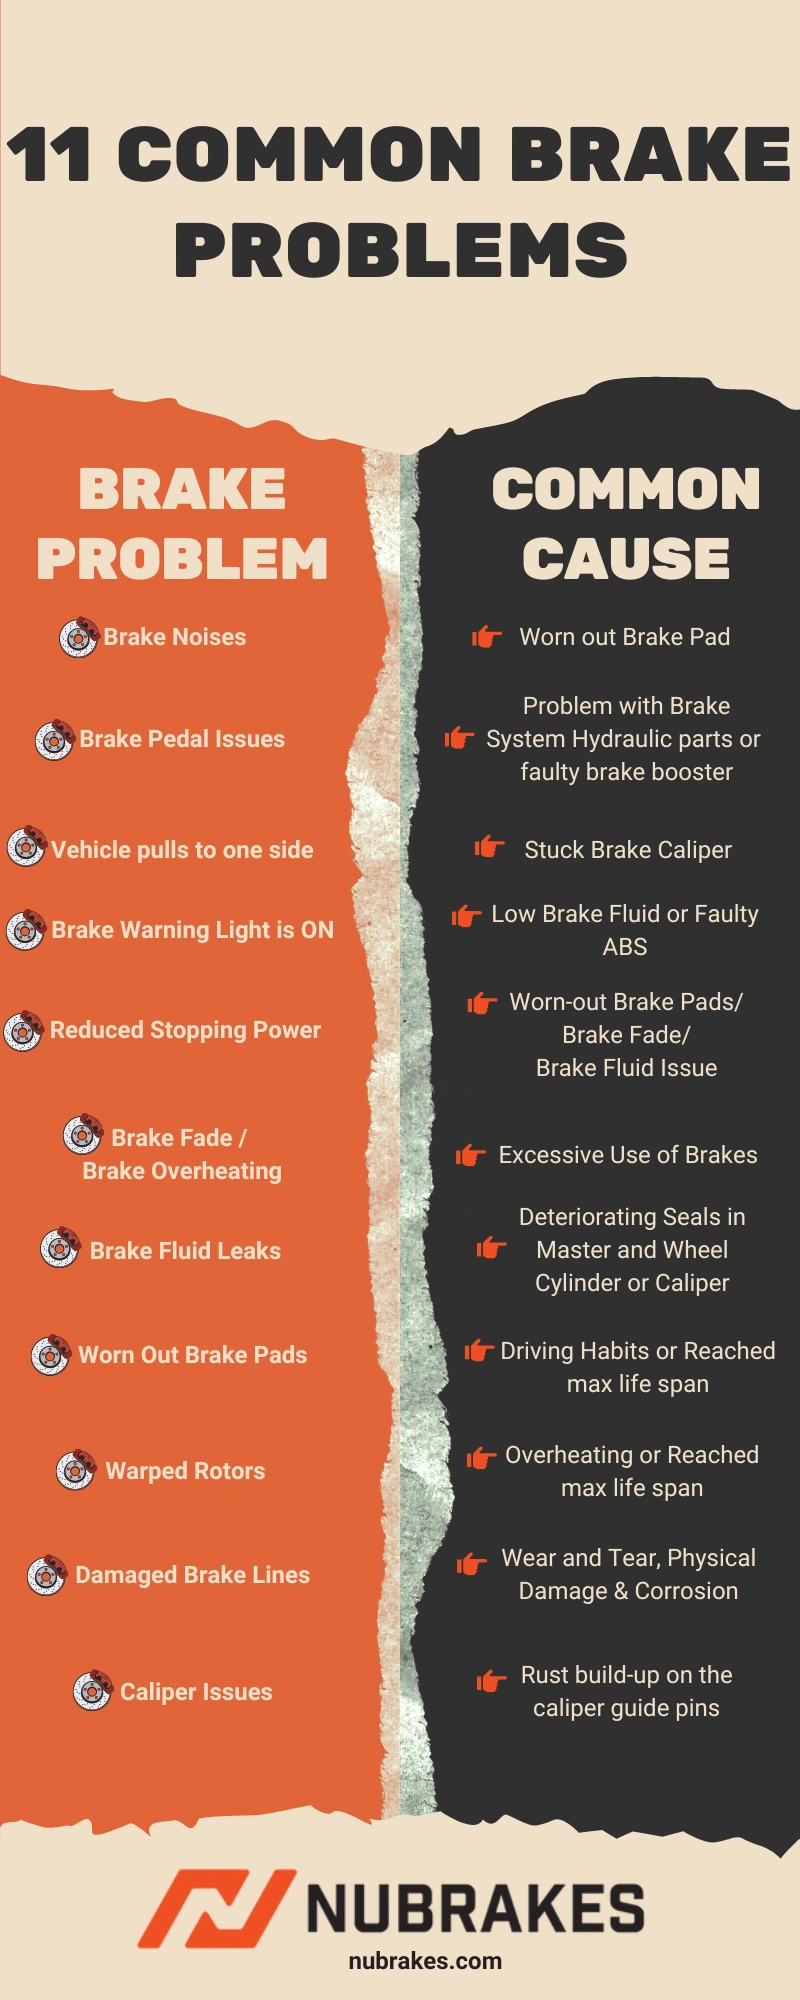
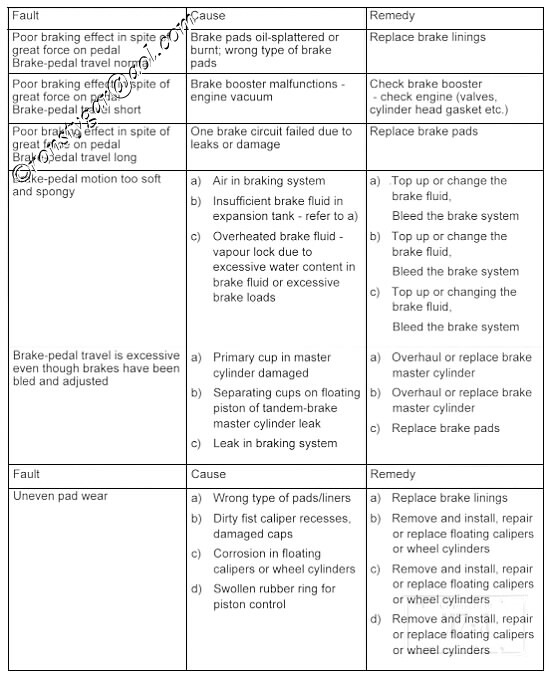
Common brake problems and causes
Brake System Troubleshooting starts with knowing common faults. Here are the usual culprits and what they mean.
- Squealing or grinding noises
Pads worn or rotor damage. Contaminated pads can also squeal. - Soft or spongy pedal
Air in lines, low fluid, or a failing master cylinder. - Pulling to one side
Stuck caliper, uneven pad wear, or brake hose collapse. - Brake warning light or ABS light
Sensor issue, low fluid, or ABS module fault. - Burning smell or smoke
Stuck caliper, dragging pad, or overheated fluid.
Spotting the right symptom helps narrow Brake System Troubleshooting quickly. Use the symptom to choose the test that matters.
Step-by-step Brake System Troubleshooting guide
Follow these clear steps to find most brake issues. Work in order and test after each fix.
- Safety first
Park on level ground. Use wheel chocks and jack stands. Wear goggles and gloves. - Visual inspection
Check pad thickness, rotor surface, fluid level, and leaks. Look for rust or damaged hoses. - Check brake fluid
Fluid should be clear or light amber. Dark fluid means contamination. Low fluid points to leaks or worn pads. - Pedal feel test
With engine off, pump pedal to build pressure. With engine on, hold pedal and watch for sinking. Sinking often means internal leak or master cylinder failure. - Test drive
Drive slowly in a safe area. Note noise, pulling, vibration, or delayed response. - Component checks
Inspect calipers, rotors, drums, wheel cylinders, and sensors as needed. - Brake bleeding
Remove air from lines using a manual, pressure, or vacuum method. - Final check
Ensure no leaks, pedal is firm, and warning lights are off.
This ordered routine makes Brake System Troubleshooting efficient and safe. Tackle simple fixes first before moving to complex repairs.
Troubleshooting by component
Break problems down by part. This helps isolate the fault fast.
Brake pads and rotors
- Symptoms: noise, vibration, reduced stopping power.
- Test: measure pad thickness, run finger across rotor for grooves, check runout with a dial indicator.
- Fix: replace pads and resurface or replace rotors if needed.
Calipers and wheel cylinders
- Symptoms: pulling, uneven wear, fluid leaks.
- Test: check for stuck slide pins, piston movement, and leaking seals.
- Fix: clean and lubricate pins, rebuild or replace calipers, change seals on wheel cylinders.
Brake lines and hoses
- Symptoms: soft pedal, spongy feel, fluid loss.
- Test: inspect hoses for bulges and cracks. Check metal lines for rust or pinholes.
- Fix: replace damaged hoses or corroded lines. Always bleed system after replacement.
Master cylinder
- Symptoms: pedal sinks slowly, brake fluid around the pedal box.
- Test: hold pressure on the pedal and watch for drop. Remove reservoir cap and look for internal foam.
- Fix: replace master cylinder or rebuild where serviceable.
ABS and sensors
- Symptoms: ABS light on, pulsing pedal under normal stops.
- Test: use a scan tool to read codes. Inspect wheel speed sensors and tone rings.
- Fix: clean sensors, repair wiring, or replace faulty sensors or ABS module.
Brake fluid and contamination
- Symptoms: reduced braking, corrosion in system, soft pedal.
- Test: check fluid color and boiling point if possible.
- Fix: flush and replace fluid every 1-2 years or as manufacturer recommends.
Following these checks will narrow Brake System Troubleshooting to one part at a time. Replace only what you need after you confirm the defect.

Tools and equipment for Brake System Troubleshooting
You do not need a full shop to find many brake faults. Have these items on hand.
- Basic hand tools and sockets
- Jack and quality jack stands
- Brake pad spreader or C-clamp
- Brake fluid and funnel with filter
- Brake bleeder kit or vacuum pump
- Multimeter and code reader for ABS diagnostics
- Pad caliper or micrometer to measure pad thickness
- Brake cleaner and rags
Good tools speed up Brake System Troubleshooting and reduce mistakes. Invest in a quality bleeder and a scan tool for modern vehicles.

Safety and when to seek professional help
Brakes are life-critical. Stop if you are unsure.
- If there is a major leak or no pedal, tow the vehicle.
- If ABS or traction control gives persistent errors, a pro scan may be needed.
- Complex repairs like ABS module replacement or internal master cylinder work are best left to trained techs.
- Always use the correct parts and follow torque specs.
Use caution during Brake System Troubleshooting. A mistake can make brakes worse. Trust professionals for high-risk or unclear issues.
Preventive maintenance to avoid common failures
A little care prevents many brake repairs. Do these simple tasks.
- Check fluid level monthly and top up with the correct type.
- Inspect pads and rotors every oil change.
- Replace brake fluid every 12–24 months.
- Keep brake parts clean and free of grease.
- Replace rubber hoses every 6–10 years or on visual damage.
- Address warning lights early.
These steps cut down on emergency Brake System Troubleshooting and keep you safer on the road.
My experience and lessons learned
I worked in a shop for over a decade and fixed hundreds of brake faults. Early in my career I chased noises without measuring pad wear. I learned to trust simple tests first. Now I always check fluid, pad thickness, and ride feel before disassembling.
Tips I use daily
- Photograph parts before removal to aid reassembly.
- Mark wheel position to track uneven wear.
- Use new hardware with pads to avoid rattles.
Mistakes to avoid
- Don’t reuse old fluid after it’s dark or contaminated.
- Don’t ignore a soft pedal even if brakes seem to work.
- Don’t overtighten caliper bolts; use correct torque.
These real lessons make Brake System Troubleshooting faster and more reliable for both DIYers and pros.
PAA-style questions to answer common queries
What causes a spongy brake pedal?
A spongy pedal usually means air in the lines, contaminated fluid, or a leak. Bleeding the brakes or fixing the leak often restores firm pedal feel.
Why do brakes pull to one side?
Uneven pad wear, a stuck caliper, or uneven tire pressure can cause pulling. Inspect calipers, hoses, and tire pressure to find the root cause.
How often should brake fluid be changed?
Change brake fluid every 12–24 months depending on use and manufacturer guidance. Old fluid can absorb water and lower boiling point, harming braking.
Can I drive with a grinding brake noise?
No. Grinding often means metal-on-metal contact and can damage rotors. Tow or drive slowly to a safe place and inspect before regular driving.
Does ABS failure affect normal brakes?
ABS failure usually affects only the anti-lock function. Normal braking may still work, but ABS problems should be fixed for safe emergency stops.
Frequently Asked Questions of Brake System Troubleshooting
What is the first step in brake system troubleshooting?
Start with safety and a visual inspection. Check fluid level, pad wear, and obvious leaks before deeper tests.
How do I know if the master cylinder is bad?
A sinking pedal under steady pressure or fluid around the pedal box suggests a failing master cylinder. A firm pedal after bleeding points away from the master cylinder.
Can old brake fluid cause brake failure?
Old fluid can absorb water and lower the boiling point. This can reduce braking under heavy use but does not usually cause immediate failure.
How long does a brake job take for one axle?
A basic pad and rotor job on one axle takes about one to two hours for a practiced DIYer. Complex caliper work takes longer.
Is ABS repair expensive?
ABS repairs can be costly due to parts and diagnostics. Prices vary, but sensor cleaning or simple wiring fixes are cheaper than module replacement.
Conclusion
Brake System Troubleshooting is a step-by-step craft that blends simple checks with smart tests. Start with safety, inspect visually, test pedal feel, and work component by component. Small fixes often prevent big failures and save money. Take one clear step today: check your fluid and pad wear, or schedule a pro inspection if anything feels off. Share your brake questions or subscribe for more hands-on tips and real repair stories.

