
Sewing machine troubleshooting fixes jams, tension issues, skipped stitches, and basic motor faults quickly.
As a sewing technician and long-time home sewist, I’ve fixed hundreds of machines. This guide walks you through practical Sewing Machine Troubleshooting steps. You will learn how to diagnose common faults, apply simple fixes, and decide when to call a pro. Read on for clear, tested advice to get your machine stitching smoothly again.

Common Sewing Machine Problems and Quick Fixes
Sewing Machine Troubleshooting begins with identifying the symptom. Below are the most common problems and clear causes. Each item gives the likely reason and a simple fix you can try at home.
- Machine won’t start
- Causes: power, foot pedal, fuse, or motor switch issues.
- Fixes: check power cord and outlet. Test a different outlet. Inspect foot pedal connection. Replace blown fuse or reset circuit if needed.
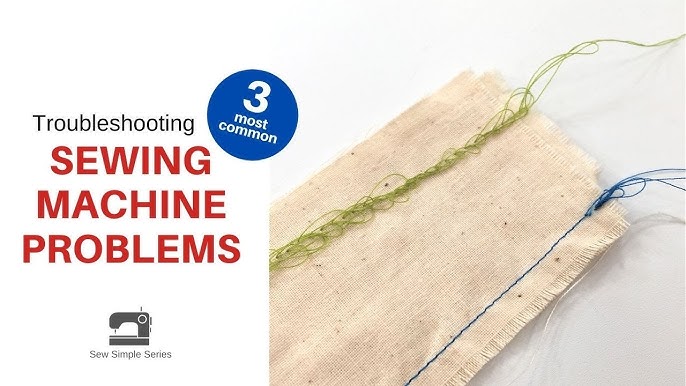
- Thread jams and birdnesting under fabric
- Causes: wrong bobbin winding, incorrect threading, lint buildup, bad bobbin case.
- Fixes: rethread top and bobbin. Clean bobbin area. Replace damaged bobbin or case.
- Skipped stitches
- Causes: dull or bent needle, wrong needle type, timing issue.
- Fixes: replace the needle with the correct size and type. If skipping continues, consult a technician for timing adjustments.
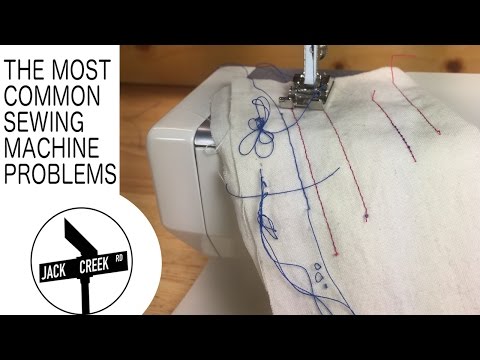
- Tension problems (loops, puckering)
- Causes: wrong tension setting, mismatched thread weight, incorrect threading.
- Fixes: rethread the machine, adjust top tension gradually, use matching bobbin thread, test on scrap fabric.
- Needle breaks
- Causes: hitting a pin, wrong needle for fabric, needle not fully inserted.
- Fixes: remove pins before sewing, use the right needle, insert fully and tighten the clamp.
- Machine won’t feed fabric evenly
- Causes: feed dog lowered, presser foot pressure too light, build-up under feed dogs.
- Fixes: raise feed dogs, increase presser foot pressure, clean lint away.
- Strange noises or burning smell
- Causes: lack of lubrication, debris, motor strain, electrical fault.
- Fixes: unplug machine. Clean and oil as per manual. If smell or loud noise persists, stop using and get professional service.
Sewing Machine Troubleshooting works best when you start simple and escalate. First check power and threading. Then move to cleaning, tension, and needle checks. If still unresolved, seek repair.
Step-by-Step Troubleshooting Workflow
A logical workflow reduces guesswork. Follow these ordered steps for consistent results.
- Safety first
- Unplug the machine before opening covers.
- Turn off the power before changing needles or parts.
- Visual check
- Look for broken needles, bent parts, lint, and thread caught in gears.
- Remove fabric, spool, and bobbin to inspect.
- Rethread top and bobbin
- Wind a fresh bobbin correctly.
- Rethread the top thread following path marks.
- Test basic functions
- Try hand-turning the flywheel to see if it feels smooth.
- Use scrap fabric to run a few stitches at slow speed.
- Adjust tension and stitch settings
- Set stitch length and width to medium.
- Adjust tension in small steps and test.
- Clean and oil
- Brush lint from the bobbin area and feed dogs.
- Apply machine oil only where manual directs.
- Swap parts
- Replace the needle.
- Try a different bobbin and thread.
- Final checks
- If problems persist, note exact symptoms, when they started, and recent changes.
- Contact a service center with this information.
PAA-style question: How do I know if tension or needle is the problem?
Tension shows as loops on either side of fabric. Needle issues cause skipped stitches and broken needles.
PAA-style question: Can I fix timing at home?
Timing is delicate. Minor timing checks are possible, but full timing repairs usually need a pro.

Maintenance Tips to Prevent Problems
Good maintenance reduces the need for Sewing Machine Troubleshooting later. I follow a simple routine that keeps my machines reliable.
- Clean after every few sewing sessions
- Brush lint from the bobbin area and feed dogs.
- Wipe accessible parts with a soft cloth.
- Change needles often
- Replace the needle after 6–8 hours of sewing or when switching fabric types.
- Use the correct needle size for the fabric and thread.
- Oil only where the manual says
- Over-oiling causes problems. Use a drop where indicated.
- Use proper thread and bobbins
- Cheap thread sheds lint and breaks more.
- Use bobbins that match your machine model.
- Store covered and dry
- Keep the machine in a dust-free place when not in use.
- Schedule regular servicing
- Annual service helps catch wear and timing drift early.
Personal note: I once ignored lint build-up and paid for it with a seized shuttle. Regular cleaning saved me time and money afterward.

When to Seek Professional Repair
Some problems go beyond home Sewing Machine Troubleshooting. Know when to stop and call a pro.
- Electrical faults
- Burning smell, sparks, or intermittent power require immediate professional attention.
- Persistent skipping after correct needle and threading
- This may point to timing or bent parts that need tools.
- Loud grinding or metal-on-metal noise
- Internal gears or bearings may be worn.
- Complex computerized errors
- Electronic control boards need trained service.
- Cost vs. value
- Compare repair cost with machine value. For older machines, replacement may be more cost-effective.
How to choose a repair shop
- Look for certified technicians or authorized service centers.
- Ask about warranty on repairs and parts.
- Request a written estimate before work begins.
I’ve sent two vintage machines to a specialist for timing and gear replacement. Both came back quiet and reliable. Good repair can extend a machine’s life by years.

Parts, Tools, and Supplies to Keep on Hand
Having the right items helps you solve issues fast. Keep a small kit near your sewing area.
- Needles in assorted sizes and types
- Extra bobbins that fit your machine
- Small screwdriver set (flat and Philips)
- Lint brush and small vacuum attachment
- Tweezers and a seam ripper
- Machine oil (as specified by your manual)
- Spare presser feet you commonly use
- A soft cloth and a flashlight
Tip: Keep a simple log of needle changes, services, and problems. This helps with future Sewing Machine Troubleshooting.
Common Myths and Mistakes to Avoid
Clear myths lead to better care. Avoid these common errors.
- Myth: Oil all moving parts frequently
- Reality: Only specific points need oil. Consult the manual.
- Myth: Heavier thread always fixes skipped stitches
- Reality: Wrong needle or timing causes skips, not just thread weight.
- Myth: Any bobbin fits any machine
- Reality: Mismatched bobbins cause tension and feed problems.
- Mistake: Ignoring small noises
- Small noises often precede big failure. Check early.
- Mistake: Sewing over pins
- Pins can break needles or damage the throat plate.
I once used the wrong bobbin size and chased mysterious tension problems for hours. Replacing it solved the issue immediately.

Frequently Asked Questions of Sewing Machine Troubleshooting
What should I do first when my machine jams?
Start by turning off the machine and removing the fabric. Unplug power, remove the needle, and clean the bobbin area gently. Rethread and test on scrap fabric.
Why do I get loops on the underside of my fabric?
Loops below usually mean top thread tension is too loose or the top thread is not seated correctly in the tension discs. Tighten tension slightly and rethread the top.
How often should I change the needle?
Replace needles after 6–8 hours of sewing or when changing fabric types. A dull needle causes skipped stitches and pulls.
Can lint cause skipped stitches?
Yes. Lint in the bobbin area or around the feed dogs can stop proper thread pathing and cause skipped stitches. Clean the area regularly.
Is it safe to oil my machine at home?
Only oil where the manual says. Use the recommended sewing machine oil and a tiny amount. If you’re unsure, skip oiling and seek pro service.
Conclusion
Sewing Machine Troubleshooting is mostly about clear checks, basic cleaning, and the right parts. Start with power and threading, then move to needle, tension, and bobbin checks. Keep a small tool kit and follow a simple maintenance routine to avoid repeat problems. Take action: try the steps above, log what you do, and ask for professional help when needed. If this guide helped, subscribe or leave a comment with your issue so I can help further.

