
Electric Brake Controller Troubleshooting solves common trailer-brake faults fast and safely.
I have spent years diagnosing trailer brake issues and writing guides that help owners fix them. This article dives deep into Electric Brake Controller Troubleshooting. You will learn how these systems work, how to find faults, and how to fix or prevent problems. I mix hands-on tips, clear steps, and real examples so you can act with confidence.
 controllers work”
style=”max-width: 100%; height: auto; border: 2px solid black; border-radius: 10px; display: block; margin: 0 auto;”
loading=”lazy”
/>
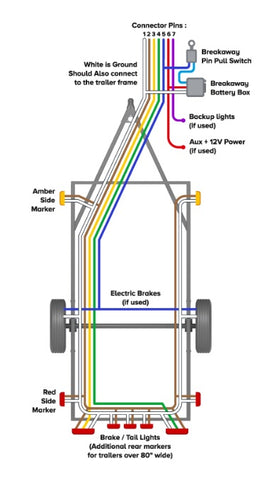
How electric brake controllers work
An electric brake controller tells trailer brakes when and how hard to apply. It senses vehicle braking or uses time-based settings. The controller sends current to the trailer's brake magnets. The magnets pull the brakes and slow the trailer.
Common controller types are proportional and time-delayed. Proportional controllers follow vehicle deceleration. Time-delayed controllers apply a preset current after a delay. Each type has its own troubleshooting patterns. Understanding this helps with efficient Electric Brake Controller Troubleshooting.

Common problems and root causes
Brake lights work but brakes do not apply
Electrical connection failure is common. Breaks in wiring, loose ground, or corroded connectors often cause this.
Controller power but no output
A blown fuse or faulty internal components can stop the output. Connectors and wiring to the trailer can also be the issue.
Trailer brakes pull unevenly
Uneven drum or disc wear, bad magnets, or weak grounding cause uneven braking. Poor adjustment or seized components also show this symptom.
Weak braking or delayed response
Low controller gain, voltage drop, battery or alternator issues, and wiring resistance lead to weak braking. Time-delayed controllers can feel sluggish when not set correctly.
Intermittent braking or flicker
Vibration, loose connectors, or failing controller electronics often create intermittent faults. Moisture intrusion in plugs or corroded pins is a frequent culprit.
Each of these causes appears regularly during Electric Brake Controller Troubleshooting. Knowing likely roots reduces time spent guessing.

Step-by-step Electric Brake Controller Troubleshooting guide
Follow these steps in order. Each step rules out a class of problems.
- Inspect visual connections
- Check the 7-way or 4-way plug for corrosion or bent pins.
- Look for frayed or pinched wiring along the harness.
- Ensure the controller is mounted securely and dry.
- Verify power and ground
- Turn key on and measure controller power at the fuse or input terminal.
- Test ground continuity to chassis; poor ground kills output.
- Replace scorched lugs or loose ring terminals.
- Check fuses and circuit breakers
- Locate in-cab fuses and the trailer fuse or breaker.
- Replace blown fuses with same rating.
- Swap in a known good breaker if present.
- Test output signal
- Use a multimeter set to DC volts or an amp clamp to read output when brakes are applied.
- For proportional controllers, test while moving slowly and braking.
- No output means controller failure or upstream wiring fault.
- Inspect trailer wiring and connectors
- Test voltage at the trailer plug with the brake applied.
- Wiggle connectors and watch for loss of signal.
- Repair or replace corroded connectors.
- Test trailer brakes (magnets and shoes)
- Remove a wheel and inspect magnet condition and brake shoes.
- Use a tow vehicle with battery disconnected, apply current and feel magnets.
- Replace weak magnets or glazed shoes.
- Check controller settings
- Set gain and sensitivity to manufacturer recommendations.
- For time-delayed units, test different delay and power settings.
- Document changes to revert if needed.
- Validate vehicle charging system
- Test battery and alternator for stable voltage under load.
- Low vehicle voltage reduces controller output.
- Fix charging issues before final calibration.
- Try a known-good controller
- Swap in a trusted controller to isolate the fault.
- If replacement works, the original is likely defective.
- Return faulty units for repair or replacement.
These steps form a practical path for Electric Brake Controller Troubleshooting. They save time and cut repair costs.

Tools and parts you need
Essentials for effective troubleshooting:
- Multimeter for voltage and continuity checks
- 12V test light for quick checks
- Amp clamp for output current readings
- Wire brush and contact cleaner for connectors
- Replacement fuses and ring terminals
- Basic socket set and screwdrivers
- Spare 7-way trailer plug or pigtail
- Torque wrench for mounting fasteners
Packing these tools helps you complete Electric Brake Controller Troubleshooting tasks in one visit. I always keep a basic kit in my truck. It saved me time on roadside fixes.
Testing and diagnostics tips
Test under real conditions when possible. A parked test may miss proportional controller faults that show only while moving.
Practical checks:
- Slow drive brake test for proportional response.
- Stationary apply test to verify output under different settings.
- Load the trailer with weight to replicate towing conditions.
Watch for these signs during tests:
- Smooth proportional ramp indicates good controller function.
- Sudden jumps or flicker suggest loose wiring or failed electronics.
- Low current with correct voltage indicates high resistance in wiring.
Document readings. That helps when you consult a professional or order parts. These testing habits improve your success with Electric Brake Controller Troubleshooting.
Preventive maintenance and best practices
Routine care avoids many issues. Do these checks every 6 months or before long trips:
- Clean and lubricate connectors
- Inspect and retorque ground and power terminals
- Replace worn magnets or shoes promptly
- Check plug seals and apply dielectric grease
- Verify controller mount is dry and vibration-free
Good maintenance reduces roadside failures and makes Electric Brake Controller Troubleshooting rare. From my experience, a little preventive work prevents most common failures.
Advanced issues and when to seek professional help
Some problems need a pro. Call a technician when:
- The controller shows no output after all wiring checks
- There is complex chassis wiring or CAN-bus integration
- Trailer brakes require drum machining or axle work
- You suspect internal controller electronics failure under warranty
Professional shops have diagnostic gear for deep faults. They can test magnet resistance, measure in-circuit amps, and access vehicle systems. If you are unsure, seeking help prevents unsafe repairs and liability.
Frequently Asked Questions of Electric Brake Controller Troubleshooting
What should I do if my controller has power but no trailer braking?
Check the trailer plug for corrosion and test voltage at the trailer end while brakes are applied. If voltage is present, test trailer magnets and continuity; if not, trace wiring back to the controller.
How often should I inspect my trailer brake system?
Inspect before long trips and at least every six months for signs of wear, corrosion, and loose connections. Regular checks prevent most failures.
Can a weak battery affect braking power?
Yes. Low vehicle voltage reduces controller output and causes weak braking. Test the battery and alternator if braking feels weak.
Is it safe to tow with a flickering controller output?
No. Flicker can indicate intermittent wiring or failing electronics and may cause uneven braking. Stop towing and fix the issue before continuing.
How do I test a proportional controller on the road?
Drive slowly in a safe area and apply the truck brakes gently. Observe or measure the controller output ramp; it should match vehicle deceleration smoothly.
Conclusion
Electric Brake Controller Troubleshooting is a practical skill you can master. Start with visual checks, verify power and ground, test outputs, and inspect trailer brakes. Use simple tools and follow ordered steps to isolate faults fast. My experience shows that steady inspection and correct testing save time and keep towing safe. Take action today: inspect your connectors, test your controller, and keep a basic tool kit handy. Share your experiences below or subscribe for more hands-on troubleshooting guides.

