
Winter brings beautiful scenery, but it can also cause big problems for RV owners. If you have a Suburban Advantage RV tank water heater, winterizing is essential. Without proper care, freezing temperatures can damage your water heater, leading to expensive repairs and ruined trips. Luckily, with the right steps, you can protect your investment and enjoy peace of mind all season. This guide will walk you through the entire process, from understanding your water heater to avoiding common mistakes. Even if you’re new to RV maintenance, you’ll find clear instructions and practical tips that make winterizing easy and safe.
Understanding The Suburban Advantage Rv Tank Water Heater
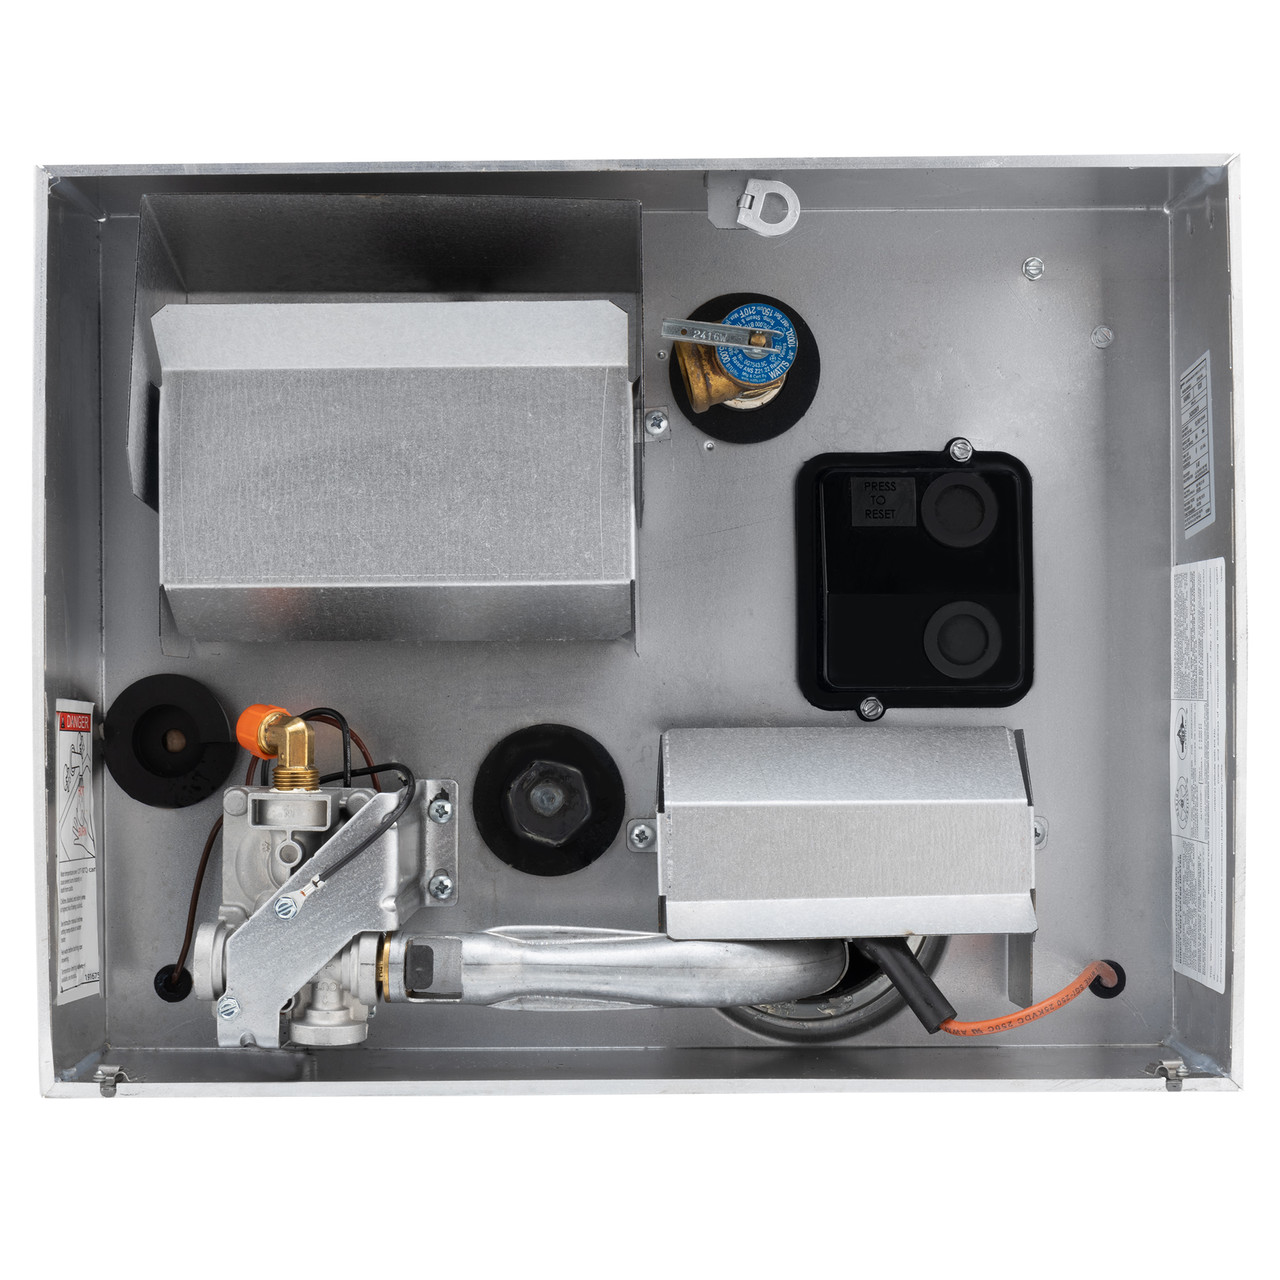
Before winterizing, it helps to know how your Suburban Advantage RV tank water heater works. This heater uses a metal tank to store and heat water. It runs on propane, electricity, or both. Inside, you’ll find an anode rod—a piece of metal that helps prevent rust. The heater also has pressure relief valves and drain plugs.
Why is winterizing so important? When water freezes, it expands. If water stays in your heater during cold weather, it can crack the tank, destroy the heating elements, and damage valves. Repairing or replacing these parts can cost hundreds of dollars.
That’s why draining and protecting the system is a must for every RV owner.
Essential Tools And Materials
You don’t need fancy tools to winterize your water heater, but having the right items makes the job easier and safer. Here’s what you’ll need:
- Socket wrench set (for removing the anode rod)
- Flat-head screwdriver (for drain plug or access panels)
- RV antifreeze (non-toxic, safe for potable water systems)
- Hose or bucket (for draining water)
- Pressure regulator (optional, prevents damage when flushing)
- Protective gloves (keeps hands safe from hot water and chemicals)
- Teflon tape (for re-sealing threads)
- Flashlight (for working in dark spaces)
If you don’t have some of these items, most RV supply stores carry them. Make sure the antifreeze is labeled as RV/marine safe—never use automotive antifreeze.
Step-by-step Guide To Winterizing
Follow these steps for a complete winterization. Each step is important, so don’t skip any—even if you’re in a hurry.
1. Turn Off Power And Gas
Safety comes first. Switch off the water heater at the electrical panel. If it uses propane, turn off the gas supply. Wait at least 30 minutes for the water inside to cool down. Opening a hot tank can cause burns.
2. Disconnect Water Supply
Close the incoming water valves. If your RV has a water pump, turn it off. You want to isolate the heater from the rest of the system.
3. Open Pressure Relief Valve
This valve is usually on top of the heater. Pull it open to release pressure. You might hear a hiss—this is normal. Doing this prevents water from spraying when you remove the drain plug.
4. Remove The Drain Plug And Anode Rod
Using a socket wrench, carefully unscrew the drain plug at the bottom of the heater. In most Suburban models, this plug is combined with the anode rod. Water will start draining out, so place a bucket underneath or use a hose to direct it away from your RV.
Example:
If your tank holds 6 gallons, expect about 23 liters to drain. For larger tanks (10 gallons), the water volume is higher.
5. Flush The Tank
Once all water is out, flush the tank to remove sediment. Insert a hose into the drain opening and run clean water through. This step improves heater performance and prevents future corrosion.
Common Mistake:
Many beginners skip flushing. This leads to sediment buildup, which can reduce heating efficiency by up to 30%.
6. Inspect And Replace The Anode Rod
The anode rod protects your tank from rust. After draining, check it for wear—if more than 75% is gone, replace it. This is a cheap fix that can save your tank.
Comparison Table: Anode Rod Condition
| Anode Rod Status | Replacement Needed? | Cost Estimate |
|---|---|---|
| New / minimal wear | No | $0 |
| 50% worn | Not yet | $0 |
| 75% worn | Yes | $15–$30 |
| Completely gone | Urgent | $15–$30 |
7. Reinstall Plug Or Rod
If you replaced the anode rod, wrap threads with Teflon tape and reinstall. For just draining, reinstall the drain plug. Make sure it’s snug but not overtightened.
8. Bypass The Water Heater
Most RVs have a bypass valve. This sends water around the heater, preventing antifreeze from filling the tank. Find the bypass panel (usually near the heater) and switch to bypass mode.
Data Table: Water Heater Bypass Types
| Bypass Type | Location | Ease of Use |
|---|---|---|
| Single valve | Near heater tank | Easy |
| Three-valve system | Behind access panel | Moderate |
| Automatic bypass | Integrated in plumbing | Very easy |
If you don’t have a bypass, you may need to install one or fill the tank with antifreeze.
9. Add Rv Antifreeze
With the heater bypassed, pump RV antifreeze into the rest of your plumbing system. This protects pipes, faucets, and pumps from freezing. Do not fill the water heater tank with antifreeze unless you lack a bypass.
Important Tip:
Use only enough antifreeze to fill lines and traps. Most RVs need 2–3 gallons for full protection.
10. Final Checks And Seal Panels
Check for leaks at all connections. Seal access panels and doors. Store your RV in a safe place, preferably indoors or under cover. If outside, consider insulating around the heater compartment.
Practical Tips And Non-obvious Insights
Winterizing isn’t just about draining water. Here are two key points beginners often miss:
- Test bypass valves before adding antifreeze. If a valve leaks, antifreeze may enter your heater tank, wasting product and risking contamination.
- Document your steps and parts used. This makes de-winterizing easier in spring and helps with future maintenance.
Also, don’t forget to check your RV’s manual. Some models require extra steps, such as removing access panels or checking for hidden valves.

Common Mistakes To Avoid
Even experienced RV owners make errors. Here’s what to watch for:
- Leaving water in the tank: Even a small amount can freeze and cause damage.
- Forgetting to turn off power: Heaters can burn out if powered without water.
- Skipping anode rod inspection: This leads to rust and leaks.
- Using automotive antifreeze: Only RV/marine antifreeze is safe.
- Ignoring leaks after winterizing: Small leaks can become big problems.
How Often Should You Winterize?
If you use your RV year-round, you might not need to winterize. However, for most owners, winterizing is essential before the first freeze. In the US, this usually means October or November. If you travel between climates, always check the weather forecast and winterize before cold snaps.
Cost And Time Estimates
Winterizing takes about 1–2 hours for most people. If you pay a professional, expect costs between $100 and $200. Doing it yourself usually costs $20–$40 for materials.
Troubleshooting After Winterizing
Sometimes, problems appear after winterizing:
- Low water pressure: Check for trapped air or clogged filters.
- Bad smell: Flush the system in spring with fresh water.
- Leaks: Inspect all connections, especially around the drain plug and anode rod.
If you notice unusual noises, check that all valves are set correctly. If you need help, consult the Suburban user manual or visit your local RV service center.

Comparison: Suburban Advantage Vs Other Rv Water Heaters
Understanding how the Suburban Advantage compares to other brands can help you feel confident about your system.
| Brand | Tank Capacity | Anode Rod | Winterizing Steps |
|---|---|---|---|
| Suburban Advantage | 6–12 gallons | Yes | Drain, flush, bypass, antifreeze |
| Atwood | 6–10 gallons | No | Drain, bypass, antifreeze |
| Girard (tankless) | N/A | No | Flush lines, antifreeze |
Suburban’s use of anode rods adds extra protection against corrosion, making it a favorite for long-term RV owners.
When To Seek Professional Help
If you’re unsure about any step, or notice damage (like cracked tanks or broken valves), call a professional. Some repairs are best left to experts, especially when dealing with gas lines or electrical wiring.
For more detailed information about RV water heaters, visit the RV Travel Water Heater Guide.
Frequently Asked Questions
How Much Rv Antifreeze Do I Need For Winterizing?
Most RVs require 2–3 gallons of RV/marine antifreeze to protect plumbing lines and traps. If you lack a bypass valve, you may need more to fill the water heater tank.
Can I Winterize Without A Bypass Valve?
Yes, but you’ll have to fill the heater tank with antifreeze, which uses extra product and can be messy. Installing a bypass valve is recommended for easier winterizing.
Do I Need To Replace The Anode Rod Every Year?
Not always. Inspect the rod each winter. Replace it if more than 75% is gone, or it looks heavily corroded. Many rods last 2–3 years with normal use.
What Happens If I Skip Winterizing?
Skipping winterizing can lead to frozen pipes, cracked water heater tanks, and damaged valves. Repairs may cost hundreds of dollars and delay your next trip.
Is Rv Antifreeze Safe For Drinking Water?
RV/marine antifreeze is non-toxic and designed for potable water systems. Flush your lines thoroughly in spring before using for drinking or cooking.
Winterizing your Suburban Advantage RV tank water heater is a smart way to protect your RV and enjoy worry-free travel. By following these steps, checking your parts, and avoiding common mistakes, you keep your water heater safe and ready for spring.
Take the time now, and you’ll save money and hassle later.

