
Most LiftMaster Professional 13 HP issues start with power, sensors, or remote programming.
I’ve spent years fixing commercial and residential openers, and this guide breaks down Liftmaster Professional 13 Hp Troubleshooting into clear, safe steps you can follow today. You’ll get quick diagnostics, step-by-step fixes, error-code explanations, maintenance tips, and real-world advice from hands-on experience so you can diagnose problems fast and avoid common mistakes.
Overview: What the Liftmaster Professional 13 Hp Troubleshooting guide covers
The Liftmaster Professional 13 Hp Troubleshooting process helps you find and fix common faults in a heavy-duty opener. This model is powerful and built for frequent use. It uses a robust motor, logic board, remotes, and safety sensors. Problems often look electrical, mechanical, or programming‑related.
Why this matters:
- Reliable operation keeps vehicles and equipment secure.
- Proper troubleshooting prevents expensive repairs.
- Safe fixes protect you and the equipment.
This article covers causes, tools, step-by-step checks, error codes, maintenance, and when to call a pro. It focuses on practical steps you can do yourself, plus safety limits. You will learn how to read symptoms, interpret codes, and act with confidence.
Common problems and causes for Liftmaster Professional 13 Hp Troubleshooting
Here are the most frequent issues people report with the Liftmaster Professional 13 Hp Troubleshooting and what usually causes them.
Frequent symptoms:
- Opener won’t power on — often a blown fuse, tripped breaker, or loose wiring.
- Opener runs but won’t move the door — broken belt, chain, gear, or clutch slipping.
- Intermittent operation — remote interference, weak battery, or wiring fault.
- Safety sensor errors — misalignment, dirt, or wiring damage.
- Strange noises — worn gears, motor bearings, or unlubricated parts.
Common root causes:
- Power supply problems or poor grounding.
- Worn mechanical parts after heavy use.
- Incorrect force or limit settings.
- Faulty logic board or sensors.
- Incorrect programming or interference.
Understanding these causes helps you prioritize checks during Liftmaster Professional 13 Hp Troubleshooting.

Diagnostic checklist before you start Liftmaster Professional 13 Hp Troubleshooting
Before touching anything, follow this quick checklist. These steps save time and avoid mistakes.
Safety and prep:
- Cut power to the opener at the breaker.
- Put the door in the manual mode or secure it with clamps.
- Wear safety glasses and gloves.
- Keep a multimeter and basic tools handy.
Initial checks:
- Confirm the breaker and outlet are working.
- Inspect remote batteries and wall control.
- Look for visible damage to the rail, chain, or belt.
- Check safety sensors for alignment and cleanliness.
- Listen for motor hum or grinding when power applied.
Record what you find. A clear record speeds resolution during Liftmaster Professional 13 Hp Troubleshooting.
Step-by-step Liftmaster Professional 13 Hp Troubleshooting procedures
Follow these steps in order. Keep instructions short and test after each step.
- Restore and verify power
- Turn the circuit breaker off and on.
- Check outlet voltage with a multimeter (120V typical).
- Inspect the unit for loose power wires.
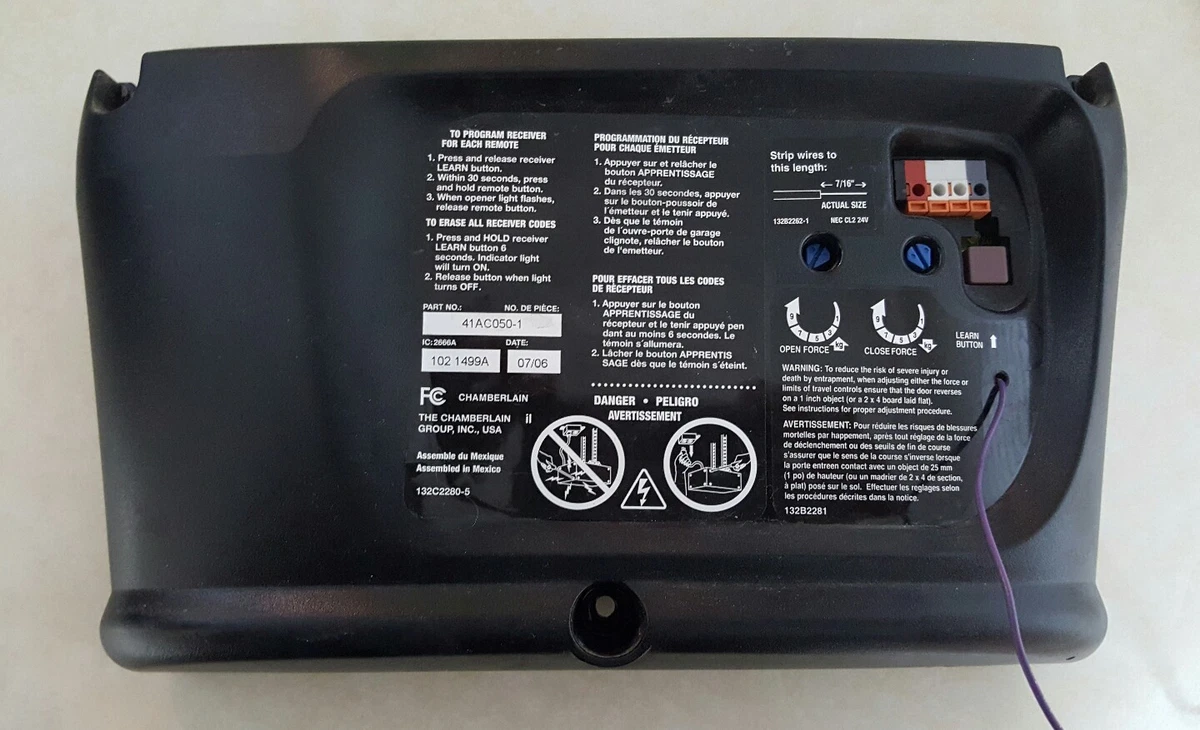
- Test wall control and remotes
- Replace remote batteries.
- Test the wall switch; if it works, remotes or sensors are suspect.
- Reprogram remote per manual and retest.
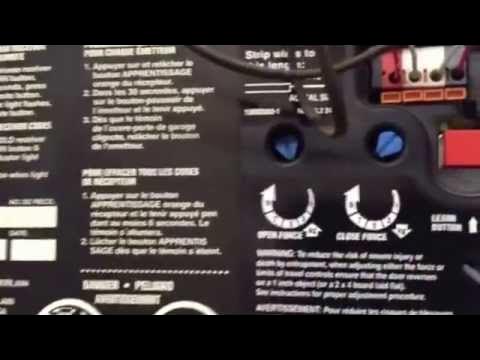
- Check safety sensors
1. Inspect lenses for dirt or spider webs and clean them.- Ensure LED indicators on each sensor are lit and steady.
- Adjust alignment until LEDs show proper status.
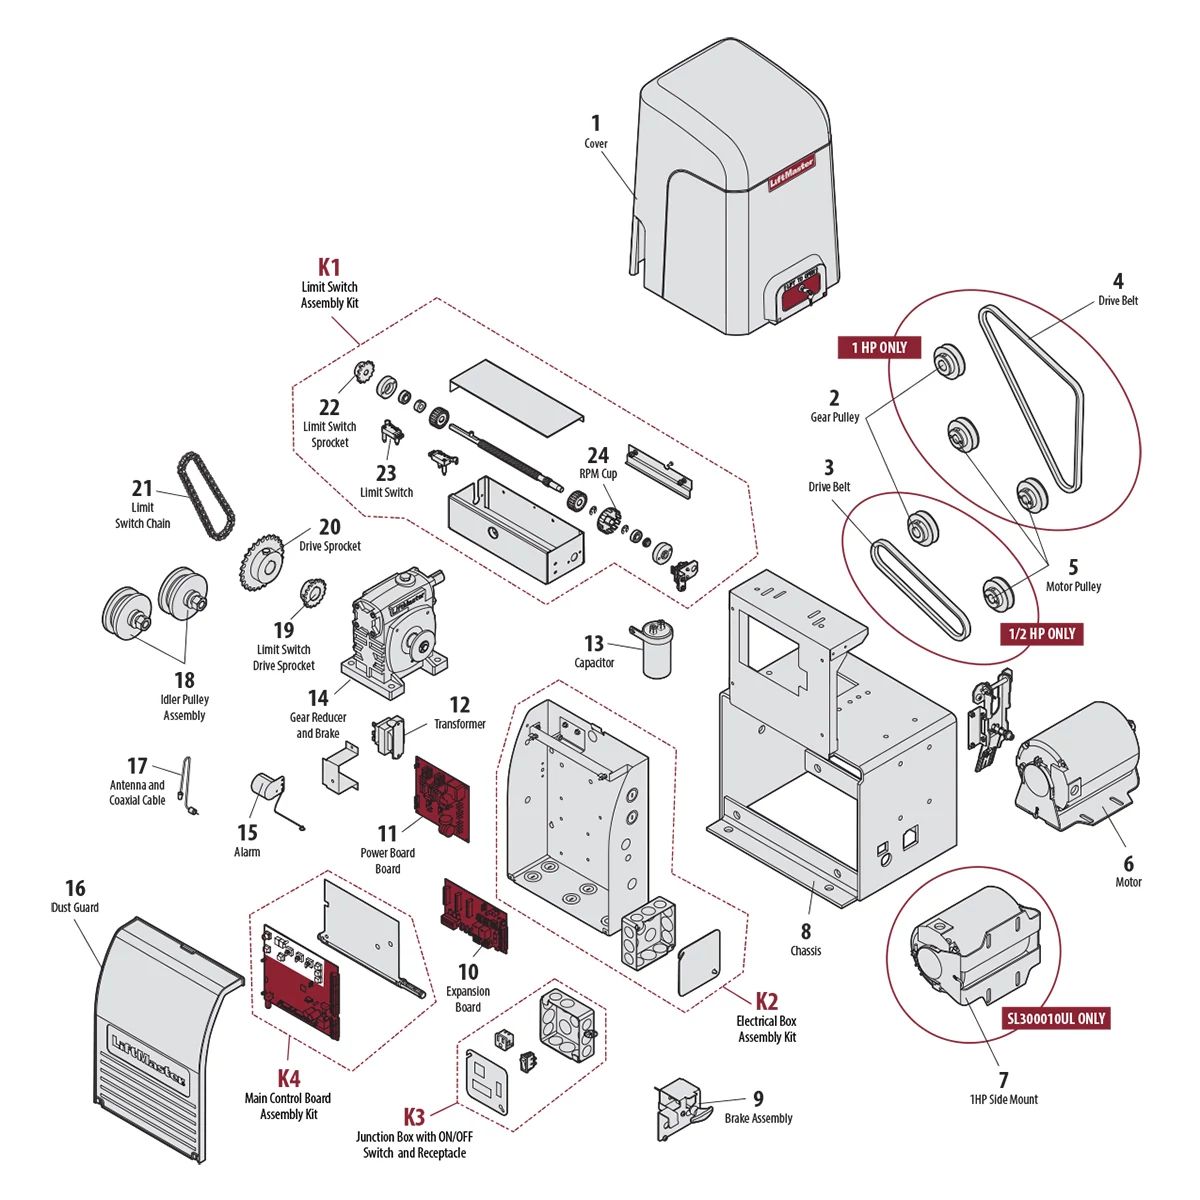
- Inspect mechanical drive
- Look for broken chains, belts, or loose mounting brackets.
- Check for worn sprockets, bearings, or bent rail.
- Lubricate moving parts if dry and recheck operation.
- Adjust travel and force settings
- Set limits per manufacturer specs.
- Increase force in small increments if door stalls.
- Never exceed safe limits or ignore binding.
- Test logic board and motor
- Listen for motor attempts when powered.
- If motor hums but won’t engage, the capacitor or clutch may be bad.
- Replace only after confirming other systems are OK.
Repeat tests after each step. This staged approach keeps the Liftmaster Professional 13 Hp Troubleshooting process efficient and safe.

Error codes, LED indicators, and what they mean for Liftmaster Professional 13 Hp Troubleshooting
The logic board uses LEDs and codes to show faults. Learn basic meanings to speed repair.
Common indicators:
- No LEDs — power issue or fuse.
- Solid fault LED — sensor or wiring problem.
- Flashing LED pattern — consult the unit’s manual for pattern meaning.
Typical error interpretations:
- Sensor error — block, misalignment, or broken sensor.
- Motor overload — excessive force, binding, or failing motor.
- Communication error — keypad or external control wiring.
If you see an unfamiliar pattern, record the flashes and compare to the manual. If the logic board reports repeated motor overloads during Liftmaster Professional 13 Hp Troubleshooting, focus on mechanical binding or weight issues.
Maintenance, safety, and best practices for long-term reliability
Good maintenance prevents most Liftmaster Professional 13 Hp Troubleshooting calls. These tasks are simple but effective.
Routine maintenance tasks:
- Inspect and clean sensors monthly.
- Lubricate chain/rail and pivot points quarterly.
- Replace remotes’ batteries yearly.
- Tighten mounting hardware and rail connections.
- Visually check gear and drive components every six months.
Safety tips:
- Always cut power before repairs.
- Use proper lockout/tagout if available.
- Never stand under a moving door during tests.
- If door balance is poor, fix springs before the opener handles load.
Following these practices cuts failures and extends equipment life.
Parts, tools, and estimated costs for Liftmaster Professional 13 Hp Troubleshooting
Knowing common parts and costs helps decide repair vs replace.
Essential tools:
- Multimeter
- Screwdriver and nut drivers
- Adjustable wrench
- Ladder and flashlight
- Replacement remote, sensors, or logic board as needed
Common replacement parts and ballpark costs:
- Remote control: low cost, $15–$60
- Safety sensors: $30–$80 pair
- Logic board: $80–$250 depending on model
- Motor capacitor or clutch: $40–$120
- Drive belt or chain components: $30–$150
Labor varies. Small fixes you can do yourself. For motor or spring work, professional service is safer and often recommended during Liftmaster Professional 13 Hp Troubleshooting.

Personal experience, tips, and mistakes to avoid during Liftmaster Professional 13 Hp Troubleshooting
I’ve repaired dozens of heavy openers. Here are frank lessons I learned the hard way.
What worked for me:
- Start with power and sensors — they cause 70% of calls.
- Keep a small parts kit: fuses, remote batteries, and sensor cleaners.
- Use a camera phone to record LED codes and wiring before disconnecting anything.
Common mistakes:
- Replacing the logic board first — often unnecessary.
- Ignoring door balance — the opener can fail if springs are weak.
- Testing with the door unsecured — dangerous and avoidable.
Practical tip: when aligning sensors, have a second person watch LED status while you gently nudge the sensor body. Patience here saves parts and time.
Frequently Asked Questions of Liftmaster Professional 13 Hp Troubleshooting
What should I check first when my Liftmaster Professional 13 Hp won’t start?
Check power at the breaker and the outlet, then inspect the unit for loose or burnt wiring. Replace a blown fuse and test the wall control.
How do I know if the safety sensors are the problem?
Look for blocked lenses, misalignment, or unlit sensor LEDs. Clean and realign sensors; if LEDs stay off, test wiring for continuity.
Can I replace the logic board myself?
Yes, if you are comfortable with basic wiring and safety steps. Always disconnect power and photograph wiring before removal to ensure correct reinstallation.
Why does my opener run but not move the door?
This often means a worn drive belt, broken chain, or slipped clutch. Inspect the drive train and check the door balance before replacing parts.
When should I call a professional technician?
Call a professional for spring replacement, major motor work, or if you see smoke or smell burning. Also call if electrical troubleshooting finds complex wiring faults.
Conclusion
Liftmaster Professional 13 Hp Troubleshooting is a clear, stepwise process: verify power, check sensors, inspect mechanics, and isolate the logic board. Start with simple checks and escalate carefully. With routine maintenance and basic tools, you’ll fix most issues safely and quickly. If a repair feels risky, hire a qualified technician.
Take action today: run the quick diagnostic checklist, record what you find, and try the simple fixes. If this guide helped, leave a comment or subscribe for more hands-on troubleshooting tips.

