
Orbit Solenoid Valve Troubleshooting often finds stuck diaphragms, wiring faults, or clogged inlets.

Today's Exclusive Deals
Limited-time Exclusive Deals. Check current discount on Amazon.
Check Price on Amazon As an Amazon Associate I earn from qualifying purchases.I have spent years fixing irrigation and fluid systems, and I will walk you through Orbit Solenoid Valve Troubleshooting with clear steps and real tips. This guide explains how these valves work, why they fail, how to test them, and how to fix common faults safely. Read on to save time, avoid parts waste, and get your system flowing again.
How Orbit Solenoid Valves Work
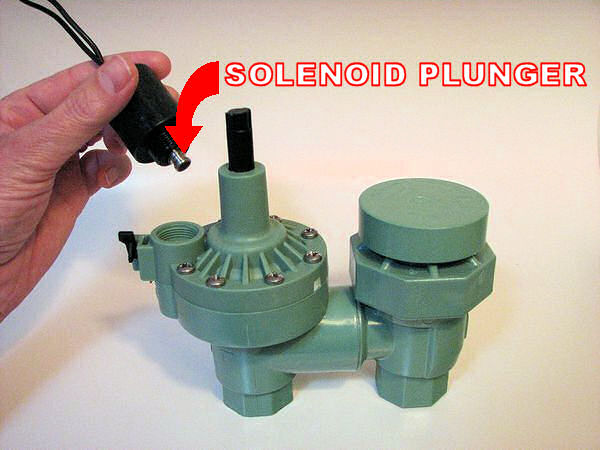
Orbit Solenoid Valve Troubleshooting starts with a simple grasp of how the valve moves water. A solenoid coil makes a magnetic field. That field lifts a pin or plunger and lets water move through the valve seat. Many Orbit valves use a diaphragm that opens when the pilot flow changes. Faults come from the coil, wiring, diaphragm, or debris in the pilot lines. Knowing this helps you target the right test and fix.
Today's Exclusive Deals
Limited-time Exclusive Deals. Check current discount on Amazon.
Check Price on Amazon As an Amazon Associate I earn from qualifying purchases.
Common Problems and Causes
Orbit Solenoid Valve Troubleshooting is faster when you know the likely causes. Here are the most common failures and their roots:
- Coil not energizing – Loose wire, bad transformer, or burned coil.
- Valve stays closed – Clogged pilot hole, blocked inlet, or failed diaphragm.
- Valve stays open – Stuck plunger, debris under the seat, or a torn diaphragm.
- Intermittent operation – Corroded connectors, weak transformer, or moisture in the coil.
- Slow open/close – Low supply pressure or clogged filter screen.
These causes repeat across many Orbit valve models. Target the simple checks first to save time and parts.
Today's Exclusive Deals
Limited-time Exclusive Deals. Check current discount on Amazon.
Check Price on Amazon As an Amazon Associate I earn from qualifying purchases.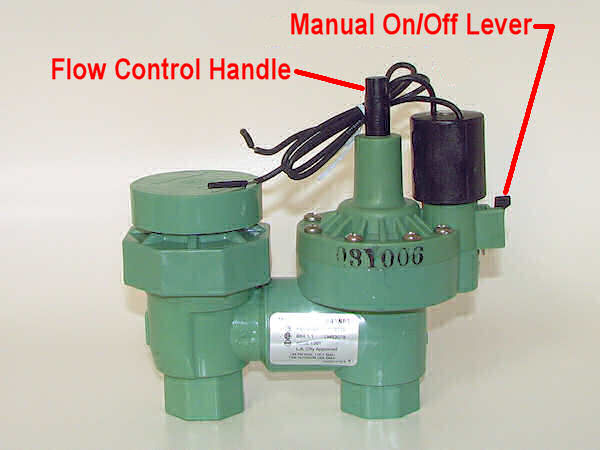
Step-by-Step Troubleshooting Guide
Follow this ordered checklist for practical Orbit Solenoid Valve Troubleshooting. Work safely and turn off power and water where needed.
-
Visual check
Look for damage, leaks, and loose wires. Note any corrosion or burn marks on the coil or terminal. -
Confirm power
Use a multimeter to check voltage at the valve terminals. Compare to the valve rating printed on the coil. No or low voltage points to wiring or controller issues. -
Manual cycle test
Many Orbit valves let you manually open the diaphragm or press a manual lever. If it opens, the valve body is OK and the issue is likely electrical or pilot flow. -
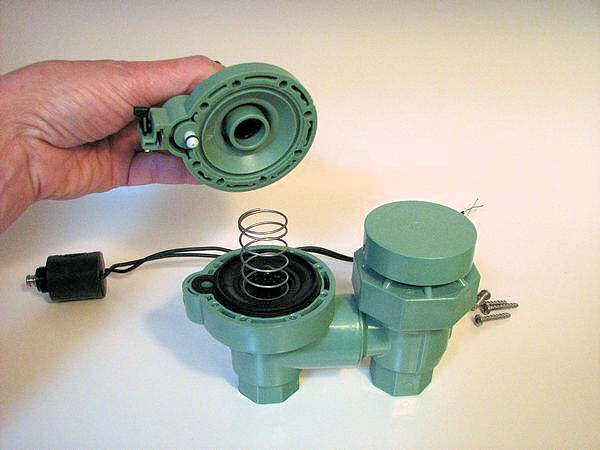
Inspect inlet and pilot holes
Remove the cover and clean screens and pilot holes. Small grit can block pilot flow and stop the diaphragm from moving. -
Test the coil
Measure coil resistance with an ohm meter. A very high or infinite value means an open coil. A very low reading can mean a shorted coil. Replace the coil if it fails spec. -
Check the diaphragm and seals
Look for cracks, warping, or hardening. Replace any damaged diaphragm parts to restore proper sealing. -
Re-test under load
Reassemble and apply power and water. Watch for proper open and close times. If issues persist, re-check wiring and controller timing.
Follow each step slowly. Many fixes are quick and cheap if you test methodically.

Testing and Diagnostic Tools
Good Orbit Solenoid Valve Troubleshooting is faster with a small kit. Key tools:
- Multimeter for voltage and resistance checks
- Small flashlight and mirror for visual checks inside the valve
- Soft brushes and compressed air to clear debris
- Replacement diaphragms and coil kits for common Orbit models
- A clamp meter or non-contact voltage tester for safe checks
Use the meter first. It tells you if the issue is electrical or hydraulic. I always keep spare diaphragms and a coil on hand for field work. That practice cuts repair time in half.
Repair, Parts, and Replacement Tips
Orbit Solenoid Valve Troubleshooting often ends with a parts swap. Here are tips to do it well:
- Match exact part numbers. Orbit models vary and parts are not always interchangeable.
- Replace the diaphragm and seat together. A new diaphragm on a worn seat can still leak.
- Use proper torque on screws. Over-tightening can crack plastic housings.
- Keep electrical connections dry and treated with dielectric grease to prevent corrosion.
- When replacing a coil, power the valve to test before full reassembly to save time.
From my field work: I once replaced only the diaphragm and missed grinding in grit under the seat. The valve still leaked. Lesson learned—clean first, then replace parts.

Maintenance and Prevention
Routine care reduces the need for Orbit Solenoid Valve Troubleshooting. Keep a simple schedule:
- Inspect valves every season for leaks and corrosion.
- Clean filters and screens monthly in dirty systems.
- Test electrical connections yearly and after storms.
- Replace diaphragms every few years on heavy-use systems.
- Use inlet strainers to stop grit from entering valve bodies.
Small actions prevent big failures. I advise operators to log simple checks. A short note saves hours on later troubleshooting.
When to Call a Professional
Some problems go beyond DIY Orbit Solenoid Valve Troubleshooting. Call a pro when:
- You find no power but lack wiring skills to trace controllers and transformers.
- Plastic valve bodies are cracked or severely warped.
- You suspect complex controller faults in smart systems.
- Multiple valves fail at once, indicating a common supply or controller issue.
Professionals bring tools and spare parts. They can also test controllers and field wiring safely.

Frequently Asked Questions of Orbit Solenoid Valve Troubleshooting
How do I know if my Orbit valve coil is bad?
Check coil resistance with an ohm meter. An open or infinite reading means the coil is bad; a shorted reading or burned smell also indicates failure.
Can I clean an Orbit valve without replacing parts?
Yes, many issues clear with cleaning. Remove the cover, rinse screens and pilot holes, and clear grit from under the seat.
What voltage should an Orbit solenoid have?
Most Orbit valves use 24 VAC, but some are 12 VDC or 120 VAC. Always check the coil label before testing.
Why does my Orbit valve click but not open?
A click often means the coil energizes but the diaphragm or pilot hole is blocked. Clean the pilot and check inlet pressure.
How long do Orbit diaphragms last?
Diaphragm life varies with water quality and use, but expect 2–5 years in normal conditions. Replace sooner in hard or dirty water.
Is it safe to test a valve with power on?
Basic voltage checks are safe with proper tools and care. Turn off power when touching bare connections or doing repairs.
Conclusion
Orbit Solenoid Valve Troubleshooting becomes simple when you follow clear steps: inspect, test power, clean pilot paths, and replace worn parts. Start with easy checks and keep a small kit on hand to speed repairs. Take action now—inspect one valve today, log the findings, and you will cut down future downtime. If this guide helped, leave a comment, subscribe for more tips, or try the tests on your system and report back your results.


