
PCV valve problems cause rough idle, oil leaks, and check engine lights—quick fixes often solve them.
I have spent years working on cars and helping drivers with Pcv Valve Troubleshooting. This guide gives clear, tested steps to diagnose, test, and fix PCV issues. You will get simple checks, tool lists, real examples, and safe, practical fixes you can try at home. Read on to learn how to spot problems fast, reduce engine wear, and know when to call a pro.
What is a PCV valve and why it matters
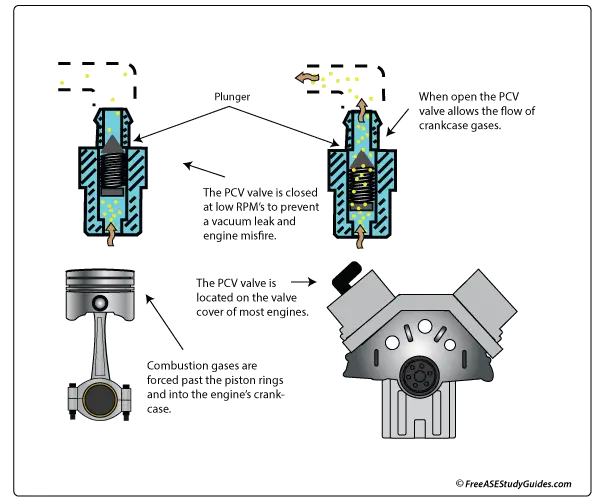
The PCV valve stands for Positive Crankcase Ventilation valve. It vents gases from the engine crankcase back into the intake so the engine burns them. Proper PCV function keeps pressure in check, stops oil leaks, and reduces harmful emissions.
Pcv Valve Troubleshooting focuses on detecting when that system fails. A bad PCV valve can cause poor idle, sludging, oil consumption, and a check engine light. Knowing the parts and how they work helps you fix small issues before they become big repairs.

Common causes of PCV valve failure and how they show up
PCV valves fail from wear, contamination, or blocked hoses. Here are typical causes and signs you may notice.
- Carbon buildup in the valve. Causes a valve to stick and leads to irregular crankcase venting.
- Oil sludge or thick deposits. Often from long oil-change intervals or low-quality oil.
- Cracked or collapsed hoses. Leads to vacuum leaks and rough running.
- Excess blow-by (worn piston rings). Overloads the PCV system and clogs parts.
- Wrong installation or poor seals. Causes oil leaks and pressure issues.
Signs of failure:
- Rough idle or stalling at low speeds.
- Increased oil consumption or oil leaks around valve covers.
- White or blue smoke from the tailpipe under acceleration.
- Check engine light with codes related to intake or vacuum leaks.
- Engine oil sludging or very oily intake piping.
Pcv Valve Troubleshooting means looking for these causes and symptoms and connecting the dots quickly.

Tools and safety before you start PCV valve troubleshooting
A few simple tools make Pcv Valve Troubleshooting faster and safer. Gather these before you begin.
- Basic socket set and screwdrivers for removing hoses and covers.
- Pliers for clamps and hose removal.
- Shop rags and gloves to keep hands clean.
- Flashlight for inspecting tight areas.
- Vacuum pump or hand-held tester for deeper testing.
- Replacement PCV valve and hoses for quick swap testing.
Safety tips:
- Work on a cool engine to avoid burns.
- Wear eye protection if you use compressed air or sprays.
- Keep rags away from moving belts when the engine runs.
Step-by-step PCV valve troubleshooting guide
Follow these steps for a structured Pcv Valve Troubleshooting routine. Keep notes as you test so you can compare before and after.
- Visual inspection
- Check PCV valve location, hoses, and connections.
- Look for cracked hoses, oil-soaked lines, or loose clamps.
- Shake test for basic check
- Remove the valve and shake it. A rattle usually means the internal parts move freely.
- No rattle suggests the valve is stuck and likely bad.
- Vacuum check
- With the engine idling, place your finger over the service port or use a vacuum gauge.
- A steady vacuum indicates the valve is operating; erratic vacuum suggests a problem.
- Blow test
- Blow gently through the valve both directions. Air should flow one way only.
- Two-way flow or blocked flow indicates replacement is needed.
- Inspect intake and PCV hoses
- Remove and look inside hoses for sludge or oil pooling.
- Replace collapsed or hardened hoses.
- Road test after service
- Start the engine and check idle, acceleration, and any leakage.
- Monitor for recurring vacuum or smoke issues.
These steps cover most Pcv Valve Troubleshooting scenarios. If the problem persists, move to advanced tests below.
Advanced tests for PCV systems
For deeper Pcv Valve Troubleshooting use a hand vacuum pump and gauge, and inspect intake for oil contamination.
- Vacuum gauge readings
- Normal idle vacuum is about 18 to 22 inHg for many engines. Lower or unstable values point to leaks or malfunction.
- Crankcase pressure test
- A dedicated gauge can measure blow-by pressure at the crankcase. High pressure suggests worn rings or a clogged PCV.
- Smoke testing
- A smoke machine helps find external vacuum leaks in the PCV hoses and intake.
- Intake manifold inspection
- Remove the intake elbow and check for heavy oil build-up. Severe contamination shows long-term PCV issues or engine wear.
These tests help separate a valve problem from deeper engine faults. Proper readings guide whether to repair hoses, clean parts, or plan for an engine overhaul.

Common fixes for PCV valve problems
Most PCV issues have straightforward remedies. Here are common fixes tied to specific symptoms.
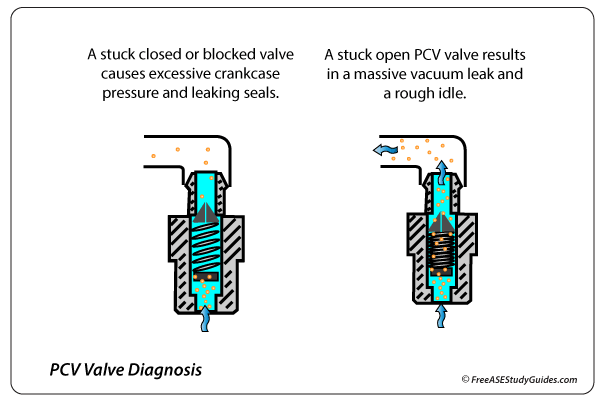
- Stuck valve
- Replace the PCV valve. Cleaning is a short-term fix but replacement is cheap and reliable.
- Collapsed or brittle hoses
- Replace hoses and clamps. Use OEM or high-quality silicone hoses for longevity.
- Oil in intake or sludge
- Clean intake passages and change oil. Consider an oil catch can for high blow-by engines.
- Persistent high crankcase pressure
- Inspect piston rings and PCV routing. Repair engine wear if needed.
- Check engine light for misfires or leaks
- Scan codes, fix vacuum leaks, and clear codes after repairs.
Pcv Valve Troubleshooting often ends with a simple swap of parts. Keep a few replacement parts on hand if you do your own maintenance.
Replacement and maintenance tips
Replacing the PCV valve is a low-cost, high-impact maintenance task. Here’s how to approach it with confidence.
- Replacement interval
- Replace the valve when you see symptoms, during tune-ups, or every 30,000 to 50,000 miles as preventive care.
- Choosing parts
- Use a part that matches your vehicle’s specs. Cheap universal valves can fit but may perform worse.
- DIY replacement steps
- Locate the valve, remove hoses, swap the valve, and fit new hoses or grommets as needed.
- Start the engine and recheck for leaks or idle changes.
- Maintenance tips
- Check hoses at each oil change. Replace any brittle or oil-logged parts.
- If your car has high mileage, inspect the intake for oil pooling more often.
Doing Pcv Valve Troubleshooting during routine service saves money and prevents engine damage.

When to seek professional help
Some Pcv Valve Troubleshooting outcomes need a mechanic. Look for these red flags.
- Repeated oil in the intake after valve replacement.
- Very high crankcase pressure or continuous blue smoke.
- Codes pointing to internal engine wear or misfires that don’t clear.
- Complex intake routing that requires special tools or diagnostic machines.
If you suspect worn piston rings or head gasket issues, a shop can perform compression and leak-down tests to confirm the problem.
Real-life examples and lessons learned
From my experience working on varied cars, most Pcv Valve Troubleshooting calls were solved by simple parts swaps. One example: a customer had rough idle and oil on the oil cap. A stuck PCV valve and a collapsed hose were the culprits. Replacing both fixed the idle immediately and stopped the oil seep.
Lessons learned:
- Always check hoses first; they fail more often than the valve itself.
- Keep spare PCV valves when servicing older cars; the swap takes minutes.
- Don’t ignore small signs like oil on the filler cap—early fixes avoid big bills.
These practical tips come from hands-on repairs and save time and money.
Frequently Asked Questions of Pcv Valve Troubleshooting
What does a failing PCV valve feel like when driving?
A failing PCV valve often causes rough idle, hesitation, or stalling at low speed. You may also notice increased oil use or smoke on acceleration.
Can I drive with a bad PCV valve?
Short trips are possible, but driving long term with a bad PCV valve risks oil leaks, sludging, and engine wear. Replace the valve as soon as you can.
How long does a PCV valve last?
Many PCV valves last 30,000 to 50,000 miles, but lifespan varies with engine type, oil changes, and driving style. Check it during routine service.
Is cleaning a PCV valve enough?
Cleaning can help temporarily, but replacement is inexpensive and more reliable. A stuck valve usually needs to be replaced.
Will a bad PCV valve trigger the check engine light?
Yes. A bad PCV can cause vacuum leaks or rich/lean conditions that set engine codes. Scanning the car helps pinpoint the issue.
How do I know if PCV hoses are bad?
Look for cracks, collapses, and oil saturation in hoses. A soft or flattened hose at idle signals it’s time for replacement.
Conclusion
Pcv Valve Troubleshooting is a practical skill that prevents engine problems and saves money. Check hoses, do a quick valve shake test, and use a vacuum gauge when needed. Replace cheap parts early and keep an eye on oil and idle behavior.
Take action today: inspect the PCV system on your car, change any brittle hoses, and replace a noisy or stuck valve. If unsure, get a professional scan and tests. Leave a comment with your PCV issue or share a repair story to help others.

