
Rohl faucet repair troubleshooting often fixes leaks, low flow, or loose handles with basic tools.
I have repaired dozens of luxury faucets, including many Rohl models. This guide on Rohl Faucet Repair Troubleshooting delivers clear steps, real tips from field work, and help you can trust. Read on to learn how to diagnose issues, swap parts, and know when to call a pro.
Understanding Rohl faucets and common problems
Rohl faucets use high-quality materials and precise cartridges. They still wear over time. Common problems include dripping, low flow, loose handles, and spray diverter faults. Knowing the parts and how they fail speeds repair and saves money.
Key Rohl parts to know:
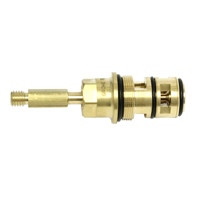
- Cartridge: Controls water mix and flow.
- O-rings and seals: Stop leaks at joints.
- Diverter: Directs water to spray or spout.
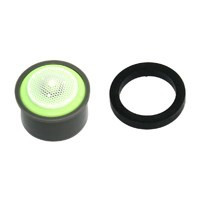
- Aerator: Filters flow and affects pressure.
- Handles and set screws: Provide control and can loosen.
Why this matters for Rohl Faucet Repair Troubleshooting:
- Parts are often unique to Rohl finishes and designs.
- Small seals fail before larger components.
- Correct diagnosis avoids unnecessary part purchases.
Tools and parts you need
Gather the right tools before starting Rohl Faucet Repair Troubleshooting. Work in small steps. Turn off water. Protect finishes.
Essential tools:
- Adjustable wrench or basin wrench for tight nuts.
- Allen keys for handle setscrews.
- Screwdrivers, both flat and Phillips.
- Needle-nose pliers for O-rings and clips.
- Cartridge puller if the cartridge is stuck.
- Soft cloths to protect chrome or brass.
- Replacement O-rings, seals, and a compatible Rohl cartridge.
Where to get parts:
- Official Rohl parts list helps match model numbers.
- Many local plumbing suppliers stock common seals and cartridges.
- Keep model and finish info handy when ordering.

Step-by-step Rohl Faucet Repair Troubleshooting
Start simple. Work from outside in. Follow these steps for common Rohl Faucet Repair Troubleshooting tasks.
- Shut off water and test
- Turn off hot and cold supply valves under sink.
- Open faucet to relieve pressure and drain lines.
- Place a towel or small bucket to catch drips.
- Inspect exterior and aerator
- Remove aerator and check for debris. Clean with vinegar if clogged.
- Replace aerator screen if damaged.
- Re-test flow.
- Tighten loose handles and set screws
- Loosen handle cap and tighten set screw with correct Allen key.
- Avoid overtightening; feel for snug fit.
- Test handle movement.
- Replace O-rings and seals
- Remove handle and escutcheon.
- Carefully extract old O-rings with pick or pliers.
- Lubricate new rings with plumber’s grease and seat them properly.
- Reassemble and test for leaks.
- Swap cartridge
- Note orientation before removing cartridge.
- Use cartridge puller for stuck cartridges.
- Install new Rohl-compatible cartridge and test.
- Check diverter and sprayer
- If the spray function fails, inspect diverter for mineral buildup.
- Remove and clean, or replace if worn.
- Test both spout and sprayer functions.
- Final leak test
- Turn supplies back on slowly.
- Check for drips at base, under sink, and from spout.
- Tighten connections if needed.
Rohl Faucet Repair Troubleshooting tip: keep small parts sorted in order as you disassemble. Label parts if you worry about reassembly.

Diagnosing specific issues (quick fixes and deep fixes)
Leaky spout
- Likely worn cartridge or seals. Replace cartridge if seals are intact. If small leak persists, inspect valve seat and replace O-rings.
Dripping after shutoff
- Worn cartridge or debris. Clean or replace cartridge. Flushing lines can clear debris.
Low water flow
- Check aerator for mineral build-up. Inspect supply valves for full open. If one side is low, the cartridge or supply line may be restricted.
Handle is loose or wobbly
- Tighten set screw or replace handle trim. If the stem is worn, the cartridge may require replacement.
Sprayer issues or poor diverter function
- Clean or replace the diverter. For pull-out sprayers, check hose routing and weight placement.
Noisy faucet or hammer
- Check loose mounting or high water pressure. Install shock arrestor or tighten mounting hardware.
Cold/hot imbalance
- Faulty cartridge can cause temperature drift. Replace cartridge to restore stable mix.
Rohl Faucet Repair Troubleshooting PAA-style questions:
- Why is my Rohl faucet dripping only from the spout? Often the cartridge or internal seals fail; replacing them usually stops the drip.
- Why does my faucet have low flow after cleaning? A clogged aerator or supply line issue is common; clean screens and check valves.

When to call a professional and warranty tips
Call a pro when:
- You find broken casting or metal fatigue.
- The cartridge is seized and won’t budge.
- Plumbing connections under the sink are corroded.
- You are unsure about soldered pipes or gas lines nearby.
Warranty and parts guidance:
- Rohl often offers limited lifetime or specific part warranties. Keep purchase records and model numbers.
- Using non-OEM parts may void warranty in some cases. Check warranty terms before major repairs.
Personal experience and pro tips from the field
I’ve replaced dozens of Rohl cartridges and cleaned many diverters. Small fixes like O-rings often stop the problem. Once I removed a stuck cartridge using heat and steady pull. I learned to never rush; a gentle approach protects finishes. Keep a simple kit with common Rohl seals and a spare cartridge. It saves time and prevents second trips to the store.
Lessons learned:
- Always turn off supplies and relieve pressure first.
- Take photos as you disassemble. Photos make reassembly simple.
- Buy a quality cartridge puller. It prevents damage and speeds the job.
Frequently Asked Questions of Rohl Faucet Repair Troubleshooting
How do I identify my Rohl faucet model?
Look under the sink or on the spout for a model number. If not found, take photos and compare them with Rohl catalogs or supplier listings. Model info helps match cartridges and trim.
Can I use generic cartridges in a Rohl faucet?
Some generic cartridges fit, but using OEM parts reduces risk of poor fit and finish damage. OEM parts help preserve warranty and performance.
How often do Rohl faucets need maintenance?
Light cleaning every 6 months and seal inspection every 1–2 years keeps them working well. High mineral areas need more frequent aerator and diverter cleaning.
Is it safe to replace a Rohl cartridge myself?
Yes, if you can turn off the water and follow step-by-step instructions. Stop and call a pro if parts are stuck or you find corrosion.
What if the faucet still leaks after replacing seals?
Recheck installation and seating of parts. If the leak persists, the cartridge may be wrong size or the valve body could be damaged. A plumber can diagnose metal wear or hidden damage.
Will aggressive cleaning harm my Rohl finish?
Harsh chemicals and abrasive pads can damage finishes. Use mild soap, water, and a soft cloth. For mineral deposits, use diluted vinegar with care and rinse well.
Conclusion
This Rohl Faucet Repair Troubleshooting guide gives hands-on steps, clear diagnosis paths, and useful tips from field work. Follow the step-by-step approach, keep the right tools and parts, and save time by diagnosing first. Start with simple fixes like cleaning the aerator and replacing O-rings. If you hit a snag, consult a pro and check warranty rules. Try one repair today, and share your experience or questions below to learn more.

