
Most Kohler faucet issues can be fixed by simple troubleshooting and replacing worn parts.
I’ve worked on dozens of sinks and showers, and I know Kohler Faucet Troubleshooting inside and out. This guide walks you through common problems, step-by-step fixes, diagnostic tips, and when to call a pro. Read on to learn practical, safe, and tested ways to restore your Kohler faucet quickly and confidently.
Common Kohler Faucet Problems and Causes
Kohler Faucet Troubleshooting starts with knowing what goes wrong most often. Common problems include dripping, low water pressure, noisy operation, loose handles, and leaks around the base or spout. Each issue has a few likely causes like worn cartridges, blocked aerators, faulty seals, or water supply issues. Understanding these causes helps you pick the right fix without guessing.

Tools, Parts, and Safety Basics
Before you start Kohler Faucet Troubleshooting, gather basic tools and parts. You will need an adjustable wrench, screwdriver set, hex keys, needle-nose pliers, plumber’s grease, replacement O-rings, and a new cartridge if needed. Always shut off the water supply at the shutoff valves and cover the drain to avoid losing small parts. Wear gloves and eye protection when cleaning or replacing metal parts.

Step-by-Step Troubleshooting: Dripping Faucet
A faucet that drips wastes water and causes stains. For Kohler Faucet Troubleshooting, first isolate the cause. Turn off water, remove the handle, and inspect the cartridge and O-rings. Replace worn O-rings or the cartridge if you see corrosion or mineral buildup.
Steps to follow
- Turn off hot and cold supply valves.
- Remove handle and decorative cap.
- Inspect cartridge and seals for wear.
- Clean mineral deposits with vinegar or replace part.
- Reassemble and test for leaks.
If replacing the cartridge stops the drip, you solved the issue. If not, check the valve seat or supply valves.
Step-by-Step Troubleshooting: Low Water Pressure
Low flow often looks like a clog but can be supply related. Start by removing the aerator and checking for debris and mineral build-up. If the aerator is clean, check both supply valves and the cartridge. A blocked cartridge or partially closed valve is a common reason.
Quick checks
- Clean or replace the aerator.
- Verify supply valves are fully open.
- Inspect cartridge for blockage.
- Flush supply lines briefly after removing cartridge.
If pressure returns after cleaning the aerator, the issue is resolved. If not, the cartridge or supply lines may need servicing.

Step-by-Step Troubleshooting: Noisy or Squeaky Faucet
Noise can come from loose parts, high water pressure, or worn pieces. For Kohler Faucet Troubleshooting, first tighten mounting nuts and check for loose hoses. If the noise persists, inspect the cartridge and water hammer arrestor if present.
Fix tips
- Tighten connections under the sink.
- Replace worn cartridges or seats.
- Add or replace a water hammer arrestor to reduce banging.
- Reduce water pressure if it is above recommended levels.
Small noises are often simple fixes. Persistent hammering may require a plumber.
Step-by-Step Troubleshooting: Stiff or Hard-to-Move Handle
A sticky handle makes daily use unpleasant. Mineral deposits or dried grease in the cartridge are common culprits during Kohler Faucet Troubleshooting. Remove the handle, clean the cartridge area, and apply a small amount of silicone-based plumber’s grease.
How to free a stuck handle
- Shut off water and remove handle.
- Remove cartridge and inspect for deposits.
- Clean with vinegar or replace cartridge.
- Lubricate moving parts with plumber’s grease.
If the handle remains stiff after cleaning and lubrication, replace the cartridge.

Diagnostic Tests and Simple Checks
Diagnosis saves time in Kohler Faucet Troubleshooting. Run these simple checks before disassembly. Test both hot and cold separately. Note when and where the problem appears. Look for water stains under the sink, steady dripping, or sudden changes in pressure.
Useful tests
- Isolate hot or cold supply to find which side is faulty.
- Use a bucket to capture flow and gauge pressure.
- Listen for tankless heater or pump cycles that affect flow.
- Check for recent plumbing work that could have loosened parts.
These tests narrow the cause and guide your repair plan.
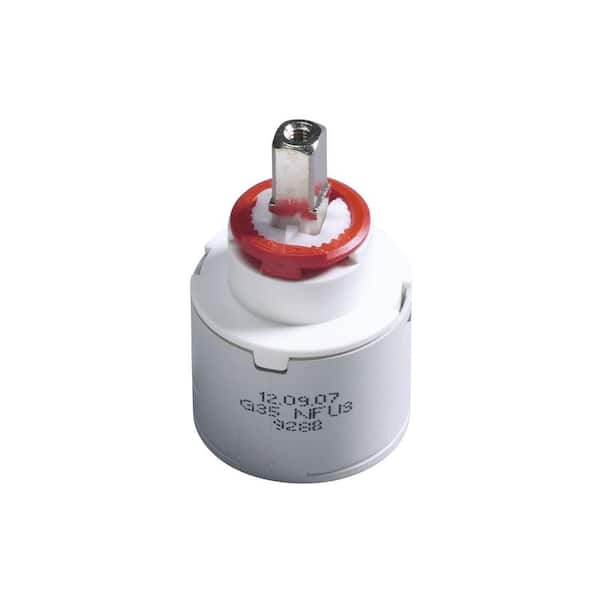
Replacing Cartridges, Aerators, and Seals
Replacement parts solve most Kohler Faucet Troubleshooting cases. Use genuine Kohler cartridges when possible for fit and longevity. Note the model number stamped on the faucet or referenced in the manual to order correct parts. Replace worn O-rings, seals, and the cartridge in a single service session to prevent repeat issues.
Replacement steps
- Remove handle and escutcheon plate.
- Extract old cartridge and compare to new part.
- Install new cartridge with correct orientation.
- Replace O-rings and seals with fresh parts.
- Reassemble and test carefully.
Keep old parts until the new assembly passes a 24-hour leak test.
Maintenance Tips to Prevent Future Problems
Regular care reduces the need for Kohler Faucet Troubleshooting. Clean the aerator every 3–6 months. Wipe fixtures with mild soap to remove minerals and residue. Avoid harsh cleaners that can damage finish and seals.
Maintenance checklist
- Clean aerator and spray heads regularly.
- Inspect under-sink connections for moisture.
- Replace worn seals before they fail.
- Use water softeners if your water is very hard.
My experience: a quick annual check prevented several leaks that would have led to bigger repairs.
When to Call a Professional
Not all Kohler Faucet Troubleshooting should be DIY. Call a licensed plumber if you see major leaks, broken valves, or if the repair needs special tools. Also seek help when water damage, mold, or structural concerns appear.
Signs to call a pro
- Continuous leak after cartridge replacement.
- Burst supply line or hidden leaks inside walls.
- Water heater or home water system interaction problems.
- You’re uncomfortable shutting off the main supply or working under the sink.
Hiring a pro can save time and prevent mistakes that lead to costly repairs.
Parts, Warranty, and Sourcing Replacement Components
Using the correct parts makes Kohler Faucet Troubleshooting durable. Check your faucet model number, usually on the installation guide or behind the escutcheon. Kohler offers warranty information and replacement parts through authorized dealers. Keep receipts and part numbers for warranty claims.
Sourcing tips
- Match part numbers exactly to avoid fit issues.
- Prefer OEM parts for long-term reliability.
- Keep a small stash of common parts like O-rings and aerators.
If your faucet is under warranty, consult the warranty terms before replacing parts yourself.
Personal Experience and Lessons Learned
I’ve repaired dozens of Kohler faucets. One common mistake is changing one part at a time and not testing fully. I now replace seals and cartridges in the same visit. That approach saved my clients repeat trips and reduced downtime.
Lessons I share
- Always shut off the water and test both sides.
- Use gentle cleaners and avoid abrasive pads.
- Keep a record of parts replaced and dates for future checks.
These small habits reduce failures and make troubleshooting faster.
Frequently Asked Questions of Kohler Faucet Troubleshooting
What should I check first when my Kohler faucet drips?
Start by turning off the water and removing the handle to inspect the cartridge and O-rings. Replace worn seals or the cartridge if you find corrosion or damage.
How do I know if low flow is the aerator or cartridge?
Remove and rinse the aerator first; if flow improves, the aerator was the issue. If not, the cartridge or supply valve may be blocked and should be inspected.
Can I use generic parts for Kohler faucets?
You can use them, but OEM parts are recommended for best fit and longevity. Generic parts sometimes fit poorly and wear faster.
How often should I clean the aerator on a Kohler faucet?
Clean the aerator every 3–6 months, or sooner if you see reduced flow or build-up. Regular cleaning prevents many common flow problems.
Is it safe to replace a Kohler cartridge myself?
Yes, if you follow safety steps: shut off water, drain lines, and use the right tools. If you’re unsure or encounter damage, call a professional.
Conclusion
Kohler Faucet Troubleshooting is mostly about clear diagnosis and the right parts. Start with simple checks like the aerator and supply valves, then move to cartridges and seals when needed. Use genuine parts when possible, keep tools handy, and don’t hesitate to call a pro for complex or risky repairs. Try one repair this weekend, track what you did, and comment below with your faucet model or question to get targeted help.

