
Solar charger not firing? Most issues are wiring, grounding, battery, or solar-panel shade.

Today's Exclusive Deals
Limited-time Exclusive Deals. Check current discount on Amazon.
Check Price on Amazon As an Amazon Associate I earn from qualifying purchases.I’ve spent years installing and fixing fence energizers on farms and ranches. This guide covers American Farmworks Solar Fence Charger Troubleshooting with clear steps, real-world tips, and proven fixes. You will learn how to diagnose faults, test components, and keep your charger reliable in all seasons.

Quick overview of American Farmworks Solar Fence Charger Troubleshooting
American Farmworks Solar Fence Charger Troubleshooting means finding why the energizer is not delivering steady pulses and fixing the root cause. Problems usually come from weak solar charging, bad batteries, poor grounding, corroded connections, or fence shorts.
Today's Exclusive Deals
Limited-time Exclusive Deals. Check current discount on Amazon.
Check Price on Amazon As an Amazon Associate I earn from qualifying purchases.This section gives a simple map of the troubleshooting process. Follow the map step by step to save time and avoid replacing parts you don’t need.
Common problems and causes
Knowing what commonly fails helps you narrow the issue fast. Here are the frequent causes I see on farms.
Today's Exclusive Deals
Limited-time Exclusive Deals. Check current discount on Amazon.
Check Price on Amazon As an Amazon Associate I earn from qualifying purchases.- Weak or dead battery
- Batteries age fast in cold or hot weather. A visibly charged panel can still leave the battery undercharged.
- Shaded or dirty solar panel
- Even small shade patches cut charge output a lot.
- Poor grounding
- A bad ground or too few ground rods lowers pulse strength.
- Corroded or loose connections
- Moisture and salt lead to resistance at terminals.
- Fence short or vegetation contact
- Vines, tall grass, or broken insulators cause leakage and reduce shock strength.
- Damaged charger electronics
- Lightning strikes or water intrusion can kill internal parts.
These causes are simple to test. Prioritize battery, panel, ground, and fence checks in that order.

Step-by-step troubleshooting guide
Follow these steps in sequence. Each step narrows down the cause.
- Visual check
- Inspect solar panel for dirt, bird droppings, and shade.
- Look for cracked housings or water inside the charger.
- Check LEDs or status lights on the unit.
- Test the output with a fence tester
- Use a digital fence voltmeter. Place it on the hot wire away from the charger.
- Record open-circuit voltage and voltage under load.
- Check battery health
- Remove and test battery voltage with a meter. Healthy 12V should read near 12.6–13V when charged.
- Load-test the battery if possible. A weak battery can show voltage then drop under load.
- Inspect solar panel performance
- Measure panel voltage in bright sun. Panel should read higher than battery voltage.
- Clean the panel and remove shade.
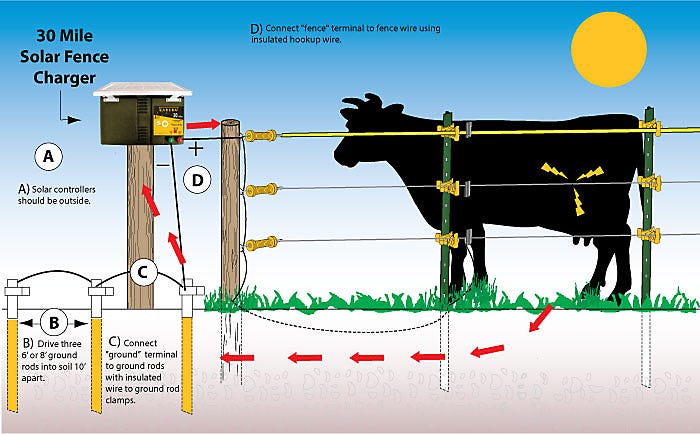
- Verify grounding
- Inspect ground rods and connections.
- Add more ground rods in damp soil. Space rods at least 6–8 feet apart.
- Check fence continuity and shorts
- Walk the fence and look for vegetation or broken insulators.
- Disconnect sections and isolate to find the shorted segment.
- Test charger internals if needed
- If all external parts test good, the unit electronics may be faulty.
- Consider professional repair or replacement if the board is damaged.
Follow each step and record results. This helps you identify intermittent faults and prevents repeat trips.

Tools and tests you need
Simple tools let you solve most problems quickly.
- Digital multimeter
- Measures battery and panel voltages accurately.
- Fence voltmeter / tester
- Shows real on-wire voltage under load.
- Insulation resistance tester (optional)
- Helps locate hidden shorts on long fences.
- Ratchet, wrenches, and screwdrivers
- For tightening terminals and replacing parts.
- Wire brush and contact cleaner
- Cleans corrosion for better connections.
- Spare battery and jumper leads
- Let you substitute a known-good battery for testing.
Having these tools saves time and helps avoid guesswork.

Maintenance tips to keep the charger working
Regular care prevents most failures. I learned these the hard way after a winter outage ruined a lambing season.
- Clean the solar panel monthly
- Wipe dirt and bird droppings off. Trim nearby tree branches.
- Test battery quarterly
- Replace batteries every 3–5 years depending on climate and use.
- Tighten and grease terminals annually
- Use dielectric grease to slow corrosion.
- Keep ground rods tight and visible
- Inspect after heavy rain or frost heave.
- Clear vegetation along the fence
- Maintain a 3–4 foot clear strip for reliable pulses.
- Use surge protection
- Install lightning diverters or gas arrestors where lightning risk is high.
A small seasonal check saves major headaches later.
When to repair, replace, or call a pro
Decisions come down to cost, safety, and time.
- Repair when
- Problem is a battery, cable, terminal, or corroded part. These are low-cost fixes.
- Replace when
- The internal electronics are fried, the unit is old, or replacement cost is similar to repair.
- Call a pro when
- You suspect complex electrical faults, internal board damage, or persistent, unexplained faults after basic checks.
If the charger has lightning damage or you are unsure about mains connections, get expert help.

Personal experience and lessons learned
On a small farm I managed, the charger light looked fine but the fence was weak. I found a half-buried splice corroded by winter salt. Lesson learned: never skip checking buried or hidden connectors.
A second tip: always carry a spare deep-cycle battery or a small jump pack during inspections. I once fixed a holiday outage on-site in under an hour with a spare battery.
Common mistakes to avoid:
- Assuming the solar panel is fine because it looks clean.
- Replacing the charger before testing the battery.
- Overlooking ground rod condition after heavy drought.
These practical tips come from field work. They will help you fix problems faster.

PAA-style questions (quick answers)
How do I know if the battery is bad?
If the battery voltage drops quickly under a small load, it is likely bad. Replace or load-test to confirm.
Why does the charger show light but the fence is weak?
Indicator lights can be misleading; they may only show that the unit is powered. Low battery, poor grounding, or fence shorts often cause weak pulses.
Can a dirty solar panel stop charging?
Yes. Dirt, dust, and shade can reduce charge output significantly and cause the battery to undercharge.
Frequently Asked Questions of American Farmworks Solar Fence Charger Troubleshooting
What is the first thing to check when the charger stops working?
Check the battery voltage and visual charger indicators first. A weak battery is the most common cause.
How often should I clean the solar panel?
Clean it monthly in dusty areas or after heavy pollen seasons. More frequent cleaning improves charging.
How many ground rods do I need?
Use at least two ground rods in dry soil, spaced 6–8 feet apart, and add more if pulses are weak. Better grounding reduces leakage.
Can vegetation cause the charger to fail?
Yes. Vegetation touching the wire creates a continuous drain. Keep a clear strip along the fence.
How long should the battery last in a solar charger?
Deep-cycle batteries usually last 3–5 years depending on temperature and maintenance. Regular testing extends life.
Is a fence voltmeter necessary?
A fence voltmeter is highly recommended. It shows true fence voltage under load and helps find shorts quickly.
Conclusion
You can solve most American Farmworks Solar Fence Charger Troubleshooting issues with simple tests and routine care. Start with battery and panel checks, verify grounding, clear the fence, and use a proper fence tester. Small preventive steps save time and money.
Take action today: inspect your charger, run the simple tests listed here, and keep a spare battery on hand. If you run into a stubborn issue, share details or ask a question below so others can help.


