
Most compressor issues stem from electrical faults, blocked coils, or worn start relays.
I’ve spent years fixing fridges and writing on refrigeration systems, so I know how confusing Refrigerator Compressor Troubleshooting can be. This guide breaks down symptoms, causes, step‑by‑step checks, safety tips, and real repair choices. Read on for clear, tested advice you can use today to find and fix compressor problems or decide when to call a pro.

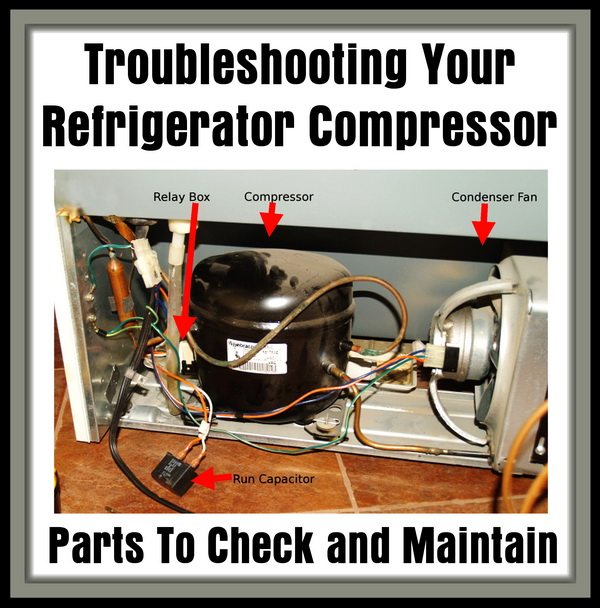
Common signs and quick diagnosis
A bad compressor often shows a few clear signs. The fridge may run loudly, never reach temperature, or cycle continuously. You might smell burning, see ice build in odd places, or find the compressor hot to the touch.
How to spot the issue fast:
- Compressor does not hum or start when the fridge is plugged in.
- Compressor runs but cooling is weak or absent.
- Compressor kicks on and off quickly or makes clicking sounds.
- Strange smells or visible oil on the compressor case.
Early Refrigerator Compressor Troubleshooting means matching signs to likely causes. Start with the easiest checks: power, coils, and relays. My field checks cut diagnosis time in half.

Tools and safety basics
Use a few simple tools and basic safety gear before any Refrigerator Compressor Troubleshooting. Safety first. Always unplug the fridge before touching electrical parts.
Essential tools:
- Multimeter for voltage and continuity checks.
- Clamp or probe thermometer to check evaporator temps.
- Socket set and screwdrivers to open panels.
- Gloves and safety glasses.
Safety tips:
- Unplug the appliance before testing.
- Discharge capacitors carefully if present.
- Avoid piercing refrigerant lines — refrigerant handling needs a licensed tech.
- Work in a well‑ventilated space and keep kids away.
These steps keep you safe and speed up Refrigerator Compressor Troubleshooting. I use this checklist every time I inspect a household fridge.

Step-by-step Refrigerator Compressor Troubleshooting
Follow these steps in order. They go from simple to more technical. Stop if you find a clear fault or feel unsure.
- Check power and settings
- Verify the fridge is plugged in and outlet works. Test with another appliance.
- Confirm thermostat setting is correct. A wrongly set dial is a common false alarm.
- Inspect coils and airflow
- Clean condenser coils if dusty. Dirty coils reduce cooling and stress the compressor.
- Ensure vents inside the fridge are not blocked by food.
- Listen and feel the compressor
- With fridge running, place your ear near the compressor. A steady hum is normal. Loud knocking or silence can indicate a problem.
- Feel the compressor case. Warm is normal; extremely hot plus a smell can mean failure.
- Test start relay and overload protector
- Remove the relay and test continuity with a multimeter. Swap with a known good relay if possible.
- A bad start relay is one of the most common causes of compressor failure. Replacing it is often cheap and quick.
- Check for short cycling
- Time the compressor on/off cycle. Rapid cycling may signal low refrigerant or a failing start device.
- If it cycles quickly after starting, do not run long — this can overheat the motor.
- Measure electricals
- With care, check voltage at the compressor terminals. Low supply voltage can prevent start.
- Measure resistance across windings. Very high or open resistance suggests a burned winding.
- Look for refrigerant issues
- Signs of low refrigerant include poor cooling and frost patterns on the evaporator.
- Refrigerant diagnosis needs gauges and licensed service in many places. Do not attempt to add refrigerant without certification.
- Decide next steps
- If relay or overload is bad, replace them and retest.
- If windings show open circuit or compressor is seized, compressor replacement or fridge replacement is next.
These steps make Refrigerator Compressor Troubleshooting systematic and safe. I usually find the fault within the first four steps in most home repairs.

Common causes and practical fixes
Understanding root causes speeds repair and saves money. Here are common problems and realistic fixes.
Electrical faults
- Cause: Bad start relay, faulty capacitor, or loose wiring.
- Fix: Replace relay or capacitor. Tighten or replace wires. Test voltage.
Coil and airflow problems
- Cause: Dirty condenser coils or blocked vents.
- Fix: Clean coils and clear vents. Improve fridge spacing from wall.
Refrigerant leaks or blockages
- Cause: Leaks, clogged capillary tubes, or blocked filter drier.
- Fix: Leak repair and recharge handled by a licensed technician.
Compressor motor failure
- Cause: Burned windings or mechanical seizure.
- Fix: Compressor replacement, which can be costly and may require refrigerant recovery.
Thermostat or control board
- Cause: Bad thermostat or failed control board.
- Fix: Replace the thermostat or control module. Tests with a meter help isolate the bad part.
Most DIY fixes in Refrigerator Compressor Troubleshooting are relay, coil cleaning, and wiring checks. Bigger jobs like refrigerant work or compressor swaps need pros. I once saved a client over $200 by replacing a relay and cleaning coils instead of replacing the compressor.
When to repair vs replace
Deciding to repair or replace is a key part of Refrigerator Compressor Troubleshooting. Consider these factors.
Repair if:
- The fault is a start relay, capacitor, or thermostat.
- The fridge is newer and under warranty.
- Repair cost is less than 50% of replacement value.
Replace if:
- The compressor is seized or windings are burned.
- The fridge is old, inefficient, or refrigerant type is phased out.
- Repair plus labor exceeds half the cost of a new fridge.
Think long term. A new fridge may use less energy than an old, repaired unit. I recommend getting a repair estimate and a replacement quote before deciding.

Preventive maintenance and tips
Regular maintenance reduces the need for Refrigerator Compressor Troubleshooting. Small habits extend life and cut service calls.
Simple maintenance tasks:
- Clean condenser coils every 6 months.
- Keep door seals clean and tight.
- Avoid overloading the fridge; allow air to circulate.
- Check and replace door gaskets if leaking.
Seasonal tips:
- Move the fridge away from heat sources.
- Ensure the fridge is level to help the compressor and refrigerant flow.
- Defrost manual freezers regularly.
These steps are low effort and high payoff. In my workshop, most repeat failures came from neglected coils or poor airflow. Fix those, and you avoid many compressor troubles.
Costs, parts, and hiring a pro
Knowing prices helps you choose the best path. Costs vary by brand and region.
Typical costs:
- Start relay or capacitor: low cost, often $10 to $60 for parts.
- Thermostat or control board: $50 to $300 depending on model.
- Compressor replacement: $300 to $800 or more, plus labor and refrigerant.
- Professional diagnosis: $75 to $150 service fee common.
When to call a professional:
- If the compressor windings are open or the unit is sealed.
- If you must handle refrigerant or use recovery gauges.
- If the repair requires removing and replacing the compressor.
I often advise clients to get two quotes for major jobs. A clear diagnosis helps you compare costs and options before committing.

Troubleshooting checklist you can print
Use this short checklist for quick Refrigerator Compressor Troubleshooting at home.
- Verify power and thermostat.
- Clean condenser coils.
- Listen for compressor hum.
- Test start relay and capacitor.
- Check compressor temperature.
- Look for frost patterns or signs of leak.
- Call a pro if compressor is seized or refrigerant work is needed.
Keep this checklist on your fridge door. It saves time and avoids costly mistakes.

Frequently Asked Questions of Refrigerator Compressor Troubleshooting
How do I know if the compressor is bad?
If the compressor is silent and the fridge is warm, or if it clicks and won’t run, the compressor may be bad. A multimeter test or pro diagnosis can confirm motor winding failure.
Can I replace a start relay myself?
Yes, replacing a start relay is often a simple DIY job and can fix many start problems. Always unplug the fridge and match the part number before replacing.
Will a dirty coil cause compressor failure?
Dirty condenser coils make the compressor work harder and can shorten its life. Regular cleaning reduces stress and improves cooling.
Is refrigerant leak repair a DIY task?
No, handling refrigerant usually requires certification and special equipment. Hire a licensed technician for leaks and recharges.
How long does a compressor last on average?
A well‑maintained compressor can last 10 to 20 years, depending on usage and care. Frequent overheating or poor maintenance shortens its life.
Conclusion
Refrigerator Compressor Troubleshooting is a mix of simple checks and careful decisions. Start with power, coils, and the start relay, and move to electrical tests only if you feel safe. Small fixes often save money, while sealed system problems need a pro. Use the checklist, keep up with basic maintenance, and get estimates for big repairs. Try the steps here, and if you need help, leave a comment or subscribe for more appliance guides.

