Most Harvest Right issues stem from vacuum, oil, or sensor faults—usually fixable with steps.
I have worked hands-on with freeze dryers and written guides for users. This Harvest Right Troubleshooting Guide offers clear steps, real tips, and simple checks to help you diagnose problems fast. Read on to learn how to spot causes, test parts, and keep your unit running well.

How Harvest Right Works — A Brief Overview
A quick grasp of how a Harvest Right freeze dryer works will speed troubleshooting. The unit uses a vacuum pump, heating plates, and sensors to remove moisture by sublimation. Knowing these parts makes it easier to find the root cause when something goes wrong with your Harvest Right Troubleshooting Guide.
Common Problems and Quick Fixes
These common issues show up most often. Each short fix helps you decide if you can DIY or call support.
- Unit won’t build vacuum
- Check vacuum hose, pump oil level, and that the lid is seated properly.
- Slow or no freeze cycle
- Verify freezer temperature, compressor function, and defrost settings.
- High temperature or heater errors
- Inspect heating plate contact, sensor wires, and controller error codes.
- Door or lid leaks
- Clean the gasket, check for damage, and tighten clamps if present.
- Loud pump noise or vibration
- Change vacuum pump oil, check mounts, and examine for loose parts.
- Tray frost or wet product after cycle
- Ensure correct dry times and that vacuum is steady during the run.
This Harvest Right Troubleshooting Guide focuses on these fixes so you can act fast and avoid damage.

Step-by-Step Deep Troubleshooting
Break down the issue into parts: vacuum, heat, sensors, seals, and electronics. Follow these steps in order. They keep troubleshooting logical and safe.
Vacuum Loss — signs and fixes
Signs: slow pressure drop, failed vacuum, or alarms.
Steps to check:
- Confirm vacuum pump is running and warm after use.
- Check oil color and level; cloudy or brown oil means change it.
- Inspect vacuum hoses and fittings for cracks or loose clamps.
- Tighten the lid clamp and inspect the gasket for debris or cuts.
If the vacuum still won’t hold, isolate leaks with a soapy water spray on joints. A steady stream of bubbles shows the leak.
Vacuum pump oil and maintenance
Pump oil wears and gets contaminated. Change oil every 40 to 80 hours or sooner if oil looks dark. Use the oil type recommended by Harvest Right. From my experience, fresh oil often restores pump performance quickly.
Heater and freeze issues
Causes: faulty heater element, bad contact, or sensor mismatch.
Fix steps:
- Confirm heater wiring is intact and connectors are tight.
- Look for controller error codes and compare to the manual.
- Test the temperature sensor resistance if you have a meter.
- Check that the freezer compressor runs and reaches the right temp.
A heater error can stop drying. Swap the sensor or heater only if you are comfortable with basic electrical checks.
Door seal and gasket problems
Gasket damage causes vacuum loss. Clean the gasket with mild soap and water. Inspect for nicks or warps. Replace the gasket if it fails to seal after cleaning.
Sensor errors and alarm codes
Sensors report temperature and pressure. Codes point to the bad area.
What to do:
- Note the exact code shown.
- Power-cycle the unit to see if the code clears.
- Re-seat sensors and wiring connectors.
- If the code returns, test sensor resistance and wiring continuity.
Keeping a log of codes and actions helps support diagnose remote or repeat issues faster.
Controller, software, and wiring checks
Controller issues can look like hardware faults. Steps:
- Reboot the controller and update firmware if updates exist.
- Inspect wiring harnesses for pinched wires or corrosion.
- Replace the controller board only if diagnostics confirm a fault.
Motor, pump, and mechanical failures
If motors stall or hum:
- Check for blocked fans or seized bearings.
- Replace belts or bearings if worn.
- Use proper replacement parts and torque to spec.
Odors, contamination, or stuck samples
If samples smell off or contamination appears:
- Clean the chamber with approved cleaners and dry fully.
- Replace filters and change pump oil.
- Avoid sealing wet or oily items directly on trays.
This Harvest Right Troubleshooting Guide gives the step sequence I use when diagnosing complex faults. It keeps checks simple and safe.

PAA-style Questions (short answers)
How do I know if my Harvest Right vacuum pump oil needs changing?
If the oil is dark, cloudy, foamy, or smells burnt, change it. Poor vacuum performance or pump noise also signal an oil change.
Why is my Harvest Right not reaching low pressure?
Common causes are a leak in the lid or hoses, bad oil, or a failing pump. Check seals, hoses, and oil level first.
What should I check if the controller shows a sensor error?
Note the error code, power-cycle the unit, and inspect sensor connectors and wiring. Test sensor resistance if available.

Preventive Maintenance and Best Practices
Routine care prevents most issues. A small schedule saves money and time.
- Daily after use
- Wipe chamber, check gasket, and let the chamber dry.
- Every 40–80 hours
- Change vacuum pump oil, inspect filters, and clean fan vents.
- Monthly
- Inspect hoses, clamps, and electrical connectors.
- Yearly
- Replace major seals, belts, and perform a full vacuum test.
Practical tips from my experience:
- Always use the right oil type and stay ahead of the change schedule.
- Don’t overload trays; leave space for vapor flow.
- Log cycles, times, and problems. Logs reveal trends before they fail.
This Harvest Right Troubleshooting Guide emphasizes simple habits that reduce breakdowns.

Parts, Tools, and When to Call Support
Have these items on hand:
- Spare vacuum pump oil and filter kits
- Replacement gaskets and sensor probes
- Basic multimeter, socket set, and hose clamps
When to call support:
- Replacing the pump, compressor, or controller board.
- Persistent error codes after basic checks.
- Any electrical fault you cannot trace safely.
When contacting support, give model, serial number, error codes, and a summary of steps tried. That saves time and improves repair outcomes.

Cost, Parts Replacement, and Limitations
Know the real costs and limits so you plan repairs smartly.
Typical costs:
- Vacuum pump oil and filters — low cost.
- Gaskets and small parts — moderate cost.
- Vacuum pump or controller — higher cost and may require pro service.
Limitations to keep in mind:
- Harvest Right freeze dryers are not meant for large batches of liquids without pre-freezing and proper technique.
- Older units may need more frequent parts replacement.
- DIY repairs can void warranty if not authorized.
This Harvest Right Troubleshooting Guide advises balancing DIY fixes with professional help to avoid costly mistakes.

Frequently Asked Questions of Harvest Right Troubleshooting Guide
What is the first thing to check if my Harvest Right won’t start?
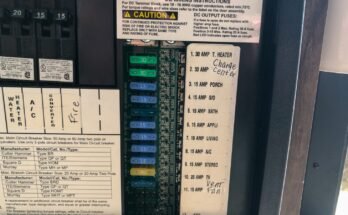
Check power, main circuit breaker, and that the lid is properly closed. Confirm the controller lights and any error codes.
How often should I change vacuum pump oil?
Change oil every 40–80 hours, or sooner if it looks dark or contaminated. Heavy use or wet loads require more frequent changes.
Can I fix a vacuum leak myself?
Yes, small leaks at hoses, clamps, or gaskets can often be fixed by replacing seals or tightening fittings. Use soapy water to pinpoint leaks.
Why does my freeze dryer stop mid-cycle?
It may be a heater fault, vacuum loss, or sensor error. Check error codes, vacuum, and sensor connections first.
Is it safe to run the Harvest Right without a filter?
No, filters protect the pump and reduce contamination. Replace filters promptly to protect the pump and product.
How do I interpret common error codes?
Document the code, power-cycle the unit, and consult the manual for defined steps. If the code persists after checks, contact support.
Conclusion
This Harvest Right Troubleshooting Guide gives clear steps to find and fix common faults. Start with simple checks: power, seals, oil, and codes. Log what you test, follow maintenance routines, and call support when repairs exceed your comfort level. Try a preventive step today—check oil and seals—and share your results or questions in the comments to learn from others.