
Most solenoid valve issues come from power, wiring, debris, or worn diaphragms.

Today's Exclusive Deals
Limited-time Exclusive Deals. Check current discount on Amazon.
Check Price on Amazon As an Amazon Associate I earn from qualifying purchases.I have worked on irrigation systems for years and I know how small faults can stop a whole zone. This guide on Irrigation Solenoid Valve Troubleshooting explains how these valves work, how to diagnose common faults, and how to fix them step by step. Read on for practical checks, easy tests, and tips that save time and money.
How irrigation solenoid valves work
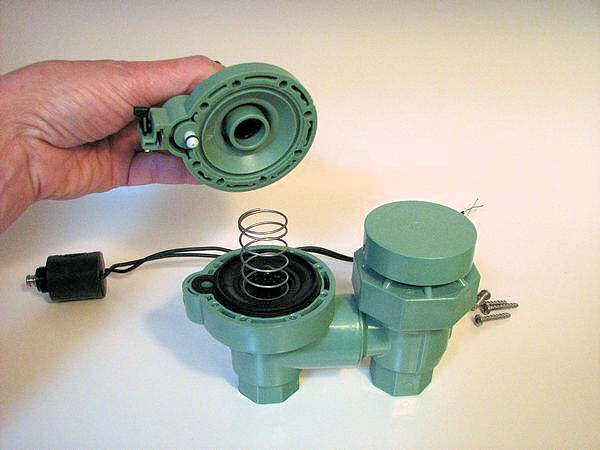
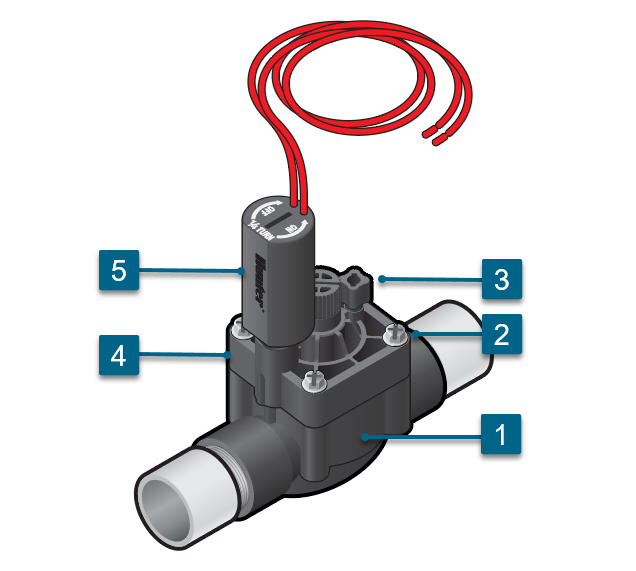
Irrigation solenoid valves control water flow automatically. A coil (solenoid) creates a magnetic field when powered. The magnetic field lifts a plunger or opens a pilot that lets water move the diaphragm. When power stops, a spring or gravity resets the valve.
Today's Exclusive Deals
Limited-time Exclusive Deals. Check current discount on Amazon.
Check Price on Amazon As an Amazon Associate I earn from qualifying purchases.Key parts:
- Solenoid coil — creates the magnetic field.
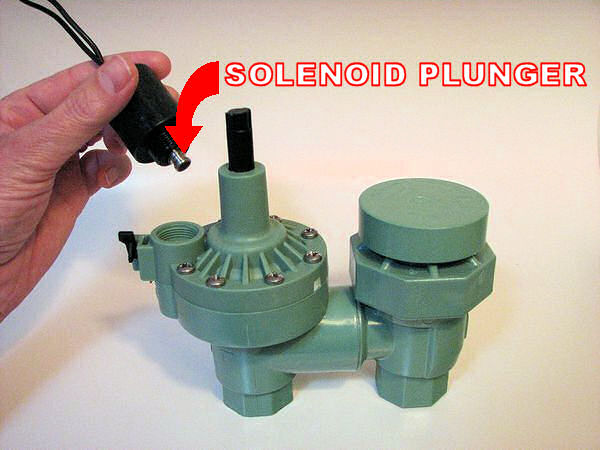
- Plunger or armature — moves to allow flow.
- Diaphragm — seals and opens the main flow.
- Valve body — holds the flow path and filters.
Knowing these parts helps with Irrigation Solenoid Valve Troubleshooting. If you hear a click but no water moves, the diaphragm or pilot is often the issue. If there is no click, look at power and wiring.
Today's Exclusive Deals
Limited-time Exclusive Deals. Check current discount on Amazon.
Check Price on Amazon As an Amazon Associate I earn from qualifying purchases.Common problems and causes
Most failures fall into a few clear groups. This section helps you spot which group to inspect first.
Common faults:
- No power to the valve — blown fuse, tripped breaker, or faulty controller.
- Bad wiring or loose connections — corroded terminals or chewed wires.
- Coil failure — burned or shorted solenoid.
- Debris in the pilot or seat — dirt blocks flow and keeps the valve closed.
- Worn diaphragm or seals — rubber parts age and leak.
- Stuck plunger — mineral deposits or rust stop movement.
Each of these shows distinct symptoms. Use this list when you start Irrigation Solenoid Valve Troubleshooting to narrow the cause fast.
Step-by-step troubleshooting process
Follow this order to save time. Start with the easiest checks and move to more invasive ones.
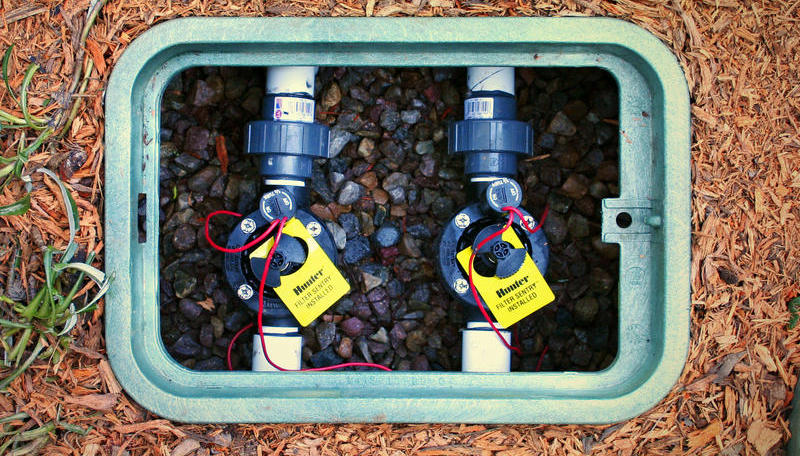
- Visual check
- Inspect for broken wires, water pooling, or obvious damage.
- Make sure the controller shows the zone is active.
- Listen and feel
- Activate the zone. Listen for a click at the valve. Feel the wires and valve body for warmth.
- Manual open test
- Locate the small manual bleed screw or lever.
- Open it. If water flows, the valve is mechanically OK and the problem is electrical or coil-related.
- Isolate wiring
- Turn off power. Check terminals for corrosion and tightness.
- Reconnect and test again.
- Swap test
- If you have a known good solenoid, swap it to see if the valve works. This isolates the coil from the valve.
- Clean and reassemble
- Remove debris from pilot holes and the seat. Replace the diaphragm if damaged.
Use this checklist each time you perform Irrigation Solenoid Valve Troubleshooting. It keeps steps logical and efficient.
PAA-style question: How do I tell if the solenoid coil is bad?
Check voltage at the coil when the controller runs the zone. If proper voltage is present but no click or movement occurs, the coil or plunger is likely bad.
PAA-style question: Can a dirty filter cause valve failure?
Yes. Debris can block pilot passages and seats, keeping the valve closed even when the solenoid energizes.

Electrical tests and wiring checks
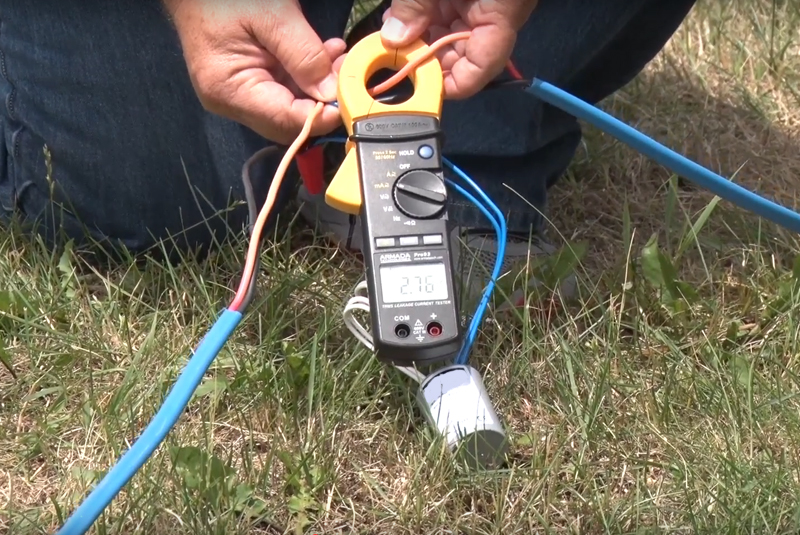
Good wiring and correct voltage are crucial for Irrigation Solenoid Valve Troubleshooting. Use a multimeter for safe checks.
Steps:
- Measure voltage at the coil when the controller calls for the zone. Expect 24 VAC for most systems.
- Check coil resistance. Typical coils read 20–60 ohms for common types. Very high or infinite resistance means an open coil.
- Inspect the common wire and controller terminals. A lost common is a common failure point.
- Look for shorts or grounding on metal posts, pipe clamps, or nearby grounding points.
Safety tips:
- Turn power off before touching wiring.
- Use insulated tools.
- Replace corroded terminals with new connectors.
These tests quickly separate electrical faults from mechanical ones while doing Irrigation Solenoid Valve Troubleshooting.
Mechanical checks and valve repair
If wiring and coil are fine, look inside the valve. Many failures are simple to fix on site.
Common mechanical checks:
- Remove the bonnet and inspect the diaphragm. Replace if cracked or stiff.
- Clear pilot holes and seat. Use water and a soft brush, not metal picks.
- Check the plunger for rust or wear. Clean with a cloth and light oil if needed.
- Inspect the spring and screws. Replace missing or corroded hardware.
When to replace:
- Cracked valve body, persistent leaks after diaphragm change, or badly corroded internals mean replace the valve.
- If parts are available, replacing the diaphragm and plunger often restores function.
I often fixed valves in minutes by changing a diaphragm and clearing grit. Keep spares on hand to speed repairs.
Maintenance and prevention tips
Regular care extends valve life and reduces troubleshooting time.
Routine tasks:
- Flush filters and mainlines seasonally.
- Check and tighten electrical terminals yearly.
- Replace diaphragms every 3–5 years or at first sign of wear.
- Winterize in cold climates to prevent freeze damage.
- Use strainers or mesh screens on valve inlets where sediment is common.
Simple habits cut the need for major Irrigation Solenoid Valve Troubleshooting. I learned this after repeated winter freeze damage taught me to drain and insulate.

Tools and parts you need
Have a compact kit ready for common fixes. This saves time and avoids return trips.
Essential tools:
- Multimeter for voltage and resistance checks.
- Needle-nose pliers and wire strippers.
- Small screwdriver set for bonnet screws and terminals.
- Soft brushes and clean rags.
- Replacement diaphragms, springs, and solenoid coils.
- Waterproof connectors and dielectric grease.
Pack these items in a weatherproof bag. On-site repairs become fast and predictable with the right kit during Irrigation Solenoid Valve Troubleshooting.
Troubleshooting flow examples and personal experience
Example 1: No click, no flow
- Symptom: Controller runs but no click at valve.
- Steps taken: Checked voltage at coil. Found no 24 VAC due to a burned controller zone. Replaced controller board. System ran.
Example 2: Click but no water
- Symptom: Click heard, no water flows.
- Steps taken: Opened manual bleed. Water flowed. Removed bonnet and cleared small stones from pilot port. Replaced diaphragm. Valve worked.
Personal tip:
- Once I spent hours chasing wiring when the real issue was a tiny pebble blocking a pilot hole. Now I always do the manual open test first.
These real scenarios show how following a clear Irrigation Solenoid Valve Troubleshooting path saves time and frustration.
Frequently Asked Questions of Irrigation Solenoid Valve Troubleshooting
What is the first thing to check when a valve won't open?
Check if the controller is calling the zone and if the valve clicks. If no click, test voltage at the coil.
How do I test a solenoid coil?
Measure voltage at the coil when the zone is active and check coil resistance with a multimeter. No voltage or infinite resistance indicates a fault.
Can a valve leak when the solenoid is fine?
Yes. A worn diaphragm or damaged seat often causes leaks even if the solenoid and wiring are fine.
Is it safe to run a swap test with another valve?
Yes, if power is off when you swap. Swap a known-good coil to isolate the problem safely.
How often should I replace valve diaphragms?
Replace diaphragms every 3–5 years or sooner if you see cracking, stiffness, or leaking.
Conclusion
Irrigation Solenoid Valve Troubleshooting becomes fast when you follow a clear plan. Start with visual and manual checks, test electrical supply, then inspect mechanical parts. Keep basic tools and spares ready, and perform routine maintenance to prevent most problems. Try the steps here on your next valve issue, leave a note about what worked, and subscribe for more practical irrigation tips.


