
Sloan Automatic Flush Valve Troubleshooting fixes most sensor, valve, and leak issues quickly and safely.
I have worked on commercial plumbing systems for years and I know Sloan Automatic Flush Valve Troubleshooting inside and out. This guide gives clear steps, real tips, and simple fixes so you can diagnose and repair common problems with confidence. Read on for practical troubleshooting, maintenance advice, and when to call a pro.

What is a Sloan Automatic Flush Valve and how it works
A Sloan automatic flush valve is a timed or sensor-driven valve for urinals and toilets. It uses an infrared sensor or solenoid to trigger a flush without touching the fixture. Components include the sensor, control module, solenoid or diaphragm, seals, and supply line. Knowing how each part works helps when you do Sloan Automatic Flush Valve Troubleshooting.

Common problems and likely causes
Sloan Automatic Flush Valve Troubleshooting most often starts with spotting symptoms. Here are common issues and quick causes.
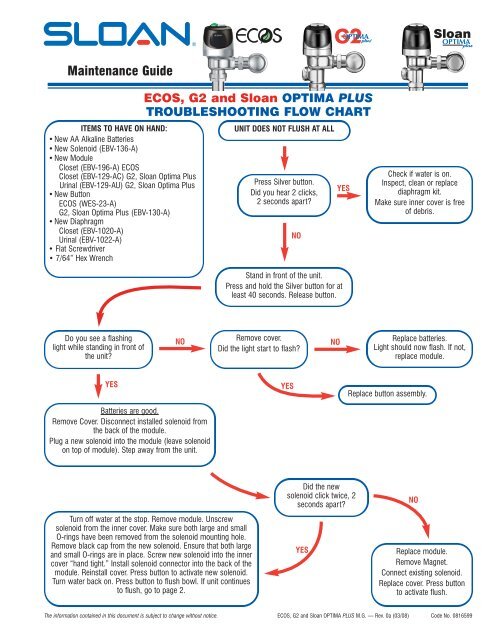
- No flush at all: Sensor failure, dead battery, or clogged solenoid.
- Continuous running or leaking: Worn diaphragm, stuck piston, or bad seal.
- Ghost or random flushes: Sensor misalignment, electrical noise, or dirty lens.
- Weak or incomplete flush: Low water pressure, partial clog, or valve seat damage.
- Slow or delayed flush: Faulty control module settings or weak batteries.
Each problem points you to a target area for Sloan Automatic Flush Valve Troubleshooting. Start with the simple checks first. Replace small parts only if cleaning does not help.

Step-by-step Sloan Automatic Flush Valve Troubleshooting guide
Follow this logical flow to save time. Work safely and shut off supply when needed.
- Visual check
- Look for leaks, corrosion, or damaged parts.
- Confirm the sensor window is clean and unobstructed.
- Power and batteries
- Replace batteries or check electrical power.
- Ensure wiring is secure and free of corrosion.
- Sensor and range check
- Wave your hand to test detection.
- Adjust sensor heads per instructions.
- Clean sensor and valve internals
- Wipe the sensor lens with a soft cloth.
- Remove and clean the solenoid, diaphragm, and screen.
- Test water supply and pressure
- Verify supply valves are fully open.
- Check upstream pressure if flush is weak.
- Replace wear parts
- Change diaphragms, seals, or solenoids if worn or damaged.
- Use genuine Sloan parts for fit and warranty.
- Final test and observation
- Cycle the flush multiple times.
- Monitor for leaks or false triggers.
These steps cover most scenarios you will face in Sloan Automatic Flush Valve Troubleshooting. Keep notes of settings that you change so you can revert if needed.

Why does my Sloan valve keep flushing by itself?
Most ghost flushes come from a dirty or misaligned sensor lens, or reflections causing false triggers. Clean the lens and move reflective items away from the sensor path.
Can I replace the diaphragm myself?
Yes, many diaphragm replacements are straightforward and require basic tools. Turn off water, remove valve cover, replace diaphragm, and test for leaks.
How long do batteries last in a Sloan automatic flush valve?
Battery life varies with traffic and model but often lasts 1–3 years. Using lithium batteries can extend life and reduce maintenance.
Maintenance tips to avoid frequent troubleshooting
Good upkeep reduces the need for Sloan Automatic Flush Valve Troubleshooting. Build a short maintenance plan.
- Monthly quick checks: Clean sensor lens and look for leaks.
- Quarterly service: Replace filters and clean solenoid screens.
- Annual inspection: Change diaphragms and test control settings.
- Use soft cloths: Avoid abrasive cleaners on sensors and chrome.
- Keep spare parts: Stock one diaphragm, seal kit, and solenoid for quick fixes.
A small maintenance routine saves time and prevents downtime in busy restrooms.

Tools, parts, and when to call a professional
Prepare basic tools and spares for efficient Sloan Automatic Flush Valve Troubleshooting.
- Tools to keep
- Adjustable wrench and pliers
- Hex keys and screwdrivers
- Bucket and towels
- Multimeter for electrical checks
- Common parts to stock
- Diaphragm repair kit
- Solenoid assembly
- Sensor lens or control module
- Gaskets and O-rings
- When to call a pro
- Persistent leaks after seal replacement
- Electrical faults or complex wiring issues
- Major valve body damage or supply pipe issues
If the fixture is under warranty, contact the manufacturer or certified technician before major work. A pro can prevent costly mistakes and protect warranties during Sloan Automatic Flush Valve Troubleshooting.

Real-world tips and lessons from experience
I have fixed hundreds of automatic valves. Small habits made a big difference.
- Clean first, replace second: Many "failed" valves just had dirty lenses.
- Label settings: Mark factory settings before you adjust range or timeout.
- Keep a log: Note battery changes and part swaps for each fixture.
- Respect water chemistry: Hard water speeds diaphragm wear, so consider softening where possible.
- Test at low traffic times: Run diagnostics when users are not present.
One lesson I learned is that quick fixes often mask root causes. Take time to inspect seals and supply lines. This saved me repeat visits and kept clients happy.

People also ask — short answers
What causes intermittent flushing in Sloan valves?
Intermittent flushing is usually a sensor or power issue. Check batteries, wiring, and clean the sensor lens first.
How do I reset a Sloan automatic flush valve?
Most Sloan models have a reset or test button on the control module. Consult the manual, press the button, and observe a test flush.
Is water pressure important for Sloan valves?
Yes. Low pressure can cause weak or incomplete flushes. Confirm supply valves and upstream pressure during troubleshooting.
Frequently Asked Questions of Sloan Automatic Flush Valve Troubleshooting
What are the first things to check if my Sloan flush valve won't operate?
Start by checking batteries or power, then clean the sensor window, and confirm the water supply valve is open. Many faults are resolved by these simple checks.
Why does the Sloan valve leak at the body joint?
A leak at the joint usually means a worn gasket, loose coupling, or cross-threaded connection. Tighten fittings and replace the gasket if the leak persists.
How can I stop false flushes caused by reflections?
Move or cover reflective surfaces near the sensor and clean the lens. Adjust the sensor range or angle according to the manual to reduce false triggers.
How often should I replace internal seals and diaphragms?
A yearly check is good for busy locations; replace parts every 1–3 years depending on water quality and usage. Inspect them sooner if you see leaks or poor performance.
Are aftermarket parts safe to use for Sloan repairs?
Some aftermarket parts work, but they may void warranties or fail earlier. Use genuine Sloan parts when possible for reliability and warranty protection.
Can I perform Sloan Automatic Flush Valve Troubleshooting in cold climates?
Yes, but frost can affect sensors and seals. Insulate exposed pipes and avoid outdoor installations without freeze protection.
How do I test the sensor range without tools?
Wave your hand slowly within a few feet of the sensor and note the activation distance. Adjust settings if activation is too close or too far.
Conclusion
Sloan Automatic Flush Valve Troubleshooting is mainly about smart diagnosis, simple cleaning, and replacing wear parts when needed. Start with power and lens checks, follow a clear troubleshooting flow, and do regular maintenance to avoid repeat visits. Try the steps here on your next service call, keep spare parts handy, and track changes in a log. If a problem persists, contact a certified technician or the manufacturer for help. Share your experiences or questions below and consider subscribing for more practical plumbing guides.

