
Most Ez Go chargers fail due to bad connections, weak batteries, or a faulty charger board.

Today's Exclusive Deals
Limited-time Exclusive Deals. Check current discount on Amazon.
Check Price on Amazon As an Amazon Associate I earn from qualifying purchases.I’ve spent years fixing and testing Ez Go Golf Cart Charger Troubleshooting cases on carts of all ages. This guide walks you through how Ez Go Golf Cart Charger Troubleshooting works, how to find the real problem fast, and what to do next. You’ll get clear steps, simple tests you can do at home, and real tips from hands-on experience to keep your cart charging reliably.

How Ez Go Golf Cart Chargers Work
Ez Go Golf Cart Charger Troubleshooting starts with knowing how the charger works. Chargers convert AC from your house outlet into the DC voltage your batteries need. They monitor voltage, current, and charge time to avoid overcharging.
Today's Exclusive Deals
Limited-time Exclusive Deals. Check current discount on Amazon.
Check Price on Amazon As an Amazon Associate I earn from qualifying purchases.Key parts you should know
- AC power cord and plug that feeds the charger
- Charger board that controls charge cycles and shows status lights
- Charging cable and connector that links to the cart battery pack
- Thermal and current sensors that protect the battery and charger
Common charger types
- Onboard chargers mounted inside the cart
- Offboard or pedestal chargers that plug into the cart externally
Understanding these parts makes Ez Go Golf Cart Charger Troubleshooting easier. If you know where the power flows, you can find where it stops.
Today's Exclusive Deals
Limited-time Exclusive Deals. Check current discount on Amazon.
Check Price on Amazon As an Amazon Associate I earn from qualifying purchases.
Common Problems and Causes
Ez Go Golf Cart Charger Troubleshooting covers common issues most owners see. Here are frequent problems and why they happen.
Battery won’t charge
- Bad battery cells or sulfation
- Loose or corroded connections
- Faulty charger output
Charger won’t power on
- Tripped breaker or bad outlet
- Blown charger fuse or internal failure
- Damaged AC cord
Charger shows fault or error light
- Overtemperature condition
- Shorted battery or bad pack wiring
- Charger electronics failed
Slow charging or short runtime
- Weak batteries from age or poor maintenance
- Uneven cell voltages or bad battery group
- Charger delivering low current due to fault
Connector or harness corrosion
- Salt, moisture, or sulfuric acid causes poor contact
- Loose terminals increase resistance and heat
Knowing the likely cause helps prioritize tests in Ez Go Golf Cart Charger Troubleshooting. Start with the simplest checks first.

Step-by-Step Troubleshooting Guide
Follow these steps to perform Ez Go Golf Cart Charger Troubleshooting safely and efficiently.
-
Safety first
- Wear eye protection and gloves.
- Work in a well-ventilated area.
- Disconnect charger power before touching wiring.
-
Visual inspection
- Look for frayed cords, melted plastic, or burn marks.
- Check battery terminals and connectors for corrosion.
- Ensure charger vents are not clogged.
-
Check the power source
- Plug a lamp or meter into the outlet to confirm power.
- Reset the GFCI or breaker if tripped.
-
Inspect the charger indicators
- Note LED patterns or error codes on the charger.
- Use the manual LED chart or label to interpret codes.
-
Test charger AC input and DC output with a multimeter
- Measure AC at the plug before opening anything.
- With the charger connected, measure DC output at the charger connector.
-
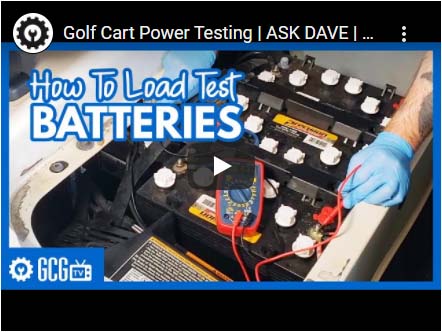
Check battery pack voltage and individual batteries
- Measure total pack voltage at rest.
- Measure each battery or cell for imbalance.
-
Test the connector and harness continuity
- Wiggle connectors while checking voltage to find intermittent faults.
- Clean and tighten all connections.
-
Inspect fuses and solenoids
- Replace blown fuses with correct ratings.
- Test solenoid operation while charging or cranking.
-
Reset or isolate the charger
- Unplug and wait a minute, then plug back in.
- Try a different charger to isolate battery vs charger issue.
-
Seek professional help when needed
-
If the charger shows internal faults after tests, replace it.
-
If multiple batteries show low voltage, battery replacement or reconditioning may be needed.
Personal note: I once fixed a cart that showed a charger fault. The problem was a loose connector inside the charger case. A quick re-seat solved it. Small things often cause big headaches in Ez Go Golf Cart Charger Troubleshooting.

Testing Tools and How to Use Them
Good tools make Ez Go Golf Cart Charger Troubleshooting fast and safe. Keep these basics on hand.
-
Multimeter
- Use to measure AC input and DC output voltage.
- Check battery pack and individual battery voltages.
-
Clamp ammeter
- Measure charge current without breaking the circuit.
- Useful for checking if charger supplies rated current.
-
Battery hydrometer
- Test specific gravity in flooded lead-acid batteries.
- Reveals weak or sulfated cells.
-
Infrared thermometer
- Spot hot spots on cables, connectors, or batteries.
- Helps detect high-resistance joints.
-
Terminal brush and baking soda
- Clean corrosion safely from battery terminals.
These tools help you do reliable Ez Go Golf Cart Charger Troubleshooting at home or in the shop.
Preventive Maintenance and Best Practices
Prevent problems with regular care. Good habits reduce the need for Ez Go Golf Cart Charger Troubleshooting.
Charging habits to follow
- Charge after each use or at least daily for heavy use.
- Avoid letting batteries sit fully discharged for long periods.
- Use a timer or automatic charger to avoid overcharging.
Battery care
- Keep water levels correct in flooded batteries.
- Clean terminals and apply a light protective grease.
- Equalize or balance batteries per manufacturer guidelines.
Charger care
- Keep the charger clean and dry.
- Store the charger in a cool, dry place when not used.
- Inspect cords and connectors monthly for wear.
These steps extend battery life and reduce charger faults. I lost a battery pack once by skipping watering for months—learned that the hard way.

When to Repair vs Replace Charger
Deciding whether to repair or replace is part of Ez Go Golf Cart Charger Troubleshooting. Consider these factors.
Age and cost
- Older chargers may cost more to repair than replace.
- If repair parts are rare, replacement is safer.
Type and safety
- Internal electronic failures or burnt boards suggest replacement.
- If a charger has safety failures, replace it immediately.
Warranty and OEM parts
- OEM chargers often fit and work better with the cart system.
- Aftermarket chargers can be cheaper but verify specs and safety ratings.
If troubleshooting shows bad output or burnt components, replacement is usually best. For small fixes like a plug or fuse, repair is fine.

Troubleshooting for Specific Ez Go Charger Models
Ez Go Golf Cart Charger Troubleshooting can differ by model. Here are quick tips for common setups.
Onboard chargers (in-cart)
- Check wiring harness and in-cab fuse first.
- Remove cover and inspect charger LEDs and board for burn marks.
Offboard chargers (external)
- Confirm outlet power and GFCI status.
- Inspect the plug and cable for corrosion or bent pins.
36V vs 48V systems
- Always measure pack voltage to match charger specs.
- Using the wrong charger voltage can damage batteries.
If you have a model number, the manual often lists LED codes and service steps. That saves time in Ez Go Golf Cart Charger Troubleshooting.

Frequently Asked Questions of Ez Go Golf Cart Charger Troubleshooting
What does it mean if my Ez Go charger shows a red or flashing light?
A red or flashing light often signals a fault such as overtemperature, shorted battery, or internal error. Check battery connections, allow the charger to cool, and read the manual for specific LED codes.
How do I know if the charger or the batteries are bad?
Measure charger DC output at the connector and battery pack resting voltage. If the charger gives correct output and batteries still read low, the batteries are likely the issue.
Can I use a generic charger on my Ez Go cart?
You can use a compatible charger but ensure voltage and amp specs match the cart’s battery pack. Incorrect specs can harm batteries and void warranties.
How often should I water lead-acid batteries to avoid charger issues?
Check water levels monthly and add distilled water to keep plates covered. Proper watering reduces sulfation and charging problems.
Is it safe to open my charger to inspect internal parts?
Only open the charger if you are trained and unplugged from power. Chargers contain high-voltage parts that can be dangerous even after unplugging.
Conclusion
Ez Go Golf Cart Charger Troubleshooting is about clear checks, safe tests, and good maintenance. Start with visual checks, verify power and voltages, and fix simple things like corroded connectors first. If tests show internal charger faults or widespread battery failure, replace the part and use OEM or rated replacements.
Takeaway: A clean connector and a simple multimeter test will solve many charging problems. Try the steps here, learn from small fixes, and act fast when batteries show imbalance. If this helped, leave a comment, subscribe for more practical tips, or share your own Ez Go Golf Cart Charger Troubleshooting story.


