
Hydrostatic Transmission Troubleshooting quickly fixes leaks, low pressure, slipping, or overheating with systematic checks.

Today's Exclusive Deals
Limited-time Exclusive Deals. Check current discount on Amazon.
Check Price on Amazon As an Amazon Associate I earn from qualifying purchases.I have spent years troubleshooting hydrostatic systems on tractors, loaders, and mowers. This guide on Hydrostatic Transmission Troubleshooting explains how these systems fail, how to diagnose issues step by step, and how to fix or prevent common problems. Read on to get clear, practical advice you can use in the shop or field, backed by hands-on experience and industry best practices.
How hydrostatic transmissions work
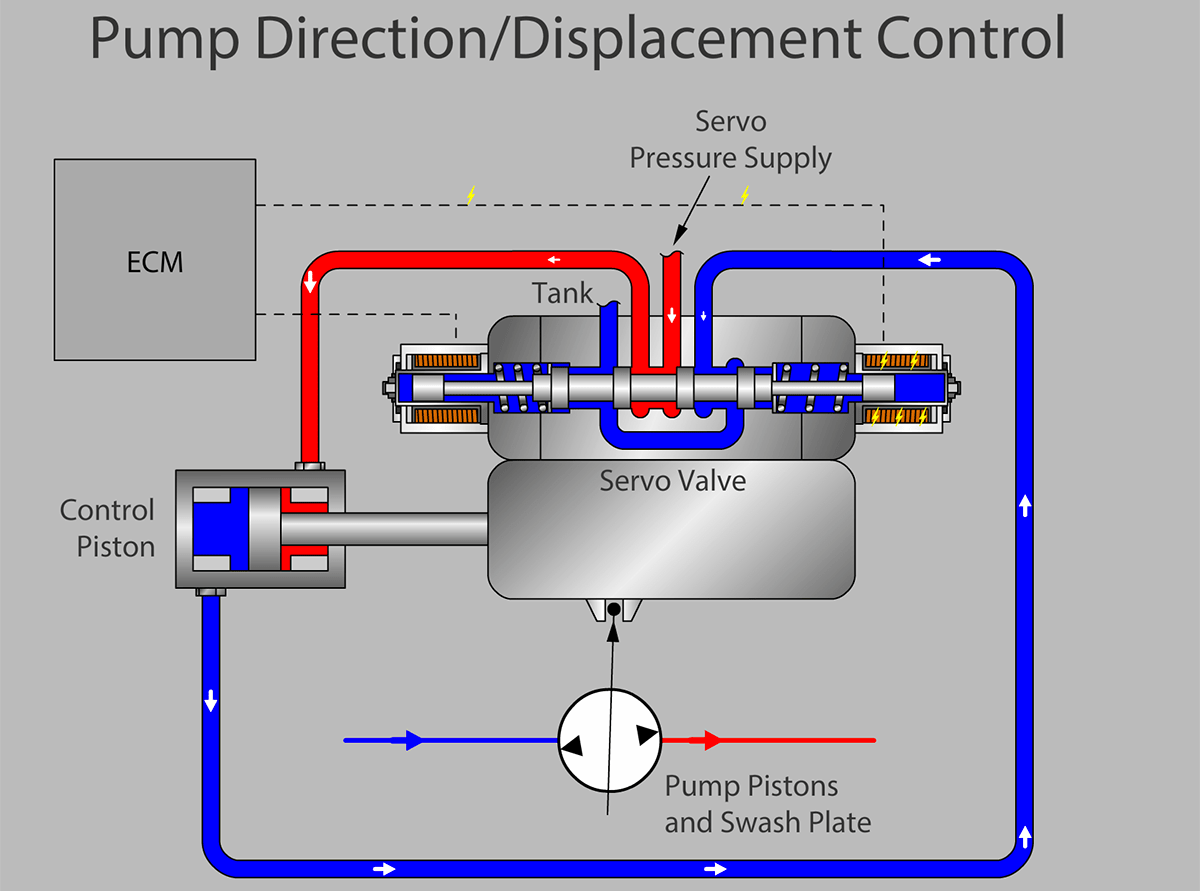
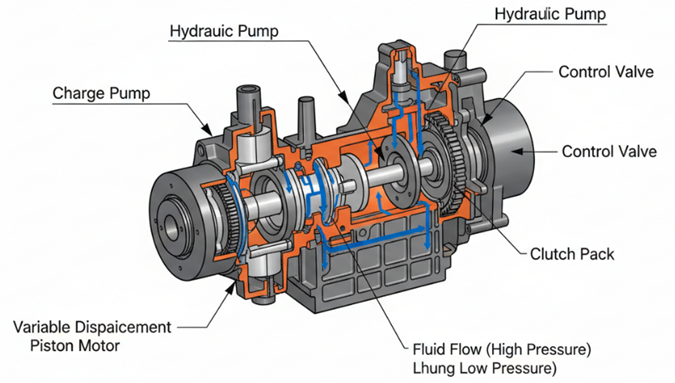
Hydrostatic transmissions use fluid pressure to transfer power. A pump driven by the engine sends hydraulic fluid to a motor. The motor turns the wheels or tracks. Control valves and swashplates change flow and direction.
Today's Exclusive Deals
Limited-time Exclusive Deals. Check current discount on Amazon.
Check Price on Amazon As an Amazon Associate I earn from qualifying purchases.Key components:
- Pump
- Motor
- Control valve or regulator
- Reservoir and filter
- Hoses, fittings, and cooling elements
Why understanding the basics matters for Hydrostatic Transmission Troubleshooting:
- Faults usually trace to fluid, pressure, or control linkages.
- Knowing components speeds diagnosis and avoids unnecessary repairs.
Today's Exclusive Deals
Limited-time Exclusive Deals. Check current discount on Amazon.
Check Price on Amazon As an Amazon Associate I earn from qualifying purchases.Common symptoms that require troubleshooting
Spotting symptoms early saves parts and labor. Here are common signs to watch for in Hydrostatic Transmission Troubleshooting:
- Low speed or loss of power
- Could be low fluid level, worn pump, or clogged filter.
- Slipping under load
- Often caused by internal wear or air in the system.
- Overheating
- Caused by low flow, heavy loads, dirty fluid, or poor cooling.
- Jerky or unresponsive control
- Valve issues, linkage problems, or electrical faults on electronically controlled units.
- Visible leaks
- Hose failure, loose fittings, or cracked seals.
Each symptom points to a small set of likely causes. Use this list to prioritize checks.

Step-by-step hydrostatic transmission troubleshooting guide
Follow a logical order. Start simple, then use tools for deeper checks. This reduces time and prevents misdiagnosis.
Safety first:
- Park on level ground, apply parking brake, and disconnect battery if needed.
- Wear eye protection and gloves.
Basic inspection
- Check fluid level and color
- Fluid should be at the correct mark and clear or amber.
- Milky fluid indicates water contamination.
- Look for visible leaks
- Inspect hoses, fittings, and cooler lines.
- Tighten loose fittings and mark active leaks for repair.
- Check filter and breathers
- Replace clogged filters.
- Clean or replace reservoir breathers.
Operational checks
- Start engine and warm system
- Many faults only show at operating temperature.
- Listen and feel
- Abnormal noise, chatter, or vibration indicates cavitation or worn parts.
- Test drive under light load
- Note speed, responsiveness, and slipping.
Pressure and flow tests (use proper gauges)
- Measure pump pressure at the designated test port.
- Compare to manufacturer specs for your model.
- Low pressure with proper engine rpm points to pump wear or relief valve issues.
- Use a flow meter if available to check output flow.
Common troubleshooting scenarios and quick fixes
- Slipping but normal pressure
- Check motor wear or internal leakage; consider motor rebuild.
- Low pressure and noise
- Air ingestion or cavitation; check suction line, tank level, and breather.
- Overheating without heavy load
- Inspect cooler, flow rate, and fluid condition; flush and replace fluid if dirty.
PAA-style questions (concise answers)
How do I troubleshoot a slipping hydrostatic transmission?
Check fluid level and condition, inspect for air leaks, measure pump and motor pressures, and test for internal leakage; worn motor or pump usually needs rebuild or replacement.
Why does my hydrostatic drive overheat?
Overheating often results from low flow, dirty fluid, blocked cooler, or sustained heavy loads; start with fluid and cooler checks.
When should I replace the hydraulic fluid?
Replace fluid when it is dark, burnt-smelling, milky, or when the manufacturer’s interval is reached; contaminated fluid causes most failures.
Repair, maintenance, and when to replace parts
Routine care prevents most Hydrostatic Transmission Troubleshooting visits. Regular maintenance extends life and reduces costly rebuilds.
Maintenance checklist
- Change fluid and filter at recommended intervals.
- Keep reservoir breathers clean.
- Inspect hoses and fittings every 50 hours.
- Monitor temperatures during use.
Repair vs. replace decisions
- Replace seals and hoses for leaks and minor failures.
- Rebuild pump or motor if internal wear causes pressure loss.
- Replace entire transmission when multiple major components fail and cost to repair approaches replacement price.
Cost and downtime considerations
- Small fixes: filters, seals, hoses — short downtime and low cost.
- Rebuilds: moderate cost and shop time.
- Replacements: highest cost but faster return to service for older, heavily worn units.

Tools, tests, and diagnostic equipment
Having the right tools makes Hydrostatic Transmission Troubleshooting accurate and faster.
Essential tools
- Hydraulic pressure gauge set
- Flow meter (optional but useful)
- Thermometer or infrared gun
- Multimeter for electronic controls
- Seal pullers and torque wrenches
Diagnostic tests
- Static pressure test at pump and motor
- Flow test under controlled rpm
- Leak-down/internal leakage test
- Thermal scan to find hot spots or cooler obstructions
Calibration and safety
- Use manufacturer test procedures and ports.
- Never exceed rated pressures.
- Keep test records to spot trends over time.
Real-world case studies and personal experience
I once repaired a compact loader that had severe slipping under load. Initial checks showed normal fluid level but very dark oil. Pressure testing revealed pump output low at idle. We cleaned the cooler, replaced fluid, and rebuilt the pump. The machine returned to full power and ran cooler. Lesson learned: dark fluid often signals internal wear and reduced cooling efficiency.
Common mistakes I’ve seen
- Replacing parts without pressure testing first.
- Overlooking simple items such as a clogged breather or coolant blockage.
- Ignoring manufacturer service intervals.
Practical tips from the field
- Keep a small pressure gauge in your kit to perform quick checks.
- Note ambient and operating temperatures to understand normal ranges.
- Document repairs and fluid changes for warranty and trend tracking.
Common myths and misconceptions
- Myth: "Topping up fluid fixes slipping."
- Reality: Low fluid helps, but slipping often means internal wear.
- Myth: "Any hydraulic fluid will do."
- Reality: Use manufacturer-specified fluid to protect seals and components.
- Myth: "Electronic faults are rare."
- Reality: Modern systems use controls that can fail or need calibration.
Frequently Asked Questions of Hydrostatic Transmission Troubleshooting
What is the first thing to check when a hydrostatic transmission acts sluggish?
Check the hydraulic fluid level and condition, inspect for visible leaks, and warm the system to operating temperature before deeper tests.
How do I know if the pump or motor is bad?
Use pressure and flow tests; low pump output points to the pump, while high internal leakage at the motor suggests motor wear.
Can I fix a hydrostatic leak myself?
Small hose or fitting leaks can be fixed with proper tools and parts, but internal leaks or pump/motor issues require professional rebuild or replacement.
Why does my hydrostatic system make a whining noise?
Whining often indicates cavitation, air in the suction line, or worn pump components; check suction hoses, breather, and fluid level.
How often should I change hydraulic fluid and filters?
Follow the manufacturer's schedule, typically every 500 to 2,000 hours depending on use; check fluid condition more often for heavy-duty applications.
Is overheating always caused by load?
Not always. Overheating can be caused by dirty fluid, blocked coolers, low flow, or improper fluid type in addition to heavy loads.
Conclusion
Hydrostatic Transmission Troubleshooting is about smart checks, correct tools, and steady preventive care. Follow a step-by-step approach: inspect, test, repair, and document. Small maintenance actions often stop big failures and save money. Take one action today: check your fluid and filters, log the results, and schedule a pressure test if you see trouble. Share your experience below or subscribe for more hands-on troubleshooting guides.


