
A blinking light on your Chamberlain garage opener is a diagnostic code—follow targeted steps to fix it.
I’ve worked on garage doors for years and helped dozens of homeowners decode flashing LEDs. This guide on Chamberlain Garage Door Opener Troubleshooting Blinking Light explains what different blink patterns mean, how to diagnose causes, and step-by-step fixes you can do safely. Read on to get confident troubleshooting advice, clear instructions, and practical tips to solve the problem fast.
Why the blinking light matters and how it helps diagnose problems
The LED on a Chamberlain opener is a simple communicator. It flashes to tell you if there is a power issue, safety sensor fault, memory error, or motor/board problem. Understanding the blink pattern narrows the problem quickly.
A clear diagnostic approach saves time and avoids unnecessary parts swaps. I use the blink code first when I troubleshoot. It points me to the most likely cause before I touch wiring or open the unit.

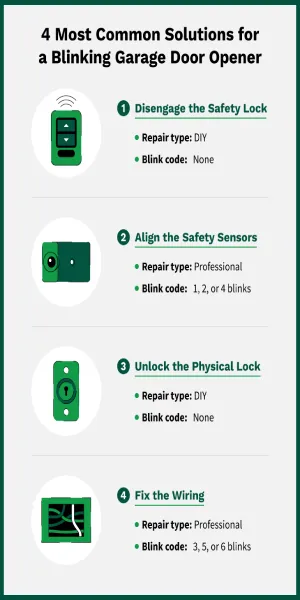
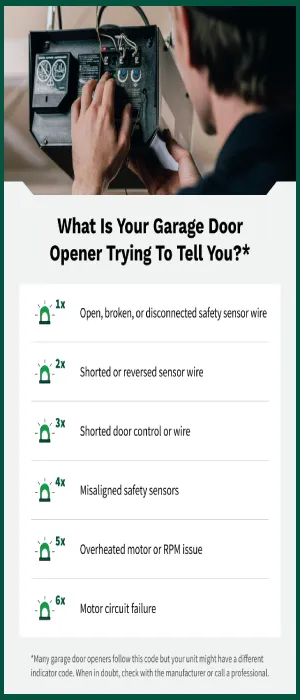
Common blink patterns and their likely causes
Below are common blink patterns you’ll see and what they usually mean. Each description uses plain language so you can act fast.
- One blink repeated
- Often a power interruption or wiring issue. Check outlet and power cord.
- Two blinks repeated
- Typically a safety sensor problem. Sensors might be misaligned or blocked.
- Three blinks repeated
- Usually a logic board or memory error. Firmware or circuit fault possible.
- Four blinks repeated
- Motor overload or obstruction during the travel cycle.
- Rapid continuous blinking
- Could be a jammed rail, broken gear, or a shorted sensor wire.
Remember that exact meanings can vary by model. The phrase Chamberlain Garage Door Opener Troubleshooting Blinking Light will help you find model-specific codes when checking your manual or support pages.
Step-by-step troubleshooting guide
Use this ordered checklist to troubleshoot safely. Work slowly and test after each step.
- Safety first
- Disconnect power at the outlet before inspecting wiring or opening covers.
- Keep fingers clear of springs, cables, and moving parts.
- Check power and wiring
- Ensure the outlet works by testing another device.
- Inspect the opener’s power cord for frays or loose plugs.
- Inspect safety sensors
- Look for dirt, spider webs, or items blocking the beam.
- Realign sensors until the indicator LEDs on them show green or steady light.
- Test remote and wall control
- Replace remote batteries and test wall button to rule out transmitter issues.
- Look for obstructions on the door path
- Check rollers, tracks, and weather seals for jams.
- Manually move the door to feel for stiff spots.
- Check limit and force settings
- If the door reverses or stalls, adjust the travel limit and force per the manual.
- Reset the opener
- Unplug for 60 seconds, plug back in, and watch the blink pattern.
- If your model has a learn button, follow reset procedures in the manual.
- Inspect the circuit board and motor
- Look for burn marks, swollen capacitors, or loose connectors.
- If you find damage, the board or motor may need replacement.
After each step, confirm whether the Chamberlain Garage Door Opener Troubleshooting Blinking Light stops or changes pattern. This helps isolate the cause.
Tools, parts, and supplies you may need
Keep basic tools on hand before you start. They make troubleshooting faster and safer.
- Screwdrivers and nut drivers
- For cover removal and terminal checks.
- Voltmeter or multimeter
- To test power at the outlet and continuity in sensor wires.
- Replacement remote batteries
- A cheap fix that rules out transmitter problems.
- Sensor alignment aids
- A clamp or small level to align sensors precisely.
- Replacement safety sensors or circuit board
- Only buy after you confirm failure.
- Work gloves and safety glasses
- Protect hands and eyes when working around springs and metal parts.
Buying generic parts without confirming the blink code can cost time and money. Use diagnostics to order the right part.
Troubleshooting tips based on personal experience
I once fixed a persistent two-blink code by pushing the sensor mounts slightly inward. The homeowner had a loose gutter that reflected sunlight and tripped the beam intermittently. Small moves can fix big headaches.
Common mistakes I’ve seen:
- Replacing the logic board before checking sensors or wiring.
- Ignoring intermittent power dips from a switched outlet or GFCI.
- Over-tightening limit screws and causing the door to jam.
Take small steps. Test often. That approach saved me time and money on many calls.

When the blinking light indicates a serious problem
Some blink patterns suggest a deeper electrical or mechanical failure. Call a pro if you see these signs:
- Burnt smell or visible scorch marks on the board.
- Repeated three-blink memory faults after reset.
- Door will not move manually or is heavy and off-balance.
- Broken springs or snapped cables.
- Motor hums but door does not move.
A trained technician can safely handle spring replacement, board diagnostics, and motor swaps. Tell them the exact blink pattern; it speeds diagnosis.
Two to three PAA-style questions
Why is my Chamberlain opener blinking but still working?
A flashing LED can be a warning that a sensor or limit needs attention while the opener still functions. Fix the underlying issue early to prevent failure.
How do I reset the Chamberlain opener after a blink code?
Unplug the opener for 60 seconds, plug it back in, and observe the LED. If the blink code returns, follow the specific reset steps in your manual.
Can weather cause the blinking light?
Yes. Moisture, extreme cold, and dirt can affect sensors and circuits and lead to blinking diagnostic codes.

Frequently Asked Questions of Chamberlain Garage Door Opener Troubleshooting Blinking Light
What does one blink on a Chamberlain opener mean?
One blink often points to a simple power or wiring disruption. Check the outlet and power cord first.
Why does my opener blink two times and refuse to close?
Two blinks usually show a safety sensor problem. Clean and realign the sensors and remove obstructions.
Will a weak battery cause the opener LED to blink?
Weak remote batteries rarely affect the opener LED, but low wall control batteries or unstable power sources can trigger codes.
How long should I wait after unplugging to reset the opener?
Wait at least 60 seconds before plugging in again to clear temporary faults.
Can I replace a logic board myself when I see three blinks?
You can replace it if you have wiring experience, but consider a pro for accurate diagnostics and safe installation.
Is it safe to operate the door with a blinking light?
It depends on the reason. If the blink signals sensor misalignment, intermittent operation could be unsafe. Diagnose before regular use.
Conclusion
A blinking LED on your opener is a helpful message. Use the blink pattern to find the cause, follow the step-by-step checks, and fix simple issues like sensors, power, or limits yourself. For scorched boards, broken springs, or persistent errors, get a pro. Start with safety, test often, and document the blink code—this will save time.
Take action today: run the quick checks, note the blink pattern, and try the simple fixes here. If you’re stuck, leave a comment with your model and blink pattern or contact a technician for a fast, safe repair.

