
Most Fluidmaster fill valve issues fix with a simple adjustment or a quick replacement.

Today's Exclusive Deals
Limited-time Exclusive Deals. Check current discount on Amazon.
Check Price on Amazon As an Amazon Associate I earn from qualifying purchases.I’ve spent years repairing toilets and training homeowners on Fluidmaster Fill Valve Troubleshooting. This guide gives clear steps, causes, and fixes so you can stop leaks, reduce waste, and feel confident working on your toilet. Read on for practical troubleshooting, hands-on tips, and real-world lessons that make Fluidmaster Fill Valve Troubleshooting easy and fast.
Common Problems with Fluidmaster Fill Valve Troubleshooting
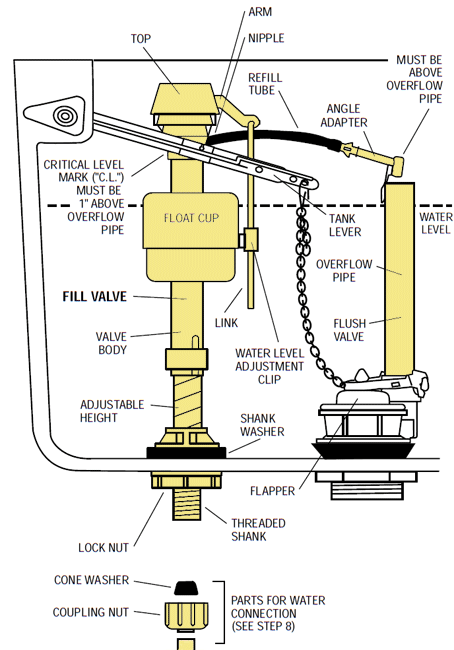
Most problems with a Fluidmaster fill valve show as a running toilet, slow fill, noisy fill, or water on the floor. These signs point to common causes like a misadjusted float, mineral buildup, a worn seal, or a kinked refill tube. Knowing the symptoms helps you pick the right fix without guessing.
Today's Exclusive Deals
Limited-time Exclusive Deals. Check current discount on Amazon.
Check Price on Amazon As an Amazon Associate I earn from qualifying purchases.What you’ll often find during Fluidmaster Fill Valve Troubleshooting:
- A continuous trickle from the tank to the bowl caused by a high water level.
- A valve that never shuts off because the float is stuck.
- Weak or slow filling from clogged or restricted parts.
- Water leaking at the base because the valve or tank fittings are loose or cracked.
:max_bytes(150000):strip_icc()/fluidmaster-fill-valve-repair-2719029-hero-513e35ed3fe248ccbf91b126e5a4910e.jpg)
Tools and Parts Needed for Fluidmaster Fill Valve Troubleshooting
You don’t need fancy tools for Fluidmaster Fill Valve Troubleshooting. Gather a small set of items and a replacement valve if needed. Working prepared saves time and prevents extra trips to the store.
Today's Exclusive Deals
Limited-time Exclusive Deals. Check current discount on Amazon.
Check Price on Amazon As an Amazon Associate I earn from qualifying purchases.Essential tools and parts:
- Adjustable wrench to loosen nuts and fittings.
- Bucket and towel to catch water.
- Screwdriver for refill tube clips or trim.
- Replacement Fluidmaster fill valve kit if the valve is beyond repair.
- Replacement washers, seals, or refill tube as common spares.

Step-by-Step Fluidmaster Fill Valve Troubleshooting
Start with safety. Turn off the water supply, flush to empty the tank, and remove excess water. Follow these steps in order to diagnose and often fix the problem quickly.
-
Inspect the tank and components.
- Check the refill tube, float, and valve for obvious damage or misalignment.
- Confirm the float moves freely and is not rubbing against the tank wall.
- Look for mineral deposits around the valve that could block flow.
-
Adjust the water level.
- Lower or raise the float to set the tank water level to about 1 inch below the overflow tube top.
- For Fluidmaster models, turn the adjustment screw or slide the float cup to change the height.
- After adjustment, flush and watch the valve shut off. Repeat if needed.
-
Test for leaks and seal issues.
- Put a few drops of food coloring in the tank and wait 10–15 minutes to see if color appears in the bowl.
- If colored water shows in the bowl, inspect the flapper and flush valve seat for wear.
- Replace the flapper or seat if they don’t seal well.
-
Clean or replace clogged components.
- Mineral build-up often reduces flow. Remove the valve cap and rinse parts with clean water.
- Replace the valve if cleaning does not restore proper operation.
- Reassemble carefully and retest.
-
Verify water supply and fill rate.
- Turn the supply back on slowly and watch fill behavior.
- If fill is very slow, check the shutoff valve and supply line for restrictions.
- Replace the fill valve if pressure is adequate but flow remains poor.
:max_bytes(150000):strip_icc()/fluidmaster-fill-valve-repair-2719029-hero-513e35ed3fe248ccbf91b126e5a4910e.jpg)
Advanced Fluidmaster Fill Valve Troubleshooting
When basic fixes fail, look deeper. Advanced troubleshooting helps with intermittent problems or unusual noise. These steps require more attention but still fall within reasonable DIY skill.
Advanced checks to perform:
- Inspect the tank bolts and gasket for small leaks that mimic fill valve issues.
- Check the fill valve for hairline cracks or warped plastic from age.
- Test whether water pressure fluctuations in the home affect valve performance.
- Replace the entire valve assembly if multiple components wear at once.
If recurring issues persist after replacement, consider professional plumbing diagnosis. Complex problems can stem from hidden supply line issues or unusual water chemistry that accelerates wear.

Replace or Repair: Making the Right Choice in Fluidmaster Fill Valve Troubleshooting
Deciding whether to repair or replace comes down to age, cost, and performance. A repair makes sense for minor issues. Replace the valve when repairs are short-lived or parts are brittle.
Guidelines to choose:
- Repair when the issue is an adjustable float, loose refill tube, or small clog.
- Replace when the valve is older than five to eight years, cracked, or the plastic is brittle.
- Replace the valve if multiple problems appear at once, like leaks and slow fill.
Most modern Fluidmaster fill valves are inexpensive and simple to install. Replacing the valve usually saves time and prevents repeat calls.
:max_bytes(150000):strip_icc()/fluidmaster-fill-valve-repair-2719029-08-94ee9e78140244eca6d82acbfb383b5b.jpg)
Maintenance Tips to Prevent Future Fluidmaster Fill Valve Troubleshooting
Routine care keeps a Fluidmaster fill valve working for years. Small habits stop many common problems before they start. Scheduled checks are cheap and quick.
Simple maintenance steps:
- Inspect the valve annually for mineral buildup or wear.
- Clean the valve cap and seat during a yearly flush.
- Replace the flapper and refill tube every few years or when signs of wear appear.
- Keep the tank water level set correctly to minimize stress on the valve.
Good water quality also matters. If your water is hard, consider a water-softening solution to slow mineral deposits and extend valve life.

Personal Experience and Pro Tips for Fluidmaster Fill Valve Troubleshooting
I once replaced a valve at a rental after tenants complained about a constant running toilet. The task took 20 minutes. The fix saved the owner a lot on a high water bill. Small steps make a big impact.
Lessons learned from hands-on work:
- Always carry a basic spare valve kit. It turns a long job into a 30-minute fix.
- Label the shutoff valve in older homes. I found many shutoffs stuck from neglect.
- If you’re unsure, take a photo of the original setup before disassembly. Reassembly is much easier with a reference.
Practical tip: keep a small towel and bucket under the tank while working. It catches spills and keeps the floor dry, which avoids panic and extra cleanup.
:max_bytes(150000):strip_icc()/fluidmaster-fill-valve-repair-2719029-04-602070af05c2478190047ed64639f489.jpg)
People Also Ask — Quick Answers
How do I stop a Fluidmaster fill valve from constantly running?
First, check and adjust the float so the water stops about 1 inch below the overflow tube. If the valve still runs, inspect the flapper and seal and replace the valve if needed.
Can I rebuild a Fluidmaster fill valve instead of replacing it?
Some Fluidmaster models allow cleaning and minor part swaps, but many modern units are designed to be replaced for reliability. Replace if the plastic is brittle or multiple parts fail.
How long does a Fluidmaster fill valve last?
Under normal conditions, a Fluidmaster fill valve lasts around five to eight years. Hard water and high use can shorten its life.

Frequently Asked Questions of Fluidmaster Fill Valve Troubleshooting
What is the first thing to check in Fluidmaster Fill Valve Troubleshooting?
Turn off the water, flush the tank, and inspect the float and refill tube for obvious problems. These simple checks often reveal the cause quickly.
Why does my Fluidmaster fill valve make noise?
Noise usually comes from trapped air, high pressure, or mineral buildup. Cleaning the valve and adjusting pressure often quiets it.
How do I adjust the water level on a Fluidmaster fill valve?
Slide the float cup or turn the adjustment screw to move the float. Aim for the water level to be about 1 inch below the overflow tube.
Will a faulty fill valve increase my water bill?
Yes. A leaking or running fill valve can waste a large amount of water over time and raise your bill. Fixing it promptly saves money.
Is it safe to replace a Fluidmaster fill valve myself?
Yes, replacement is commonly a DIY task and involves basic tools and simple steps. Turn off the water and work carefully to avoid overtightening fittings.
How do I know if the refill tube is installed correctly?
The refill tube should clip above the overflow tube without being pushed below it. If it’s too low, the bowl can siphon, causing an overflow or improper fill.
Conclusion
You can solve most Fluidmaster Fill Valve Troubleshooting tasks with a few basic tools, clear steps, and a little patience. Start by observing symptoms, adjust the float, clean parts, and replace the valve if needed. Take action early to avoid wasted water and higher bills, and keep simple maintenance habits to prevent repeat issues. Try these steps on your next plumbing task, subscribe for more home-repair guides, or leave a comment with your own troubleshooting story.


