
LiftMaster troubleshooting codes quickly identify opener faults so you can fix them fast.
I have worked with LiftMaster garage door openers for years. I know the common codes. This guide explains LiftMaster Troubleshooting Codes clearly. You will learn what each code means, how to test parts, and safe fixes you can try. I share real tips from hands-on experience and clear steps to help you solve issues without stress. Read on to get practical, reliable help for your opener.
How LiftMaster Troubleshooting Codes Work
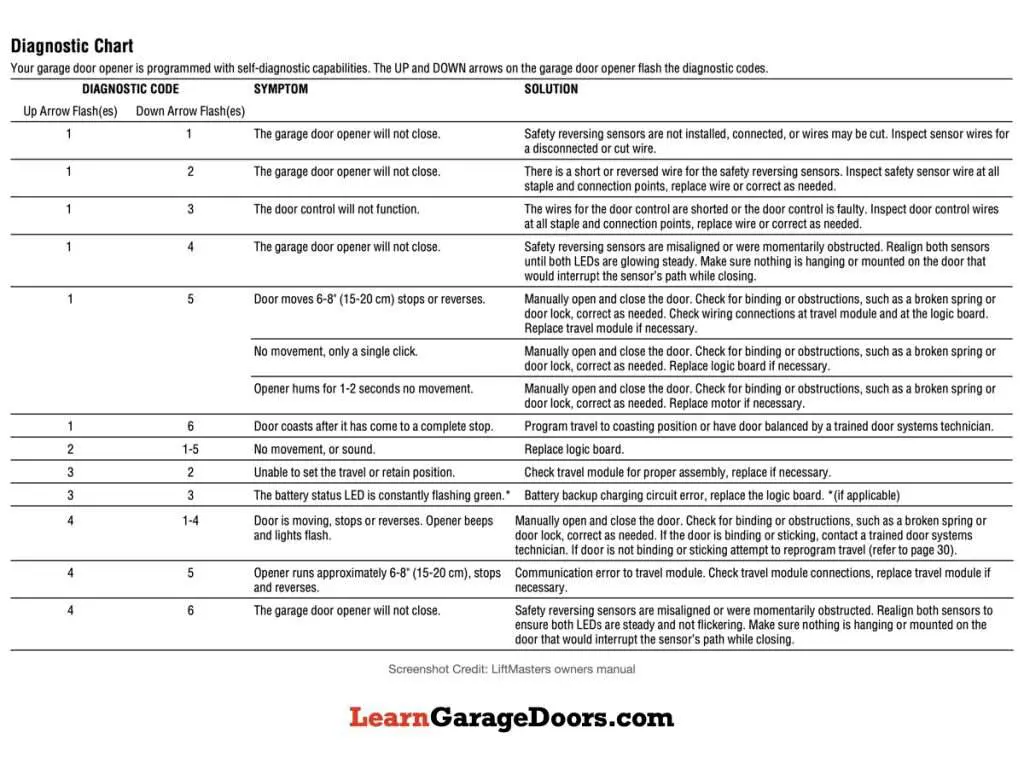
LiftMaster troubleshooting codes show problems via LED flashes or keypad displays. The opener uses a small language of flashes and blink counts to point to parts like sensors, motors, or logic boards.
Codes come from sensors, travel and force settings, safety devices, and the motor or circuit board. Each model may use slightly different flash patterns. Still, many patterns follow the same logic: one or two flashes for sensor issues, three for motor, and so on.
I learned to read these codes by watching patterns and testing parts in sequence. That method cuts guesswork. Always follow safety steps before you test or touch the opener.
Common LiftMaster Troubleshooting Codes and What They Mean
Below are common LiftMaster troubleshooting codes you will see and what they usually mean.
- 1 flash or blink
- Indicates a short on the sensor or a safety sensor alignment problem.
- 2 flashes
- Often a memory error or a problem with the control board.
- 3 flashes
- Motor overload or an obstruction in the door path.
- 4 flashes
- Radio or remote control issue with frequency or coding.
- 5 flashes
- Travel or limit switch error; opener thinks the door can’t find the end-of-travel.
- Rapid blinking
- Programming mode active, or the logic board is resetting.
These meanings can vary by model such as wall-mounted jackshaft openers versus overhead chain or belt drives. Always check your model’s LED code page in the manual for exact definitions. I keep a small cheat sheet near my toolbox. It saves time when troubleshooting at night.

Step-by-Step Fixes for Top Codes
Here are practical steps to fix common LiftMaster troubleshooting codes. Use simple tools and take precautions.
-
Sensor alignment and wiring (1 flash)
- Step 1: Cut power to the opener.
- Step 2: Inspect sensor lenses for dirt or spider webs.
- Step 3: Realign sensors until the LED on each sensor is steady.
- Step 4: Check wiring for frays and test continuity if needed.
- Tip: A steady green or red LED usually means alignment is good.
-
Motor overload or obstruction (3 flashes)
- Step 1: Clear any debris near tracks and rollers.
- Step 2: Manually open the door to check for binding.
- Step 3: Adjust force settings in small increments per the manual.
- Step 4: If the motor remains hot or stalls, stop and call a pro.
-
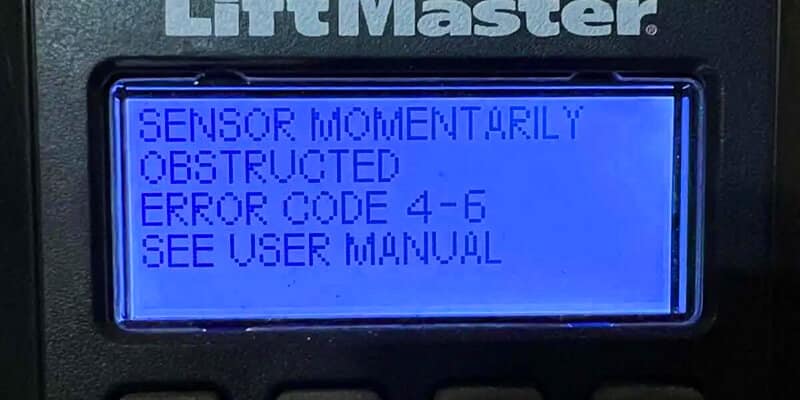
Travel and limit errors (5 flashes)
- Step 1: Reprogram travel limits per your model’s guide.
- Step 2: Tighten or adjust trolley and limit screws slowly.
- Step 3: Test a few cycles to confirm the door stops correctly.
-
Remote and radio problems (4 flashes)
- Step 1: Reprogram remotes using the learn button.
- Step 2: Replace remote batteries and test range.
- Step 3: Look for interference from other wireless devices nearby.
-
Control board or memory issues (2 flashes)
- Step 1: Power cycle the opener by unplugging for 30 seconds.
- Step 2: If the error returns, inspect the circuit board for burn marks.
- Step 3: Replace the board only if you are confident with wiring; otherwise call service.
When I fixed a 3-flash stall, cleaning the rollers and easing a bent track solved it. Small checks often stop the need for a major repair.
Diagnostic Tools and Safety Steps
Good tools make troubleshooting simple. Keep these items ready.
-
Basic tools and equipment
- Multimeter to test voltage and continuity.
- Ladder and headlamp for safe access.
- Screwdrivers and pliers for adjustments.
- Replacement batteries and fuses for quick swaps.
-
Safety checklist
- Always cut power before working on wiring.
- Release the trolley with the emergency cord before manual tests.
- Wear eye protection and gloves when handling springs.
- Avoid touching torsion springs or cables; they are dangerous.
I once tried to adjust a spring without the right tools. It cost me a service call. Don’t rush spring work. Call a technician if you are unsure.

Preventive Maintenance to Reduce Codes
Regular care limits the number of LiftMaster troubleshooting codes you will see. Do this routine at least twice a year.
- Visual check
- Inspect sensors, tracks, rollers, and cables.
- Clean and lubricate
- Clean sensor lenses and lubricate rollers and hinges with recommended lubricant.
- Test safety features
- Press the door opener’s test button and confirm auto-reverse works.
- Replace worn parts early
- Swap broken rollers, frayed cables, or weak remotes quickly.
Small tasks stop bigger problems. I schedule maintenance reminders on my phone for every six months. It keeps doors quiet and trouble free.

When to Call a Professional
Some LiftMaster troubleshooting codes need a pro. Call a certified technician if any of these apply.
- You see burned or melted components on the control board.
- The torsion spring or cable is damaged.
- Motor runs but the door doesn’t move.
- You tried safe fixes and the code returns.
- The opener is under warranty and needs part replacement.
A trained technician has the right tools and parts. They can also program and test complex issues safely. If you are unsure at any point, calling a pro saves risk and time.

Frequently Asked Questions of Liftmaster Troubleshooting Codes
What does a flashing light on my LiftMaster mean?
A flashing light shows the opener’s diagnostic code. Count the flashes and compare them to your model’s code chart to learn the specific issue.
How do I reset LiftMaster troubleshooting codes?
To reset codes, unplug the opener for 30 seconds and plug it back in. For some codes you may also need to reprogram limits or the remote.
Can I fix sensor alignment issues myself?
Yes. Turn off power, clean sensors, and gently realign them until the LED is steady. If wiring is damaged, consider a technician.
Why does my LiftMaster show a motor overload code?
Motor overload typically means the opener is straining. Check for obstructions, misaligned tracks, or worn rollers and adjust force settings.
How often should I perform maintenance to avoid codes?
Perform basic maintenance every six months. Monthly visual checks help too. Regular care reduces error codes and extends opener life.
Is it safe to replace the logic board myself?
Replacing a logic board requires electrical skills and correct wiring. If you are not experienced, hire a technician to avoid damage or safety risk.
Conclusion
LiftMaster troubleshooting codes are a clear way to find and fix opener problems. Read the code, follow safe steps, and test parts in order. Small checks like sensor alignment, track cleaning, and routine maintenance stop most issues. If a problem looks risky or the same code returns, call a pro for a fast, safe repair. Try the steps here, keep a simple maintenance schedule, and leave a comment or subscribe for more practical garage door tips.

