
Most run chicken door issues stem from power, sensors, or track alignment—check these first.
I’ve worked on many automatic coop doors and written guides for backyard poultry keepers. This article dives deep into Run Chicken Door Troubleshooting with clear steps, simple fixes, and real-world tips. You will learn how to diagnose power faults, sensor errors, mechanical jams, and app or timer problems. Read on to get reliable, practical help that saves time and keeps hens safe.
What is Run Chicken Door Troubleshooting and why it matters
Run Chicken Door Troubleshooting means finding and fixing failures in an automatic chicken coop door system. Problems can leave chickens unsafe at night or locked out at dawn. Knowing quick checks and fixes helps you avoid stress and loss.
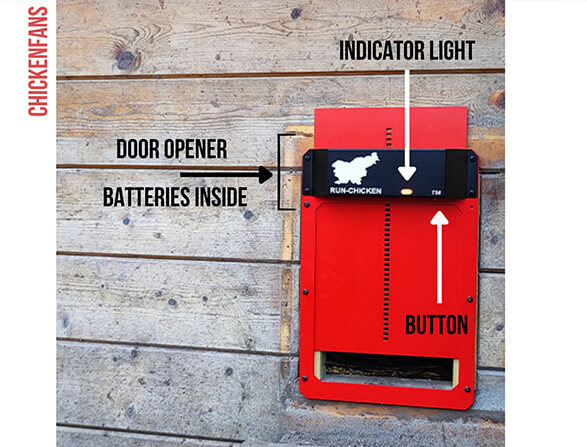
Common systems include battery, solar, wired power, limit switches, photo sensors, and motor drives. A clear troubleshooting process speeds repair and prevents repeat issues. My hands-on work with different coop doors shows that most faults are simple to fix when you follow a method.

Common problems and their likely causes
Most users see similar faults. Identifying the cause narrows your next steps.
• Door does not open or close at all. Likely causes: dead battery, broken motor, disconnected wires, or bad timer.
• Door opens but stops mid-run. Likely causes: obstruction in track, weak motor, or misaligned sensor.
• Door reverses or behaves erratically. Likely causes: wrong limit switch settings, stuck sensors, or damaged gears.
• Door opens at wrong time. Likely causes: mis-set timer, bad light sensor, or app sync error.
• Door makes grinding noise. Likely causes: stripped gears, debris in track, or worn motor bearings.
Each of these common issues will be addressed step by step below so you can complete Run Chicken Door Troubleshooting fast.

Step-by-step Run Chicken Door Troubleshooting checklist
Follow this checklist in order. Keep safety in mind: unplug power or remove batteries before touching wiring.
- Visual check first. Look for debris in the track, chewed wires, loose brackets, or visible damage.
- Power check. Test batteries with a simple meter or swap in a known-good battery. Check solar panels and charge controllers if used.
- Motor test. Listen for motor hum when the door is commanded. No sound usually means power or motor failure.
- Sensor check. Clean photo eyes and motion or magnetic sensors. Dirty sensors often block signals.
- Track and rollers. Ensure tracks are straight and rollers move freely. Remove dirt and reposition misaligned pieces.
- Limit switch and travel settings. Inspect and reset limit switches or programming for travel end stops.
- Control board and wiring. Inspect connectors and solder joints. Wiggle wires while commanding the door to find intermittent faults.
- App and timer verification. Check clock sync and firmware. Reboot the controller if possible.
Run Chicken Door Troubleshooting works best when you test one thing at a time. Replace a part only after isolating the fault.

Quick diagnostic tips
• Swap a fresh battery to rule out power faults.
• Manually move the door to feel for binding or resistance.
• Use a flashlight to inspect limit switches while running the door.
• Record audio or video to capture intermittent faults for later review.

Repairs and fixes for common faults
This section lists practical fixes that I’ve used on real coops.
Mechanical fixes
• Clean and lubricate the track with light silicone spray. Avoid heavy oils that attract dirt.
• Realign the door and bracket to remove binding. Tighten loose fasteners.
• Replace worn rollers or guides. These wear over time and cause uneven motion.
Electrical fixes
• Replace old batteries and test charging systems. Keep spare batteries on hand.
• Repair or replace damaged wiring. Use heat-shrink and proper connectors.
• Swap the motor if it shows no load response. Motors can die after heavy use or moisture exposure.
Sensor and control fixes
• Clean photo sensors and adjust sensitivity. Reposition sensors to avoid false triggers from sunrise glare.
• Reset limit switches and re-program travel distances after mechanical fixes.
• Update controller firmware and re-pair apps. A reboot often clears erratic behavior.
Parts and when to replace
• Batteries: replace every 1–3 years depending on type and usage.
• Motors: consider replacement after visible wear or burning smell.
• Gears and rollers: replace when teeth are worn or rollers wobble.
• Controllers: replace when multiple electrical faults persist after wiring checks.
Preventive maintenance to avoid repeat troubleshooting
A little care prevents many failures. Make these checks monthly or seasonally.
• Clean tracks and sensors every month.
• Test battery voltage and solar output monthly.
• Inspect wiring for wear, chewing, or corrosion quarterly.
• Run the door manually every few days to keep mechanisms moving.
• Keep a small repair kit with spare batteries, fuses, and screws.
From my experience, scheduled checks cut emergency fixes by more than half. A clean sensor or fresh battery often prevents night-time lockouts.

Tools, parts, and cost expectations
Having the right tools saves time and money during Run Chicken Door Troubleshooting.
Essential tools
• Multimeter for voltage and continuity tests.
• Basic socket and screwdriver set.
• Flashlight and mirror for tight spots.
• Needle-nose pliers and wire strippers.
• Silicone spray for light lubrication.
Common parts to keep
• Replacement batteries (compatible type).
• Spare motor or motor gear kit.
• Limit switches and photo sensors.
• Assorted screws, zip ties, and weatherproof connectors.
Cost expectations
• Batteries: low to moderate cost.
• Sensors and switches: moderate cost.
• Motors and controllers: higher cost and may need professional help.
Budgeting for these parts helps you fix problems quickly when they appear.

Real-life examples and lessons learned
I once fixed a door that refused to close. The motor sounded fine, but the door stalled. I found a cluster of wet straw in the lower track. After cleaning and replacing a worn roller, the door ran smoothly. Lesson: always inspect the track first.
Another case was a door that opened at noon then closed at dusk randomly. The problem was a light sensor mounted where direct sun hit at midday. Repositioning the sensor fixed timing issues. Lesson: sensor placement matters as much as hardware.
Avoid these mistakes
• Replacing major parts before ruling out simple causes.
• Using oil that gums the track. Use silicone instead.
• Leaving chewed wires unrepaired; rodents repeat damage.
These tips come from hands-on repairs and from helping other keepers troubleshoot remote systems. The best fixes are often low-cost and easy.

People also ask — quick PAA-style answers
How do I reset my automatic chicken door?
Turn off power or remove batteries, wait 30 seconds, then restore power. Re-run the setup or travel calibration on the controller.
Why does my chicken door close too early?
Check the light sensor position and timer settings. Dirty photo sensors or wrong timezone/timer settings can trigger early close.
Can I fix the motor myself?
Yes, if you have basic tools. Test power first. Replace the motor only after confirming the controller and wiring are good.
Frequently Asked Questions of Run Chicken Door Troubleshooting
What should I check first when the door won’t move?
Check power first by testing or swapping batteries and verifying solar output. Then inspect the track for obstructions.
Why does the door stop mid-cycle?
Mid-cycle stops usually mean a physical blockage, a weak motor, or a limit switch triggering early. Clean the track and test motor load.
How do I know if the control board is bad?
If wiring, motor, and sensors test fine yet the door still misbehaves, the control board may be faulty. Look for burned components or erratic outputs.
Can weather cause Run Chicken Door Troubleshooting problems?
Yes. Cold can thicken lubricants and slow motors, while moisture can corrode electronics. Weatherproof components and shelter the controller.
How often should I replace batteries?
Replace rechargeable batteries every 1–3 years depending on use and charge cycles. Keep spares and test voltage regularly.
Is professional repair worth it?
If the controller or motor is beyond simple swaps, a pro can diagnose complex electrical faults safely. For basic fixes you can save money by doing it yourself.
Conclusion
Run Chicken Door Troubleshooting becomes simple with a clear process: check power, inspect tracks, clean sensors, test motors, and verify controllers. Regular maintenance and a small tool kit prevent most issues. Start with the easy checks I outlined and move step by step. Try the tips above, note what you fixed, and keep spare parts handy to save time later. If this guide helped, leave a comment with your problem or subscribe for more coop care tips.

